OIT Web Hosting
OIT Web HostingThe Office of Information Technology (OIT) provides an on-campus web hosting service for official Georgia Tech units and projects. This service can host many popular PHP based content management systems, including Drupal and WordPress.
For those looking to quickly setup a unit-level website, OIT Web Hosting supports Drupal Express, a central campus web application that will give you a jump start on building a Drupal based website by installing Drupal plus a number of standard add-on components, such as the official Georgia Tech website theme. You can request a Drupal Express site when you request your OIT Web Hosting account.
OIT has provided documentation on web hosting via the OIT Service Now FAQ and an administrator's guide for the hosting control panel system (Plesk).
OIT Web Hosting Sub-Topics
How to Request a Web Hosting Space from OIT
How to Request a Web Hosting Space from OITOverview of the Process
- In a web browser, go to the OIT Web Hosting site (https://hosting.gatech.edu/ - available on-campus or via the VPN only!)
- Log in, using your GT Account username and password (e.g. "gburdell1").
- Follow the link on the right-hand side of the main menu for My Plesk Hosting.
- In the grey horizontal section, select the Request a site on Plesk link, which will take you to a request form.
- Follow the link in the left-hand sidebar for Request, and then select the Request button under New Site
- Fill out the form and select the Request New Site button at the bottom of the page.
- These requests will take up to 72 hours to complete. You will receive an email once the site has been set up.
If you have any questions about any part of the form, you can hover over or tab to any of the question mark icons to get detailed instructions.
Add an Administrator to Your Web Hosting Control Panel
Add an Administrator to Your Web Hosting Control PanelThere are two user roles for OIT Web Hosting accounts: "owner" and "authorized user".
-
Owners are the people responsible for the website who make the key decisions about the site. An owner is oftentimes not the technical manager of the site, but must be a full-time employee of Georgia Tech.
- Authorized Users have most of the same privileges as owners, and can be anyone with a valid GT Account Username (including guest user accounts).
Keep in mind that OIT will reach out to the owner(s) first when there are issues with the website that need to be addressed, so make sure at least one of the owners is someone who can answer those questions and handle those requests.
Process
To grant or revoke access for another person to access your OIT Web Hosting site's Plesk control panel, an owner of the site should do the following:
-
Go to the OIT Web Hosting site (https://hosting.gatech.edu/) in your web browser (available on-campus or via the VPN only!)
-
Select the My Plesk Hosting button on the right-hand side of the main menu bar.
-
After logging in, you should see your list of web hosting sites. Locate the entry for the site in question and select the Manage button with the cogwheel icon next to it.
-
On the next page, select the Edit tab to modify the web hosting site's configuration.
-
Update the entries under the Manage Site Owners section and/or Manage Authorized Users section as needed, noting the following:
-
To add someone to a Web Hosting Account, that person must have logged into the OIT Web Hosting site at least once before you can add them to an account.
-
You must enter each person's GT Account Username (no other identifier will work).
-
Use the Add another item button to add extra blank spaces if needed.
-
To remove an existing administrator, just delete the person's GT Account from the given blank (you can re-use the blank for a different person if you wish.
-
On the Owners section:
-
The first field cannot be left blank. If you need to remove that person, you'll need to move one of the other owners up so that there is a valid GT Account username in the first field.
-
If you have trouble adding someone as an owner, ask them log into the OIT Web Hosting site, which will refresh their account information on the site. If you still have trouble adding that person as an owner, check their status in IAT or Mage to see if they are possibly missing the "full-time-employee" role.
-
-
-
Don't forget to select the Save button at the bottom of the page.
Accessing your Web Hosting Site via SSH (Command Line)
Accessing your Web Hosting Site via SSH (Command Line)Below are some helpful tips on how to use the SSH to get command line access your web hosting site via a Windows or Mac computer.
- Are you off-campus? You must use VPN from off-campus in order to access your site via SSH.
- FAQ: finding your login information for ssh
- Guide: Using ssh on Windows with cygwin (generic).
A sample command you might run to access your site is:
$ ssh my-ftp-username@my-internal-domain-name
Configure Automatic Backups on OIT's Web Hosting
Configure Automatic Backups on OIT's Web HostingWeekly backups of all OIT Web Hosting accounts now happens automatically. However, if you wish to to more frequent backups for an important site that changes regularly, the following instructions below explain how to configure the Plesk control panel on OIT's web hosting to keep automatic backups of your entire site.
Overview
First, read this general FAQ on how to create scheduled backups.
Setting Recommendations
For a Georgia Tech Drupal site, good default settings are:
-
Backup period: Daily
-
Maximum number of backups in repository: 14
-
Backup content: All configuration and content except mail
-
Suspend domain until backup task is completed: Depends on whether you want your site to be unavailable while this backup is happening.
Who Owns an OIT Hosted Website?
Who Owns an OIT Hosted Website?If you have administrative access to at least one OIT Web Hosting account, you can look up the owners and administrators of any other account. Simply navigate to your My Plesk Hosting page (available on-campus or via the VPN only) and follow the link in the left-hand sidebar for Site Lookup.
Unfortunately, there is no longer a means for looking up an account owner / administrator if you do not have access to at least one hosting account. In this case, you will need to either contact OIT for assistance, or find someone who does own an account to perform the look-up for you.
Enabling and Using SSL on OIT Web Hosting
Enabling and Using SSL on OIT Web HostingSSL encryption is highly recommended for websites these days, not just because it makes user interactions with your site more secure, but also because the major browser manufacturers are starting to mark all non-SSL encrypted sites with some kind of red symbol (red padlock, red 'X' through a padlock, etc.) to better warn users not to enter sensitive information into these sites. So, from a marketing standpoint, it's going to make your site look more professional if you turn on SSL encryption, which will keep those red warning symbols from showing.
OIT provides an article on How to Force Your Site's HTTP Traffic to HTTPS that covesr much of what you need to know to get started your site set up with SSL encryption.
Setting Up SSL on OIT Web Hosting with an External Domain Name
Setting Up SSL on OIT Web Hosting with an External Domain NameTo set up an external domain name with SSL encryption on an OIT Web Hosting account:
Generate a Certificate Signing Request (CSR) File
You can generate a CSR for an OIT Web Hosting site from the site's Plesk Control Panel:
- Log into the Web Hosting Control Panel System and navigate to your site's control panel
- On the control panel page, select SSL Certificates
- On the SSL Certificates page, select Add SSL Certificate.
- On the Add SSL Certificate page, fill in the requested information and then select the Request button (do not use the Self-Signed button!)
- That will generate a CSR that you can then upload to a third party certificate provider, and your Private key is auto-generated and stored in your Plesk Control Panel.
Uploading and Enabling the Certificate
Once you have received your certificate from your provider:
- Log into the Web Hosting Control Panel System and navigate to your site's control panel
- On the control panel page, select SSL Certificates
- Choose or Browse to the fileon your local computer, then select the Upload Certificate button.
- After the certificate has been uploaded, select Websites & Domains in the left-hand menu bar, then select Hosting Settings in the main control panel
- Look in the middle of the page for the Security section. Select your certificate via the provided drop-down selector
- Select the OK button to save your changes.
OIT Hosting and Hosting Site Mailing Lists
OIT Hosting and Hosting Site Mailing ListsOIT is phasing out the Sympa mailing list system and is no longer using it in conjunction with OIT Web Hosting. There are other solutions for having multiple people get notifications relating to an OIT Web Hosting account, and it may be best to discuss these with your local IT support, who should understand the ins and outs of campus email.
One important thing to note is that the Plesk hosting system will only support a single email address, and cannot handle a comma separated list of multiple addresses. So, in the hosting management system (found at https://hosting.gatech.edu/), you can only put a single email address in the Notification Email Address for Website field. If you are the sole site administrator, then just put your email address in this field and you will receive all site notification emails.
The simplest solution for sending notifications to multiple people, although it will typically require the help of your local IT support, is to create an email alias for your site that forwards to all of the site admins, and then enter that alias under Notification Email Address for Website.
Previous content about Sympa mailing lists is left below for reference until Sympa is completely phased out (date TBD.)
Prior to late 2016, OIT always set up a Sympa mailing list whenever it set up a web hosting account, and the 'hosting.gatech.edu' site automatically managed the membership of that mailing list, syncing the hosting account's administrators and owners to the mailing list.
This process changed with the late 2016 upgrade of 'hosting.gatech.edu'. Previously existing mailing lists remain in place, but new hosting accounts do not get mailing lists created for them, and owners and administrators are no longer synced to the existing mailing lists for existing hosting accounts. Instead, there is now a Notification Email Address for Website field on the hosting record where the site owner or administrator can specify an email address where Plesk server notifications (e.g. your hosting account SSH password is about to expire) can be sent. The hosting record is viewed and edited by selecting the cogwheel symbol next to the hosting account name on your Plesk Web Admin Tools page.
Here's what you need to know about this new system:
-
If you have a previously existing hosting account and want to keep using the previously existing notifications mailing list, you should open a ticket with OIT and ask them to make you the owner of that Sympa mailing list. Then, you can manually update the mailing list as needed.
-
If you have a new hosting account, you can manually request a Sympa mailing list for the people who will own and administer that account. Once the list has been approved, enter the list's delivery email address into the 'Notification Email Address for Website' field for the associated hosting account.
- If you don't want to use a Sympa mailing list, you can enter any address into the 'Notification Email Address for Website' field, but it will only accept a single address. If you want to have it send to more than one person without using a Sympa mailing list, ask your IT support to set up an email alias that points to all of the admins, then enter that alias into the 'Notification Email Address for Website' field.
How to Add a GitHub Repository in Plesk
How to Add a GitHub Repository in Plesk- In your repository on github.gatech.edu, click the Clone or download button.
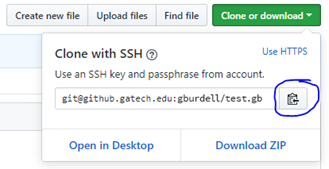
- Click the Use SSH link in the upper-right corner of the dialog.
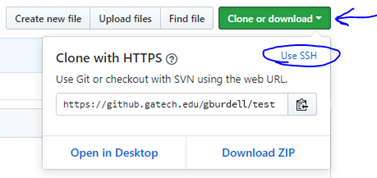
- Click the copy to clipboard icon.
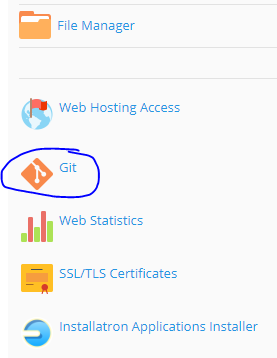
- Go to your domain under hosting.gatech.edu.
- In the Websites & Domains panel, click the Git link.
- In the Add Git Repository panel, make sure the Remote Git hosting option is selected.
- Paste the link you copied from your Github repository into the Remote Git repository box.
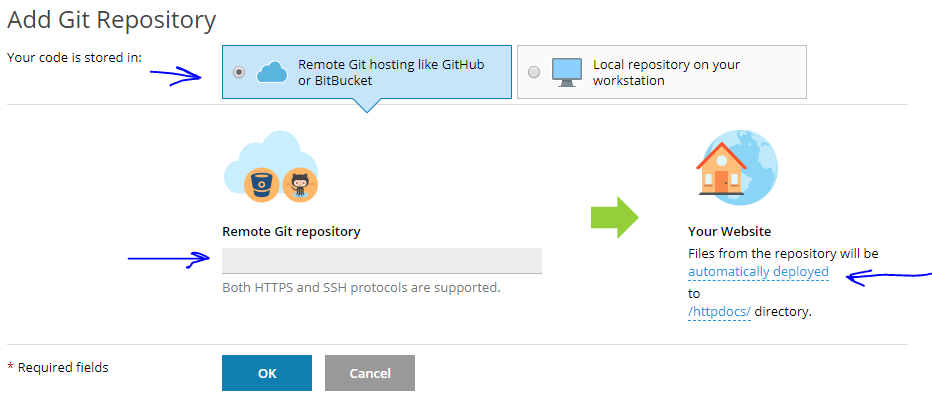
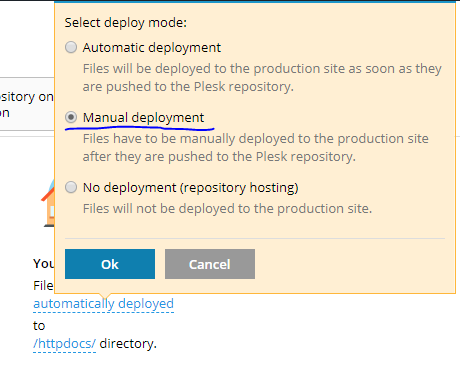
- To the right of the green arrow, you can accept the default or click the automatically deployed link and change it to manual deployment.
- Plesk will automatically generate an SSH public key. Copy the hash in the textbox.
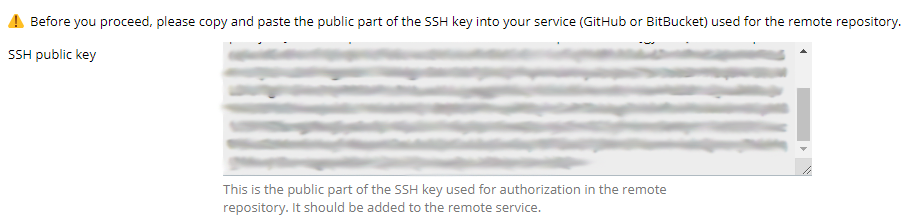
The SSH public key can be added to an individual user account or to the repository as a deploy key.
Adding SSH Public Key to an Individual User Account
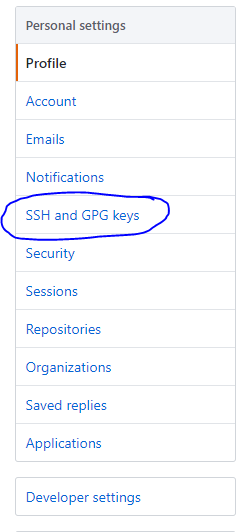
- Go to your repository on github.gatech.edu > Settings > SSH and GPG keys.
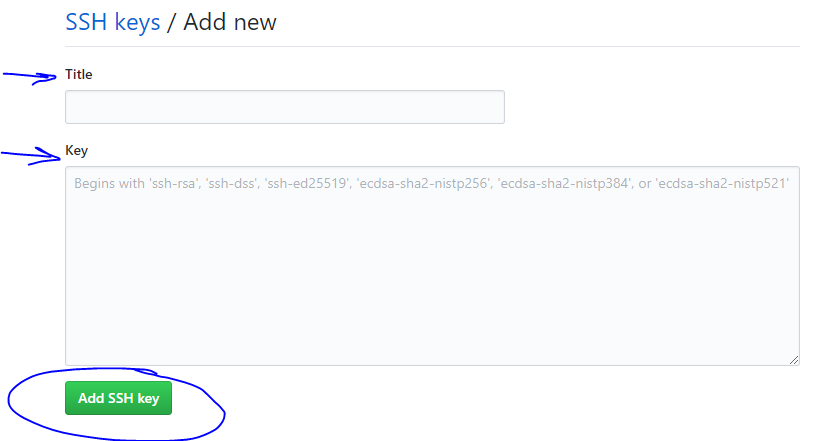
- Click the New SSH key button.
- In the SSH keys dialog, add a Title, paste the SSH key you copied from Plesk into the Key textbox, and click the Add SSH key button.
- Return to the Add Git Repository panel in Plesk and click the OK button.
- It takes a few seconds for Plesk to clone the repository.
- Once complete, you should see a your.domain.gatech.edu.git repository in Plesk.
Adding SSH Public Key to Repository as a Deploy Key
- Go into your repository in github.gatech.edu by clicking the name link.

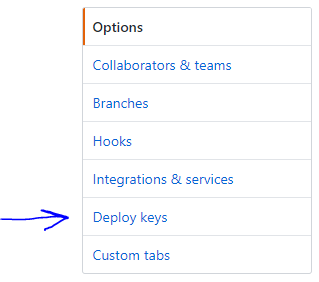
- Click on Settings in the navigation bar.

- Click Deploy keys in the side menu.
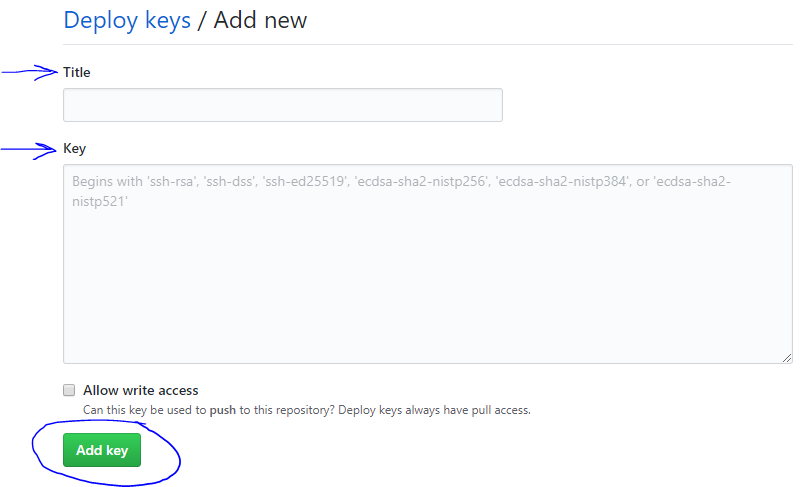
- Click the Add deploy key button.

- In the Deploy keys dialog, add a Title and paste the SSH key you copied from Plesk in the Key textbox. Leave Allow write access box unchecked and click the Add key button.
- Return to the Add Git Repository panel in Plesk and click the OK button.
- The cloning process takes a few seconds to run.
- Once complete, you should see a your.domain.gatech.edu.git repository in Plesk.
Managing SSH Access to an OIT Web Hosting Account
Managing SSH Access to an OIT Web Hosting AccountOIT Web Hosting accounts can be accessed remotely via a protocol called SSH, which gives you a command line style interface to the hosting account. From there, a knowledgable person such as a web developer can manipulate the files on the website, changing settings and configuration and even writing and debugging code to some extent. (The SSH interface on OIT Web Hosting is somewhat limited in its capabilities, so it's not recommended that anyone actually attempt to develop code using it, but technically this is possible.)
To access a hosting account via SSH, you either need the SSH password for the account or you need a valid SSH key.
SSH Password
To set the SSH password for an OIT Web Hosting account, go into the account's Plesk Control Panel, then select Web Hosting Access from the main control page (known as the "Websites & Domains" page). Please note that there is no way to see the current password - if you do not know what it is, all you can do is reset it to a new value.
SSH Keys
An SSH key is a form of public key encryption to let you connect to another system via SSH without having to send a normal password. To use this method, you will need to generate an SSH key for yourself. The process varies greatly based on the operating system and SSH client you are using, so we cannot provide any instructions for this part. However, in the end you should have two keys: a private key and a public key.
If you are enabling SSH Key access for an outside developer, then s/he should send you his/her public key, which is the part you need to enable access to your OIT Web Hosting Account.
Adding an SSH Key
After logging into the Plesk Control Panel for your hosting account, locate the large title text "Website & Domains". From there, look to the far right for an icon that looks like a square with a left-pointing black triangle in it, and select that icon. A menu of options should appear that starts with "Backup & Restore" - look to the bottom of that menu for "SSH Keys" and select that option.
That's the hard part. On the next page, "SSH Keys Manager", you can add and delete authorized keys. Simply select the Add Key button, paste the new key into the Key field, and select the Add button to add it.
Removing an SSH Key
To remove someone's key, simply locate it in the list on the "SSH Keys Manager" page, select the checkbox to the left of the key title, and then select the Remove button to remove it.