Georgia Tech Webmasters Knowledge Base
Georgia Tech Webmasters Knowledge BaseGeneral-purpose web development resources can be found in the knowledge base, and anyone in the Georgia Tech community can make additions and updates to the knowledge base, so please feel free to share your web knowledge, experiences, tips and tricks. If you have questions or would like to submit a correction, update, or suggestion for a non-editable page, please contact the site maintainers.
Looking for Drupal specific information? Anything related to Drupal is kept on the Georgia Tech Drupal Users Group website.
Knowledge Base Top Level Categories
Accessibility
AccessibilityAccessibility in short is the process of making websites and website content percievable and usable by people with disabilities.
With Georgia Tech receiving federal funding, all colleges, schools, research centers and other departments and divisions of the institute are legally required to adhere to the official accessibility standards defined in Section 508 of the Workforce Rehabilitaion Act. These standards define how information is to be presented in websites and other online materials so that users with disabilities can still properly access that information.
As a good starting point for anyone creating web content, the Ivan Allen College has provided a short fifteen minute Accessibility Primer that addresses the most common problems and how to prevent or correct them. It covers accessibility issues with images, headings, lists, page layouts, navigational aides, and handling audio and video content. In addition, the WebAIM organization provides simple explanations of the general principles of accessibility.
OIT now has an Accesibility Resources page covering a wider range of IT accessibility beyond just web pages and web applications.
Accessibility Sub-Topics
Accessibility Compliance Resources
Accessibility Compliance ResourcesThe following list of resources document the accessibility compliance requirements for Georgia Tech websites. Links are also provided to tutorials for understanding those requirements.
In short, all Georgia Tech websites must follow the Official Section 508 Specifications as prescribed by federal law, but Georgia Tech and University System of Georgia policies may add additional requirements. As of January of 2018, Section 508 now specifies that the guidelines for accessibility compliance are effectively those outlined in the World Wide Web Consortium's (W3C) Web Content Accessibility Guidelines (WCAG). The current version of those guidelines is 2.0, and links to this specification and a guide to understanding it are provided below.
We also have an Accessibility Testing and Tools page, which provides a list of software applications and browser extensions that can aid in checking a website for accessibility compliance.
State and Institute Resources and Policies
- Georgia Tech's Accessibility Resources and Requirements
- Georgia Tech Information Technology Accessibility Policy
- University System of Georgia (USG) Accessibility Policy
- University System of Georgia (USG) Accessibility Tutorial
Official Section 508 Specifications
- Section 508 Official Government Website
- W3C's WCAG 2.0 Official Specification
- W3C's Guide to Understanding WCAG 2.0
General Accessibility Compliance Resources
- Web Accessibility Group for Higher Education (WAG) Accessibility Resources List (wonderfully-relevant presentation highlights and tool recommendations, including great tips on PDF and video accessibility)
- W3C's Web Accessibility Initiative (WAI): Introduction to Accessibility
- WebAIM Guide to Cognitive Disabilities and the Web
- IAAP (International Association of Accessibility Professionals) Educational Resources
- The A11Y Project - Web Accessibility Checklist
Accessibility Resources Sub-Topics
CIDI (On Campus Accessibility Organization)
CIDI (On Campus Accessibility Organization)Center for Inclusive Design & Innovation is a Georgia Tech entity operated by the College of Design that provides accessibility support to the entire University System of Georgia. However, its services are also made available to entities outside of the university system on a subscription basis.
They can help with any accessibility compliance concerns you or your faculty might have.
Using CIDI
Each campus department/unit that wants to use CIDI services has to become a 'member' of CIDI.
The person to talk with is Doug Neal (doug.neal@design.gatech.edu), who can help a department/unit get enrolled as a CIDI member.
Registration Point of Contacts
Per CIDI's request:
[CIDI recommends] that each school create an account to manage the budget manipulations in order to receive payment for services that we render. Then the school can let [Doug Neal] know who needs access to order when the membership application in completed.
Registration Process
To register, follow the directions below:
- Open a web browser and navigate to the CIDI Membership page.
- Fill out the Become a Member form, choose your membership type ( Georgia Board of Regents Post - Secondary) and select Next to view the agreement.
- Select the check boxes at the bottom, (print for your records) and electronically sign the membership agreement when you submit.
- CIDI will contact you with login credentials to the ordering system.
Captioning and Transcription Questions
Please see the CIDI captioning and transcription for information about captioning and transcription services.
Accessibility Testing and Tools
Accessibility Testing and ToolsA list of helpful tools and checklists to make it easier to create and evaluate accessibility.
Accessibility Testing
In addition to the tools listed below, the Office of Information Technology's Enterprise Information Systems department provides on-campus accessibility testing services using a campus licensed copy of Compliance Sheriff.
- Functional Accessibility Evaluator (FAE): Free registration lets you test multiple pages at once.
- WebAIM’s accessiblity tools:
- deque aXe Firefox and Chrome Browser Extension
- List of basic screenreader commands for testing
- Colour Contrast Analyser (CCA), Web Accessibility Toolbar (WAT, and Accessibility Viewer (aViewer) from Paciello
A note on browser extensions: These utilities are installed by going to your browser's extension management area (the Web Store in Chrome, or the Add-ons area in Firefox) and searching for and installing the appropriate extension. Both the WAVE and aXe extensions work by scanning the page you are currently viewing. aXe works as a panel in the developer tools, while WAVE reopens the page in the browser window with inline notations. Both can be helpful in identifying exactly where a problem exists in the underlying HTML or CSS code.
Other Tools
Accessible Documents and Files
Accessible Documents and Files esembrat3This page lists resources for accessibility for files and documents attached to your website.
Accessible Documents and Files Sub-Topics
1194.22(m).1
1194.22(m).1The 1194.22(m).1 section relates to applet, plugin, or application boilerplate text present before file uploads of specific types.
This includes content such as Adobe PDFs, Microsoft PowerPoint, etc.
Footer Link
Websites can meet this requirement by placing a link in the footer of the page linking to a single page highlighting the accessible readers for files on the website.
For a link to the accessible documents disclosure, please see the Accessibility Disclosures for Attached Document Files.
File Types
Appropriate text for declaring accessible readers for file types:
Adobe PDF
Consider using text prior to the PDF link, such as the following:
- File downloads below contain PDF files. Please note that some more-recent browsers have the ability to download and view PDFs. To download and view PDF files, please download a PDF reader such as Adobe Acrobat Reader.
Microsoft PowerPoint
- File downloads below contain Microsoft PowerPoint files, which require an application to open. Please note that Microsoft PowerPoint is a paid product, however, free alternatives such as Apache OpenOffice exist to view the file.
Accessibility Disclosures for Attached Document Files
Accessibility Disclosures for Attached Document FilesSome document files attached to Georgia Tech website pages may be in a format that requires an additional browser extension or a special application on your computer or device to be able to open them. The following disclosures describe how to utilize the most commonly found types of files in use at Georgia Tech:
Adobe PDF
Some more-recent web browsers have the ability to download and view PDFs. If your browser does not have this support, you will need a PDF reader on your computer or device such as Adobe Acrobat Reader.
Microsoft Word, Excel, and PowerPoint Files
These document files are produced by the Microsoft Office application. If you have Microsoft Office installed on your computer, then your web browser should be able to open these files automatically. If you do not have Microsoft Office, there are other alternatives including the Apple office applications (Pages, Numbers, and Keynote) found on most Macintosh computers, or the free Apache OpenOffice or LibreOffice.
Creating Accessible Microsoft Word, PowerPoint and PDF Documents (Video Tutorial)
Creating Accessible Microsoft Word, PowerPoint and PDF Documents (Video Tutorial) esembrat3This one hour presentation was provided via Adobe Connect and incorporates a demo of JAWS screen reader accessing a Word document (Demo 1 which begins at timestamp 8:11).
For those who may be new to Adobe Connect:
- Closed captioning is provided in the Captioning Pod
- Adobe Connect Accessibility Features
- The Events Index (visually located on left side of Adobe Connect screen) contains a list of topics covered during the webinar
- Each topic can be expanded to access direct hyperlinks to that specific section
Courtesy of AccessGA.
Checklists
The checklists from HHS.gov are available via the USG Accessibility Tutorial, under Training, Intermediate/Advanced and Creating New Content.
June 2017 WAG Meeting - Creating Accessible (Word and PDF) Documents
June 2017 WAG Meeting - Creating Accessible (Word and PDF) DocumentsPlease see the Web Accessibility Group (WAG) presentation from June 2017 on accessible documents.
Presenter
There's a recording of the meeting as well as a link to the presenter's slides. The presenter's website has more resources, including information on a book about Accessible PDFs that the presenter wrote.
All About Image Carousels
All About Image CarouselsWhile carousels are traditionally seen as a good way to squeeze more content into a limited amount of screen space, studies (see Should I Use a Carousel?) show that site visitors are most likely to ignore anything beyond the first slide, and a poorly built carousel can irritate users, leaving them with negative feelings towards your site and your organization.
From an accessibility standpoint, it is possible to build an accessible carousel, but this usually has to be done from scratch, as most popular carousel widgets (e.g. Flexslider) have been unwilling or unable to update their code to make it properly accessible. If you are interested in building your own carousel system, the AccessIQ tutorial and W3C tutorial will give you a good framework to help you code your system properly.
So, in short, for the time being it's best to avoid carousels whenever possible, especially with Drupal sites, as there is yet to be a really simple, easy to configure carousel system for Drupal.
Resources
On-Campus 508 Compliance Testing
On-Campus 508 Compliance TestingFrom the Office of Information Technology's EIS Quality Assurance Team:
Presently, the EIS Quality Assurance team provides these value-add services to the Institute, both Load Testing and Compliance Testing, at no charge. However, if a requester wishes to learn how to use the many tools in our toolkit, our team can work with the requester until they become proficient. It's more of a consultation and testing service.
The EIS Quality Assurance team has access to over 1000+ mobile handsets for testing the responsive design web site approach.
Contact Information
Tutorials on using Compliance Sheriff
Video Captioning and Audio Transcripts
Video Captioning and Audio Transcripts esembrat3Georgia Tech is legally required to caption any video content and provide transcripts of any audio-only content used on its websites. This includes video and audio content created for academic (classroom) and non-academic (promotional) purposes.
For a list of possible transcription and captioning services and systems, please see our Video Captioning and Audio Transcription page in our Recommended Systems and Services section.
Community and User Groups
Community and User Groups esembrat3Web development is best accomplished when working together with peers. Lucky for us, Atlanta has a ton of great user groups around town to keep up-to-date with the latest trends, and there are many larger conference events hosted throughout the southeast and the rest of the country.
Groups and Conferences
Atlanta User Groups
Atlanta User GroupsThis page details a few of the largest user groups here in Atlanta.
Atlanta Web Design Group
The Atlanta Web Design Group (AWDG) is for anyone who makes Websites. Markup, style, code, typography, SEO, e-commerce, Web apps, and social networking are all valid topics here. We aim to provide a place for Web professionals to meet new people, exchange ideas, learn new things, and have a little fun. We have several events each month: one for learning, and happy hours all over the metro area for socializing.
Atlanta Drupal User's Group
The Atlanta Drupal User's Group (ADUG) is interested in building and strengthening the Drupal Community. Discuss new and exciting Drupal-related news - or just socialize with like-minded people!
Atlanta PHP User Group
The Atlanta PHP User Group is the Southeast's premier PHP community. We are dedicated to building up the PHP community, providing networking opportunities, and developing the skills of our members.
Atlanta JavaScript Meetup Group
The Atlanta JavaScript Meetup Group allows developers to meet other local JavaScripters to share knowledge, to review the state of the art, or to dream up new applications.
Atlanta NodeJS Developers
The Atlanta NodeJS Developers group focuses on learning node js through a practical approach. We will have keynote introductions of meetings, followed by discussions, and then hacking/development sessions where we will learn to rapidly build applications. While we may have the occasional outside expert speaker, our goals are to promote knowledge and gain experience in this new technology by work from members within the group.
We will have a heavy focus on mobile computing devices and other smart devices like TVs with less focus on plain desktop pc.
Atlanta WordPress User's Group
The Atlanta WordPress User's Group is the oldest and largest Atlanta WordPress Meetup.
Meetings usually have one or two presentations depending on the degree of complexity of the topic. The presentations are designed for beginners and/or intermediates to learn to build, customize,and maintain WordPress websites.
Higher-Education Web Development Slack Groups
Higher-Education Web Development Slack GroupsThere are a number of Slack and chat groups built for communication between web developers.
- WPCampus Organization - Where WordPress meets Higher Education
- WPCampus Slack Sign Up - Note: You must join WPCampus to get an invite to their Slack group
- WPCampus Slack Sign Up - Note: You must join WPCampus to get an invite to their Slack group
- Higher-Ed Drupal Community - A Slack community managed by people working with Drupal in higher education for other people working with Drupal in higher education.
2024 Web Developer Related Conferences
2024 Web Developer Related ConferencesJanuary
- N/A
February
- February 20 - 21, 2024 : AxeCon (Digital Accessibility) [Online]
- February 23 - 25, 2024 : Florida DrupalCamp (Orlando, FL) [In-Person]
March
- March ?, 2024 : Georgia Tech OneIT Spring Symposium [Hybrid]
- March 20 - 22, 2024 : MidCamp (Chicago, IL) [In-Person and Online?]
April
- April 9 - 11, 2024 : DevNexus (Atlanta, GA) [In-Person]
- April 9 - 13, 2024 : IAC: The Information Architecture Conference [In Person]
- April 10 - 12, 2025 : CreativeSouth (Columbus, GA) [In-Person]
- April 23 - 25, 2024 : php[tek] (Chicago, IL)
May
- May 2 - 3, 2024 : Stanford WebCamp (Stanford, CA) [Online]
June
- May 6 - 9, 2024 : DrupalCon North America (Seattle, WA) [In-Person]
July
- July 12 - 14, 2024 : Drupal Camp Asheville [In Person]
- July 31 - August 2nd, 2024 : WPCampus (Washington D.C.) [In Person]
- July 30, 2024 : Higher Ed Web Accessibility Summit [Online]
August
- N/A
September
- September 22 - 25, 2024 : HighEdWeb (Albuquerque, NM) [In-Person and Online]
- TBD : interactUSG (TBD)
- TBD : DrupalCamp Atlanta [In Person]
October
- October 9 - 12, 2024 : EDUCAUSE (Chcago IL) [In-Person and Online]
- October 27 - 29, 2024 : All Things Open (Raleigh, NC) [Format TBD]
- TBD : Connect.Tech (Atlanta, GA) [In-Person]
November
- TBD : Georgia Tech OneIT Fall Symposium [Format TBD]
- November 3rd, 2024 : Open Camp / DrupalCamp Chattanooga [In-Person]
December
- N/A
Other
- Monthly Online Seminars : eduWeb [Online]
- Monthly Meetings: Atlanta Tech Summit (Atlanta, GA)
Exhaustive Campus/Conference Lists
HighEdWeb Institutional Membership
HighEdWeb Institutional MembershipGeorgia Tech is currently an institutional member of the HighEdWeb Association, an international nonprofit organization educating digital professionals who work at colleges and universities.
Joining HighEdWeb (it's free!)
Additional Georgia Tech employees and students are welcome to join your HighEdWeb institutional membership; they just need to complete the request to join form. We'll respond to each person with login information once we process their submission.
Benefits
Log in to the Membership Community to access your member perks:
-
Professional development library — access past conference sessions and resources on demand
-
Registration discounts — save money on conference and summit tickets
-
Community groups — join topical discussions, via Slack and video discussions
-
Job board — find and post openings
-
Slack workspace — network with the community
-
Email subscription — tailor your email communications, including weekly notices on certain topics
-
Volunteer opportunities — sign up to support HighEdWeb
-
Membership profile — access your membership details and expiration date
You also have access to the public Link Journal, where we share articles and association updates. And to HighEdWeb Apparel and Accessories for branded gear.
Past Web Developer Related Conferences
Past Web Developer Related Conferences2021 Web Developer Related Conferences
2021 Web Developer Related ConferencesDue to the unusual circumstances of this year and last, many conferences are being made online only. Known updates have been posted below, but always check a conference's website for the latest details.
January
- N/A
February
- February 17, 2021 : DevNexus (Atlanta, GA) [Online]
- February 18 - 20, 2021 : Florida DrupalCamp (Orlando, FL) [Online]
March
- March 10 - 11, 2021 : AxeCon (Digital Accessibility) [Online]
- March 24 - 27, 2021 : MidCamp (Chicago, IL) [Online]
April
- April 7 - 10, 2022 : CreativeSouth (Columbus, GA) [Postponed to 2022]
- April 12 - 16, 2021: DrupalCon North America [Online]
- April 19 - 21, 2021 : An Event Apart, Spring Summit [Online]
- April 28 - 30, 2021 : IAC: The Information Architecture Conference [Online]
- April 28, 2021 : Georgia Tech OneIT Spring Symposium [Online Event]
May
- N/A
June
- N/A
July
- TBD : WPCampus (New Orleans, LA) [In Person]
- TBD : Drupal Camp Asheville [Format TBD]
- July 14 - 17, 2021 : DrupalCon Global [Online]
August
- N/A
September
- TBD : DrupalCamp Atlanta [Format TBD]
October
- TBD : Connect.Tech (Smyrna, GA) [Format TBD]
- TBD : BADCamp (Berkeley, CA) [Format TBD]
- October 3 - 6, 2021 : HighEdWeb (Buffalo, NY) [In-Person]
- October 17 - 19, 2021 : All Things Open (Raleigh, NC) [In-Person]
- October 21, 2021 : Atlanta Tech Summit (Atlanta, GA) [In-Person] [Also has monthly meetings]
- October 26 - 29, 2021 : EDUCAUSE (Philadelpha, PA) [In-Person and Online]
November
- November 2, 2021: Georgia Tech OneIT Fall Symposium [Format TBD]
- TBD : DrupalCamp Chattanooga [Format TBD]
December
- N/A
Other
- Monthly Online Seminars : eduWeb [Online]
To Be Determined
- TBD : SunshinePHP Developer Conference (Miami, FL)
- TBD : WordCamp Atlanta (there's also other WordCamps around the world)
- TBD : php[tek] (Nashville, TN)
- TBD : Higher Ed WEBSITES
- TBD : interactUSG (TBD, GA) (Formerly the Georgia Summit and Rock Eagle IT Conferences)
- TBD : hax-camp : Web components all the things (Durham, NC)
- TBD : php[world] (Washington DC)
Exhaustive Campus/Conference Lists
- Drupal Camps and Conferences List (compiled by Build A Module)
- Drupal Camp and Conference Map and List
2022 Web Developer Related Conferences
2022 Web Developer Related ConferencesDue to the unusual circumstances of the current era, many conferences are still online only, though some are returning with in-person or hybrid formats. Known updates have been posted below, but always check a conference's website for the latest details.
January
- N/A
February
- February 18 - 20, 2022 : Florida DrupalCamp (Orlando, FL) [In-Person]
March
- March 15 - 17, 2022 : AxeCon (Digital Accessibility) [Online]
- March 16 - 19, 2022 : MidCamp (Chicago, IL) [In-Person and Online]
April
- April 7 - 9, 2022 : CreativeSouth (Columbus, GA) [In-Person]
- April 12 - 14, 2022 : DevNexus (Atlanta, GA) [In-Person]
- April 18 - 20, 2022 : An Event Apart (Seattle, WA) [In-Person; On-Demand Afterward for 6 months]
- April 25 - 28, 2022 : DrupalCon North America (Portland, OR) [In-Person]
- April 19 - 23, 2022 : IAC: The Information Architecture Conference [Online]
May
- May 5 - 6, 2022 : Stanford WebCamp (Stanford, CA) [Online and In Person]
- May 16, 2022 : Georgia Tech OneIT Spring Symposium [Format TBD]
June
- N/A
July
- July 8-9, 2022 : Drupal Camp Asheville [In Person]
August
- N/A
September
- September 16-17, 2022 : DrupalCamp Atlanta [In Person]
October
- October 9 - 12, 2022 : HighEdWeb (Little Rock, AR) [In-Person and Online]
- October 25 - 28, 2022 : EDUCAUSE (Denver, CO) [In-Person and Online]
- October 30 - November 2, 2022 : All Things Open (TBD) [Format TBD]
November
- TBD: Georgia Tech OneIT Fall Symposium [Format TBD]
- November 5, 2022 : DrupalCamp Chattanooga [In-Person]
- November 7 - 9, 2022 : Connect.Tech (Smyrna, GA) [Format TBD]
December
- N/A
Returning Next Year
- May 16 - 18, 2023 : php[tek] (Chicago, IL)
- July 12 - 14, 2023 : WPCampus (New Orleans, LA) [In Person]
- September 13 - 15 2023 : interactUSG (Savannah, GA) (Formerly the Georgia Summit and Rock Eagle IT Conferences)
Other
- Monthly Online Seminars : eduWeb [Online]
- Monthly Meetings: Atlanta Tech Summit (Atlanta, GA)
Exhaustive Campus/Conference Lists
- Drupal Camps and Conferences List (compiled by Build A Module)
- Drupal Camp and Conference Map and List
2020 Web Developer Related Conferences
2020 Web Developer Related ConferencesDue to the unusual circumstances of this year, many conferences from March onward are being canceled or made online only. Known updates have been posted below, but always check a conference's website for the latest details.
January
- N/A
February
- February 6 - 8, 2020 : SunshinePHP Developer Conference (Miami, FL)
- February 21 - 23, 2020 : Florida DrupalCamp (Orlando, FL)
- February 13, 2020 : Atlanta Tech Summit (Atlanta, GA)
- February 19 - 21, 2019 : DevNexus (Atlanta, GA)
March
- March 18 - 21, 2020 : MidCamp (
Chicago, IL) [Online Event]
April 2 - 4, 2020: CreativeSouth (Columbus, GA) [Postponed to April 8 - 10, 2021]April 13 - 15, 2020: An Event Apart, Washington, DC [Canceled]- April 14 - 18, 2020 : IAC: The Information Architecture Conference (
New Orleans, LA) [Online Event] April 18 - 19, 2020: WordCamp Atlanta [Canceled] (there's also other WordCamps around the world)- April 29, 2020 : Georgia Tech OneIT Symposium [Online Event]
May
May 18 - 23, 2020: DrupalCon (Minnieapolis, MN) [Postponed; Date/Format TBD]May 18 - 21, 2020: php[tek] 2020 (Nashville, TN) [Canceled]
June
- June 3, 2020 : Higher Ed WEBSITES (Online Event)
- June 29 - July 1, 2020 : An Event Apart, Boston, MA
July
- July 10 - 12, 2020 : Drupal Camp Asheville [Online Event]
August
- August 3 - 5, 2020 : eduWeb (Salt Lake City, UT)
September
- September 10 - 12, 2020 : DrupalCamp Atlanta
October
- October 5 - 7, 2020 : An Event Apart, Orlando, FL
- October 14 - 16, 2020 : Connect.Tech (Smyrna, GA)
- October 14 - 17, 2020 : BADCamp (Berkeley, CA)
- October 17 - 21, 2020 : HighEdWeb (
Little Rock, AR) [Online Event] - October 18 - 20, 2020 : All Things Open (Raleigh, NC)
- October 26 - 29, 2020 : EDUCAUSE (Boston, MA)
November
- November 7, 2020 : DrupalCamp Chattanooga
December
- N/A
Other
- TBD : interactUSG (TBD, GA) (Formerly the Georgia Summit and Rock Eagle IT Conferences)
- TBD : hax-camp : Web components all the things (Durham, NC)
- TBD : php[world] (Washington DC)
Exhaustive Campus/Conference Lists
- Drupal Camps and Conferences List (compiled by Build A Module)
- Drupal Camp and Conference Map and List
2019 Web Developer Related Conferences
2019 Web Developer Related ConferencesThis page details upcoming web development related conferences for the upcoming 2019 calendar year.
The 2020 Conferences Page is now available.
January
- N/A
February
- February 7 - 9, 2019 : SunshinePHP Developer Conference (Miami, FL)
- February 15 - 17, 2019 : Florida DrupalCamp (Orlando, FL)
- February 15, 2019 : Atlanta Tech Summit (Atlanta, GA)
March
- March 6 - 9, 2019 : DevNexus (Atlanta, GA)
- Marcy 13 - 17, 2019: IA Conferene (Orlando, FL)
- March 20 - 23, 2019 : MidCamp (Chicago, IL)
- March 29, 2019 : USG Web Tech Day (Online)
April
- April 8 - 12, 2019 : DrupalCon (Seattle, WA)
- April 11 - 13, 2019 : CreativeSouth (Columbus, GA)
- April 24, 2019: Georgia Tech OneIT Symposium (Georgia Tech Global Learning Center)
May
- May 3 - 5, 2019 : WordCamp Atlanta (there's also other WordCamps around the world)
- May 6 - 8, 2019 : An Event Apart, Boston
- May 21 - 23, 2019 : php[tek] 2018 (Atlanta, GA)
June
- June 5, 2019 : Higher Ed WEBSITES (Online Event)
- June 8, 2019 : DrupalCamp Chattanooga
July
- July 12 - 14, 2019 : Drupal Camp Asheville
- July 29 - 31, 2019 : An Event Apart, Washington D.C.
- July 29 - 31, 2019 : eduWeb (Philadelphia, PA)
August
- August 26 - 28, 2019 : An Event Apart, Chicago
September
- September 12 - 14, 2019 : DrupalCamp Atlanta
- September 18 - 20, 2019 : interactUSG (Savannah, GA) (Formerly the Georgia Summit and Rock Eagle IT Conferences)
October
- October 2 - 5, 2019 : BadCamp (Drupal Camp @ Berkeley, CA)
- October 7 - 8, 2019: hax-camp : Web components all the things (Durham, NC)
- October 13 - 16, 2019 : HighEdWeb (Milwaukee, WI)
- October 13 - 15, 2019 : All Things Open (Raleigh, NC)
- October 14 - 17, 2019 : EDUCAUSE (Chicago, IL)
- October 16 - 18, 2019 : Connect.Tech (Smyrna, GA)
- October 23 - 24, 2019 : php[world] (Washington DC)
November
- N/A
December
- N/A
Other
- TBD : MiniCamp (Drupal Online Event)
Exhaustive Campus/Conference Lists
- Drupal Camps and Conferences List (compiled by Build A Module)
- Drupal Camp and Conference Map and List
2018 Web Developer Related Conferences
2018 Web Developer Related ConferencesThis page details upcoming web development related conferences for the upcoming 2018 calendar year.
The 2019 calendar year page is now available!
January
- N/A
February
- February 8 - 10, 2018 : SunshinePHP Developer Conference (Miami, FL)
- February 16 - 18, 2018 : Florida DrupalCamp (Orlando, FL)
- February 16, 2018 : Atlanta Tech Summit (Atlanta, GA)
- February 21 - 23, 2018 : DevNexus (Atlanta, GA)
March
- April 13 - 15, 2018 : WordCamp Atlanta (there's also other WordCamps around the world)
- March 8 - 11, 2018 : MidCamp (Chicago, IL)
April
- April 9 - 13, 2018 : DrupalCon (Nashville, TN)
- April 12 - 15, 2018 : CreativeSouth (Columbus, GA)
- April 28, 2018 : USG Web Tech Day (Macon, GA)
May
- May 29 - June 1, 2018 : php[tek] 2018 (Atlanta, GA)
June
- June 7, 2018 : MiniCamp (Drupal Online Event)
- June 13, 2018 : Higher Ed WEBSITES (Online Event)
- June 16, 2018 : DrupalCamp Chattanooga
- June 25 - 27, 2018 : An Event Apart, Boston
July
- July 30 - August 1, 2018 : An Event Apart Washington D.C.
August
- August 26 - 29, 2018 : An Event Apart Chicago
September
- September 12 - 14, 2018 : interactUSG (Athens, GA) (Formerly the Georgia Summit and Rock Eagle IT Conferences)
October
- October 8 - 10, 2018 : edUI conference (Charlottesville, VA)
- October 8 - 10, 2018 : An Event Apart Orlando
- October 17 - 19, 2018 : Connect.Tech (Smyrna, GA)
- October 21 - 22, 2018: All Things Open (Raleigh, NC)
- October 21 - 24, 2018 : HighEdWeb (Sacramento, CA)
- October 24 - 27, 2018 : BadCamp (Drupal Camp @ UCA, Berkeley, CA)
- October 30 - November 2, 2018 : EDUCAUSE (Denver, CO)
November
- November 8 - 10, 2018 : DrupalCamp Atlanta
- November 12 - 15, 2018 : php[world] (Washington DC, 15% EDU discount, Super early bird ends August 31)
December
- N/A
Exhaustive Campus/Conference Lists
2017 Web Developer Related Conferences
2017 Web Developer Related Conferences kp37This page details upcoming web development related conferences for the 2017 calendar year.
We also have a page for the 2018 calendar year.
January
- January 30 - February 1, 2017 : An Event Apart St. Louis
February
- February 2 - 4, 2017 : SunshinePHP Developer Conference (Miami, FL)
- February 17 - 19, 2017 : Florida DrupalCamp (Orlando, FL)
- February 22 - 14, 2017 : DevNexus (Atlanta, GA)
March
- March 18 - 19, 2017 : WordCamp Atlanta (there's also other WordCamps around the world)
- March 30 - April 2, 2017 : MidCamp (Chicago, IL)
April
- April 6 - 9, 2017 : CreativeSouth (Columbus, GA)
- April 21, 2017 : USG Web Tech Day (Macon, GA)
- April 24 - 28, 2017 : DrupalCon (Baltimore, MD)
May
- May 4, 2017 : Atlanta Tech Summit (Atlanta, GA)
- May 24 - 28, 2017 : php[tek] 2017 (Atlanta, GA)
June
- N/A
July
- July 10 - 12, 2017 : An Event Apart Washington D.C.
August
- N/A
September
- September 20 - 22, 2017 : ConnectJS
- September 25 - 27, 2017 : edUI conference (Charlottesville, VA)
- September 27 - 29, 2017 : University System of Georgia Annual Georgia Summit
October
- October 24 - 27, 2017 : University System of Georgia Annual Computing Conference (Rock Eagle) (Eatonton, GA)
- October 31 - November 3, 2017 : EDUCAUSE (Philladelphia, PA)
November
- November 3 - 4, 2017 : DrupalCamp Atlanta
- November 4, 2017 : DrupalCamp Chattanooga
December
- N/A
Exhaustive Campus/Conference Lists
2016 Web Developer Related Conferences
2016 Web Developer Related Conferences klpThis page details upcoming web development related conferences for the 2016 calendar year.
We also have a page for the 2017 calendar year.
January
- N/A
February
- February 15-17, 2016: DevNexus (Atlanta, GA)
March
- March 5-6, 2016: Florida DrupalCamp 2015 (Orlando, FL)
- March 14-16, 2016: An Event Apart Nashville
- March 16-17, 2016: Great Wide Open (Atlanta, GA)
- March 17-20, 2016: MidCamp (Chicago, Il)
- March 18-20, 2016: WordCamp Atlanta
April
- April 6-7, 2016: EDUCAUSE Connect (Miami, FL)
- April 7, 2016: WebVisions (New York, NY)
- April 7-9, 2016: CreativeSouth (Columbus, GA)
- April 15, 2016: Atlanta Tech Summit (Atlanta, GA)
- April 21, 2016: USG Web Tech Day 2016 (Macon, GA)
May
- May 9-13, 2016: DrupalCon (New Orleans, LA)
- May 18-20, 2016: WebVisions (Portland, OR)
- May 23-27, 2016: php[tek] 2016 (St. Louis, MO)
June
- N/A
July
- July 7-9, 2016: WebVisions (Barcelona)
August
- N/A
September
- September 14-16, 2016: University System of Georgia Annual Georgia Summit
- Sept. 21-23, 2016: WebVisions (Chicago, IL)
October
- October 12-14, 2016: University System of Georgia Annual Computing Conference (Rock Eagle) (Eatonton, GA)
- October 21-22, 2016: DrupalCamp Atlanta
- October 20-22, 2016: ConnectJS
- October 24-26, 2016: edUI conference (Charlottesville, VA)
- October 25-28, 2016: EDUCAUSE (Anaheim, CA)
- Oct. 26, 2016: WebVisions (Berlin)
- Oct. 29, 2016: WebVisions (London)
November
- November 5, 2016: DrupalCamp Chattanooga
December
- N/A
Exhaustive Campus/Conference Lists
2015 Web Developer Related Conferences
2015 Web Developer Related Conferences klpThis page details upcoming conferences for the 2015 calendar year.
January
- N/A
February
- February 16-18, 2015: An Event Apart Atlanta
- February 28, 2015: AlterConf (Atlanta, GA)
March
- March 10-12, 2015: DevNexus (Atlanta, GA)
- March 19-22, 2015: MidCamp (Chicago, Il)
- March 28, 2015: DrupalCamp New Orleans
- March 27-29, 2015: WordCamp Atlanta
- March 30-April 1, 2015: Symfony2 Bootcamp (Atlanta, GA)
April
- April 2, 2015: AWSome Day (Atlanta, GA)
- April 4, 2015: CampSass (Atlanta, GA)
- April 9-11, 2015: CreativeSouth (Columbus, GA)
- April 11-12, 2015: Florida DrupalCamp 2015 (Orlando, FL)
- April 14-15, 2015: POSSCON (Columbia, SC)
- April 22-24, 2015: EDUCAUSE Connect (San Antonio, TX)
May
- May 11-15, 2015: DrupalCon Los Angeles
- May 18, 2014: Atlanta Tech Summit (Atlanta, GA)
- Mar 18-22, 2015: php[tek] 2015 (Chicago, IL)
June
- N/A
July
- N/A
August
- N/A
September
- September (?) 2015: DrupalCamp Chattanooga
- Sep 16-18, 2015: University System of Georgia Annual Georgia Summit
October
- Oct 16-17, 2015: DrupalCamp Atlanta
- Oct 16-17, 2015: ConnectJS
- Oct 21-23, 2015: University System of Georgia Annual Computing Conference (Rock Eagle)
- Oct 27-30, 2015: EDUCAUSE (Indianapolis, IN)
November
- Nov 9-11, 2015: edUI conference (Charlottesville, VA)
December
- N/A
TBD
- Great Wide Open (Atlanta, GA - at the Georgia Tech Hotel & Conference Center)
Exhaustive Campus/Conference Lists
2023 Web Developer Related Conferences
2023 Web Developer Related ConferencesDue to the unusual circumstances of the current era, many conferences are still online only, though some are returning with in-person or hybrid formats. Known updates have been posted below, but always check a conference's website for the latest details.
January
- N/A
February
- February 17 - 19, 2023 : Florida DrupalCamp (Orlando, FL) [In-Person]
March
- March 1, 2023 : Georgia Tech OneIT Spring Symposium [Hybrid]
- March 15 - 16, 2023 : AxeCon (Digital Accessibility) [Online]
- March 26 - 28, 2023 : MidCamp (Chicago, IL) [In-Person and Online?]
- March 30 - April 1, 2023 : CreativeSouth (Columbus, GA) [In-Person]
- March 28 - April 1, 2023 : IAC: The Information Architecture Conference [In Person]
April
- April 4 - 6, 2023 : DevNexus (Atlanta, GA) [In-Person]
May
- May 11 - 12, 2023 : Stanford WebCamp (Stanford, CA) [Online and In Person]
- May 16 - 18, 2023 : php[tek] (Chicago, IL)
June
- June 5 - 8, 2023 : DrupalCon North America (Pittsburgh, PA) [In-Person]
July
- July 8-10, 2023 : Drupal Camp Asheville [In Person]
- July 12 - 14, 2023 : WPCampus (New Orleans, LA) [In Person]
- July 25, 2023 : Higher Ed Web Accessibility Summit [Online]
August
August 5, 2023: Open Camp / DrupalCamp Chattanooga [In-Person] - Postponed to November 2024
September
- September 13 - 15 2023 : interactUSG (Savannah, GA) (Formerly the Georgia Summit and Rock Eagle IT Conferences)
- TBD : DrupalCamp Atlanta [In Person]
October
- October 8 - 11, 2023 : HighEdWeb (Buffalo, NY) [In-Person and Online]
- October 9 - 12, 2023 : EDUCAUSE (Chcago IL) [In-Person and Online]
- October 15 - 17, 2023 : All Things Open (Raleigh, NC) [Format TBD]
- October 24 - 26, 2023 : Connect.Tech (Atlanta, GA) [In-Person]
November
- TBD : Georgia Tech OneIT Fall Symposium [Format TBD]
December
- N/A
Other
- Monthly Online Seminars : eduWeb [Online]
- Monthly Meetings: Atlanta Tech Summit (Atlanta, GA)
Exhaustive Campus/Conference Lists
- Drupal Camps and Conferences List (compiled by Build A Module)
- Drupal Camp and Conference Map and List
Content Management Systems
Content Management SystemsThis section contains information about different content management systems used on campus. Please note that a separate knowledge base for Drupal is maintained by the Georgia Tech Drupal Users Group.
Information about other content systems is kept in the sub-sections listed below.
Content Management System Sub-Topics
Drupal
DrupalDrupal is a very popular Content Management System that is the preferred system for Georgia Tech unit websites.
The Georgia Tech Drupal Users Group provides a wiki-style website with informational guides and articles about Drupal usage. Please refer to their website if you need more information about Drupal at Georgia Tech.
WordPress
WordPressWordPress is a content management system used by millions of websites across the world.
WordPress at Georgia Tech
At Georgia Tech, WordPress is provided through the Sites @ Georgia Tech service. Sites @ Georgia Tech is especially well suited for faculty, research group, research lab, organizational, and personal websites.
WordPress Sub-Topics
Getting Started with WordPress
Getting Started with WordPress esembrat3This page details all topics of guides for getting started with WordPress.
Getting Started Sub-Topics
Creating a Website with WordPress
Creating a Website with WordPress esembrat3Creating a WordPress website has never been easier. This page details the best-practices for configuring your new WordPress website.
Steps For a Creating a Successful Website
WordPress may seem a little daunting at first, but following the steps below will help ease the development process of your new site.
1. Select a Theme
Select a Theme by going to 'Appearance -> Themes'.
2. Customize Your Theme
Edit your theme settings by going to 'Appearance -> Customize'.
3. Create a Main Menu
Create a main menu by going to 'Appearance -> Menus' . The menu does not need to have any links on it yet, but defining the menu first will make selecting a theme a bit easier.
4. Enable Plugins
Next, enable plugins to add additional features and functionality to your website and the administrative backend. Plugins such as contact forms, polls, Google Maps integration, and more can be added.
5. Add Users
Add or edit users to add additional content editors and users on your website.
6. Create Content
Now for the fun part of website design. Create pages, posts, and other custom content (like forms, maps, etc) and bring data to your website.
WordPress Log In / Authentication
WordPress Log In / AuthenticationTo log in to your WordPress website, follow the directions below.
Logging In
These steps are adapted from the WPMUDev website.
-
Navigate to the main page of your website (e.g. https://sites.gatech.edu/ ).
-
Add wp-admin to the end of the URL and press enter ( e.g. https://sites.gatech.edu/wp-admin ).
-
For sites hosted by Sites @ Georgia Tech (and some other WordPress sites hosted on departmental servers), you will be redirected to the Georgia Tech Login service. For other sites on departmental services, you will be shown a standard login screen for WordPress.
-
If you are sent to the Georgia Tech Login service, enter your GT Account Username and password.
-
- You should be redirected to the WordPress Dashboard.
WordPress Pages and Posts
WordPress Pages and Posts esembrat3This page details all topics of guides for pages and posts.
Pages and Posts Sub-Topics
What Are Pages?
What Are Pages? esembrat3In WordPress, you can write either posts or Pages. Pages are for content such as "About," "Contact," etc. Pages live outside of the normal blog chronology, and are often used to present timeless information about yourself or your site -- information that is always applicable. You can use Pages to organize and manage any content.
In addition to the generally required "About" and "Contact" Pages, other examples of common pages include Copyright, Disclosure, Legal Information, Reprint Permissions, Company Information, and Accessibility Statement.
What Are Posts?
What Are Posts? esembrat3Posts are entries that display in reverse order on your home page. Posts usually have comments fields beneath them and are included in your site's RSS feed.
Upload Media & Files
Upload Media & FilesUploading files can be accomplished through the WordPress interface. No FTP access should be needed.
Note
Content on this page is derived from the Wordpress.org documentation on Uploading Files.
Upload Files
The Administrative Dashboard lets you upload files in the following ways:
File Format Support
WordPress supports uploading the following file types:
Images
- .jpg
- .jpeg
- .png
- .gif
- .ico
- .svg
Documents
- .pdf (Portable Document Format; Adobe Acrobat)
- .doc, .docx (Microsoft Word Document)
- .ppt, .pptx, .pps, .ppsx (Microsoft PowerPoint Presentation)
- .odt (OpenDocument Text Document)
- .xls, .xlsx (Microsoft Excel Document)
- .psd (Adobe Photoshop Document)
Audio
- .mp3
- .m4a
- .ogg
- .wav
Sites @ Georgia Tech may not permit large file uploads.
Video Uploading
We strongly recommend against uploading videos directly through Sites @ Georgia Tech. Instead, upload your videos through MediaSpace, YouTube, Vimeo, or another video streaming service.
To Upload a File in a Post/Page
- On the Dashboard menu, click Posts or Pages, and then click Add New to display the "Add New Post/Page" page.
- On the Upload/Insert menu, click the icon for the type of file you want to upload and the "Add media files from your computer" page will appear.
- Click the Select Files button.
- In the dialog box, select the file you want to upload.
To select multiple files, hold down the SHIFT key (for PC users) or the COMMAND key (for Macintosh users). - Click Open.
- When your file uploads, a field appears. At the bottom of the field, click the Insert into Post button.
Note: If you are having problems uploading files with the default Flash uploader, you may want to use the Browser uploader instead.
To Upload a File for Later Use
- On the Dashboard menu, click Media and then click Add New to display the "Upload New Media" page.
- Click the Select Files button to open a dialog box.
- In the dialog box, select the file you want to upload.
To select multiple files, hold down the SHIFT key (for PC users) or the COMMAND key (for Macintosh users). - Click the Open button.
- When the upload is complete, a field with your file details appears. Below the field, click Save all changes.
Note: If the file does not open, then the file type is not supported, the chosen format may not match the file’s true format or the file may be damaged.
Embed External Media in WordPress
Embed External Media in WordPress esembrat3WordPress allows you to embed a number of social services into posts and pages automatically.
All Embed Services
For all embed services supported by WordPress, see the WordPress documentation.
Embed a YouTube Clip
To embed a YouTube clip, simply paste the URL where you would like the video to go.
- e.g. https://www.youtube.com/watch?v=udAL48P5NJU
WordPress will convert the URL into a YouTube box. Once that is completed, you can then re-align the box to be formatted with or around text.
Embed a Tweet
To embed a tweet from Twitter, simply paste the URL of the specific tweet where you would like the video to go.
- e.g. https://twitter.com/SpaceX/status/556131313905070081
WordPress will convert the URL into a Twitter tweet box. Once that is completed, you can then re-align the box to be formatted with or around text.
Embed a Vine
To embed a Vine clip, simply paste the URL where you would like the video to go.
- e.g. https://vine.co/v/OjqeYWWpVWK
WordPress will convert the URL into a Vine video. Once that is completed, you can then re-align the box to be formatted with or around text.
Embed Instagram Media
To embed a Instagram photo or video, simply paste the URL where you would like the media to go.
- e.g. http://instagram.com/p/x7HY1WkcH8
WordPress will convert the URL into an Instagram video/photo box. Once that is completed, you can then re-align the box to be formatted with or around text.
Embed Flickr Media
To embed a Flickr photo or video, simply paste the URL where you would like the media to go.
- e.g. https://www.flickr.com/photos/georgiatech/15840996510/in/set-72157649357941487
WordPress will convert the URL into a Flickr video/photo box. Once that is completed, you can then re-align the box to be formatted with or around text.
Embed a Meetup Event
To embed a Meetup event, simply paste the URL where you would like the event information to go.
- e.g. http://www.meetup.com/drupalatlanta/events/219069764/
WordPress will convert the URL into a Meetup event box. Once that is completed, you can then re-align the box to be formatted with or around text.
Embed a Vimeo Video
To embed a Viemo video, simply paste the URL where you would like the video to go.
- e.g. http://vimeo.com/83455083
WordPress will convert the URL into a Vimeo video box. Once that is completed, you can then re-align the box to be formatted with or around text.
Embed External Media Sub-Topics
Google Docs Embeds
Google Docs EmbedsSites @ Georgia Tech has not found an appropriate plugin that allows for safe and easy-to-use Google Docs embeds.
Obtain Embed Code
To use a Google Doc in your WordPress page, please obtain the embed code from the Google Document. Documentation on how to complete this process can be found on WordPress's knowledge base.
- Use the above link to copy the embed code.
- Edit the page or post where you would like the embedded content to go.
- From the 'Edit Page/Create Page' screen, click the 'Text' tab to enter the HTML view.
- Paste the embed code at the bottom of the HTML code shown in the 'Text' tab.
- Return to the 'Visual' tab.
- Save the content.
Media Embeds
Media EmbedsWordPress has built-in embedding support for various media services.
Note that this content is derived from the Wordpress.org article on Embeds.
What is Embedding?
Embedding allows you to paste a URL from a media service, which is then converted into the proper code for placing into a webpage.
As an example, pasting a YouTube URL into a post or page causes WordPress to convert that URL into the proper YouTube player on your page.
Embedding Services
| Service | Embed Type | Since | |
|---|---|---|---|
| Animoto | Videos | WordPress 4.0 | |
| Blip | Videos | WordPress 2.9 | |
| CollegeHumor | Videos | WordPress 4.0 | |
| DailyMotion | Videos | WordPress 2.9 | |
| EmbedArticles | Various | WordPress 3.9 | |
| Flickr | Videos & Images | WordPress 2.9 | |
| FunnyOrDie.com | Videos | WordPress 3.0 | |
| Hulu | Videos | WordPress 2.9 | |
| Imgur | Images | WordPress 3.9 | |
| Images | WordPress 3.5 | ||
| iSnare | Articles | WordPress 2.9 | |
| Issuu | Documents | WordPress 4.0 | |
| Kickstarter | Projects | WordPress 4.2 | |
| Meetup.com | Various | WordPress 3.9 | |
| Mixcloud | Music | WordPress 4.0 | |
| Photobucket | Images | WordPress 2.9 | |
| PollDaddy | Polls & Surveys | WordPress 3.0 | |
| Scribd | Documents | WordPress 2.9 | |
| SlideShare | Presentation slideshows | WordPress 3.5 | |
| SmugMug | Various | WordPress 3.0 | |
| SoundCloud | Music | WordPress 3.5 | |
| Spotify | Music | WordPress 3.6 | |
| TED | Videos | WordPress 4.0 | |
| Tumblr | Various | WordPress 4.2 | |
| Social media | WordPress 3.4 | ||
| Vimeo | Videos | WordPress 2.9 | |
| Vine | Videos | WordPress 4.1 | |
| WordPress.tv | Videos | WordPress 2.9 | |
| YouTube | Videos | WordPress 2.9 |
How to Use Embed
To embed a video or another object into a post or page, place its URL into the content area. Make sure the URL is on its own line and not hyperlinked (clickable when viewing the post).
Content Privacy
Content PrivacyTo change the privacy of the content, follow the directions below.
Privacy
To change a post or page to be private or password protected, please follow the directions provided by WordPress:
-
Visibility for posts and Pages is set from the Edit screen. The option is available under the "Publish" option normally found at the top-right of the Edit screen. The screenshot below shows the interface, with the relevant section highlighted in the red rectangle.
-
The default state for post and Page visibility is Public. Public visibility means that the content will be visible to the outside world as soon as it is published.
-
By clicking on the edit link next to Visibility: Public in the Publish options, you can choose from an expanded selection of visibility options.
Content URLs
Content URLs esembrat3You can easily change the URL of your pages and posts.
Note
Content below courtesy of Wordpress.org's page on Pages.
URLs of Your Pages
WordPress will automatically create a URL part ('slug') for your page as soon as you complete the name of the page/post title.
Changing the URL of Your Pages
To change the URL part (also referred to as 'slug') containing the name of your Page, use the 'Edit' button under the Page title on the Edit screen of the particular Page, accessible from Pages tab of WordPress Administration Panel.
Create Posts/Pages
Create Posts/Pages esembrat3To create a post/page:
- Log in to your WordPress Administration Panel (Dashboard).
- Click the 'Posts' or 'Pages' tab.
- Click the 'Add New' sub-tab.
- Start filling in the blanks: enter your post title in the upper field, and enter your post body content in the main post editing box below it.
- As needed, select a category, add tags, and make other selections from the sections below the post. (Each of these sections is explained below.)
- When you are ready, click Publish.
Creating Teaser for Post
Creating Teaser for Post esembrat3To create a teaser or a preview for your post for display on the blog page, follow the directions below.

Process
- Edit the post you would like to trim down.
- Locate the area on the story you would like to place the 'Read More' on.
- From the editor box, select 'Insert "Read More" tag'.
- Save your post.
Edit Posts/Pages
Edit Posts/Pages esembrat3To edit a post or page:
- Log in to your WordPress Administration Panel (Dashboard).
- Click the 'Posts' or 'Pages' tab.
- Click the 'List' sub-tab.
- From the table list, select which post or page you would like to edit.
Subpages
Subpages esembrat3Subpages allow pages to exist as child-pages of another page.
Create a Subpage
- Go to Administration > Pages > Add New panel.
- In the right menu, click the "Page Parent" drop-down menu. The drop-down menu contains a list of all the Pages already created for your site.
- Select the appropriate parent Page from the drop-down menu to make the current Page a child Page.
- Add content to the subpage.
- Click Publish when ready.
When your Pages are listed, the Child Page will be nested under the Parent Page. The Permalinks of your Pages will also reflect this Page hierarchy.
In the above example, the Permalink for the Cameroon Page would be:
http://example.com/africa/cameroon/
WordPress Appearance and Themes
WordPress Appearance and ThemesThis section contains information and guides for WordPress themes and theme customization options.
Appearance and Themes Sub-Topics
Selecting a WordPress Theme
Selecting a WordPress Theme esembrat3Changing themes in WordPress can be accomplished from the 'Appearance -> Themes' page.
Page content is courtesy of Wordpress.org.
Changing Themes
The Appearance Themes Screen allows you to manage your Themes. That means you can install, preview, delete Themes, activate, and update Themes. Two tabs, Manage Themes (the default view) and Install Themes, can be clicked to provide access to each of those functions.
A WordPress Theme is a collection of files that work together to produce a graphical interface with an underlying unifying design for a website. These files are called template files. A Theme modifies the way the site is displayed, without modifying the underlying software.
Activate
Select this to make this theme the current theme.
Live Preview
Select this and you can preview how your blog will appear with this specific theme version.
WordPress Home Page Setup
WordPress Home Page Setup esembrat3To set up a home page, follow the directions below:
Process
- Log in to your WordPress website.
- From the top administrative bar, select Dashboard.
- From the WordPress Dashboard, select Settings.
- From the Settings page, select Reading.
- You can select to display a static page, a listing of recent posts, and provide settings for both.
- Click Save Changes to save your changes.
Static Page
A static page is a page you have already created on WordPress that you would like to use as a front page.
Latest Posts
The latest posts generates a dynamic page listing the most recently created posts.
More Information
For more information, please see the WordPress documentation on home/front pages.
WordPress Theme Settings
WordPress Theme SettingsAll WordPress themes allow additional customization for end-users.
How to Customize
To customize, follow the directions below:
- Log in to your WordPress website.
- Ensure that a theme is enabled.
- Under the administrative menu, select 'Appearance -> Customize'.
Customization Options
The customization options allow you to make changes to the theme options, then view the changed settings in real time.
Site Title & Tagline
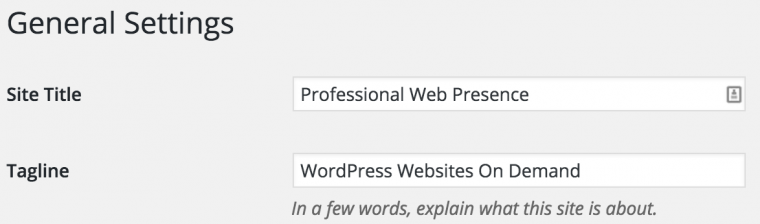
The title and tagline (subtitle) are text used for social media sharing and appear in your header. You can also change these settings from 'Settings -> General'.
The title and tagline are used on the title bar, the header, and the search-engine optimization of your website, so make sure these are set appropriately.
Colors
Colors allow you to change the color of various theme elements, such as the background or header text color.
Each theme has preset color customization options tailored to its theme.
Header Image
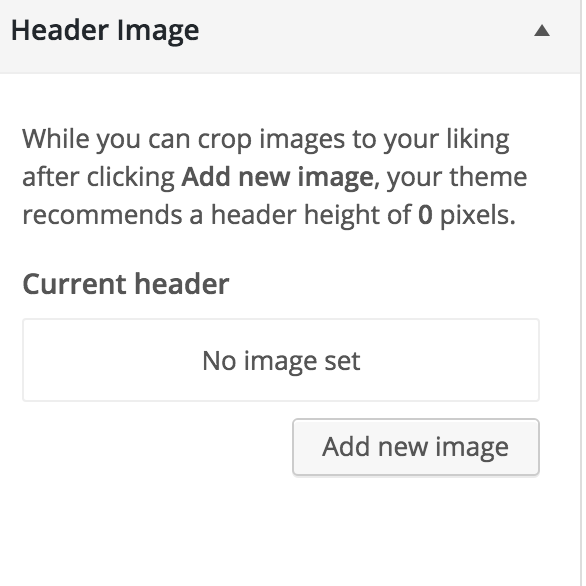
Upload and crop a replacement logo for the site title on the website. This will hide the title text.
Please note that your image should be approved by Institute Communications before usage.
Background Image
Upload a replacement background image for the website. This will override any background color or image currently used on the website.
Please note that background images should not be tiled unless the image is tailored for the tile format.
Navigation
This enables which menu should be used for the primary (main) and secondary menus.
Please note that this requires you to create menus first.
Static Front Page
Select either an already created page (static front page) or a listing of latest posts as the front page of your website.
You can also change these settings from 'Settings -> Reading'.
Site Layout
Select which site layout (sidebars) is best for this website. Please note that this can be overwritten on individual pages and posts.
Breadcrumbs
Enable or disable breadcrumbs on certain page types on your website.
Comments and Trackbacks
Enable or disable comments or trackbacks on pages and posts. The recommended value is to disable comments and trackbacks for both pages and posts.
Content Archives
Configure how you would like archiving of posts should be displayed and formatted.
WordPress Training and Walkthrough Videos
WordPress Training and Walkthrough Videos esembrat3We have training resources both on- and off-campus available for WordPress usage and best-practices.
WordPress Training Sub-Topics
WordPress Video Walkthroughs and Guides
WordPress Video Walkthroughs and GuidesVarious video walkthrough and guides are provided by Georgia Tech resources for learning about WordPress.
LinkedIn Learning
The most in-depth walkthroughs and guides can be found through the Georgia Tech LinkedIn Learning subscription. You can view all WordPress training courses available through our subscription.
Highlighted courses for training:
- WordPress Essential Training (all sections)
- Up and Running with Genesis for WordPress (sections 2-6)
WP Beginner
WPBeginner has some great free videos for getting started with WordPress.
Please note that viewing the videos requires creating a free account on the WPBeginner website.
Securing WordPress
Securing WordPressAnyone who is running their own instances of WordPress that they fully administer themselves (this doesn't include people maintaining sites on Sites @ Georgia Tech), should make sure they are running a comprehensive security plugin like WordFence to monitor and protect their WordPress instance from cyber attacks. WordPress sites are popular attack vectors, especially ones that rank well in the major search engines.
Minimal Security Settings
If you have a valid reason for not running a comprehensive security plugin, it is recommended that your website has Limit Login Attempts Reloaded to prevent brute force login attacks.
Please note that WordFence limits login attempts as well, so you don't need a separate plugin for that if you're running WordFence.
User Login
To strengthen user logins on campus, CAS/Single Sign-On based authentication for user logins is strongly recommended. Please see the drupal.gatech.edu article on CAS for Drupal 7 for recommended settings and server information.
If you cannot enable CAS/Single Sign-On, consider adding a two-factor authentication (2FA) plugin to your site. WordFence supports 2FA but only in their paid premium version.
Please note that you should not run both CAS authentication and 2FA, as that will result in a three-factor authentication for all of your faculty/staff users.
WordPress Menus and Navigation
WordPress Menus and Navigation esembrat3Menus and navigation can be edited through the WordPress Appearance dashboard section.
Menus and Navigation Sub-Topics
Add WordPress Menu Links
Add WordPress Menu Links esembrat3The most up-to-date information on adding menu links to menus can be found on Wordpress.org's knowledge base page.
Locating Menu from Dashboard
- Login to the WordPress Dashboard.
- From the 'Appearance' menu on the left-hand side of the Dashboard, select the 'Menus' option to bring up the Menu Editor.
Adding Menu Links
- Locate the pane entitled Pages.
- Within this pane, select the View All link to bring up a list of all the currently published Pages on your site.
- Select the Pages that you want to add by clicking the checkbox next to each Page's title.
- Click the Add to Menu button located at the bottom of this pane to add your selection(s) to the menu that you created in the previous step.
- Click the Save Menu button once you've added all the menu items you want.
Attach WordPress Menu to Theme
Attach WordPress Menu to Theme esembrat3One thing that WordPress does not automatically do is attach menus to your theme. To do so, follow the directions below.
Attaching a Menu
- Log in to your WordPress website.
- From the Administrative Dashboard, select 'Appearance -> Menus'
- On the top of the page, select your current menu from the dropdown and click 'Select'.
- From the 'Menu Structure', set the 'Menu Settings -> Theme locations' to assign where the menu should live in your selected theme.
Notes
- You can also assign menu locations by using the 'Manage Locations' tab on the 'Appearance -> Menus' page.
- You can also assign menu locations through the 'Appearance -> Customize' page.
Create a WordPress Menu
Create a WordPress Menu esembrat3To create a new menu, follow the steps below.
Creating a New Menu
- Log in to your WordPress website.
- From the Administrative Dashboard, select 'Appearance -> Menus'
- On the right, create a new menu by giving it a 'Menu Name' and click 'Save'.
WordPress User Roles and Access
WordPress User Roles and Access esembrat3WordPress allows you to add users and provide them with preset roles for editing, posting, and administration.
User Roles and Access Sub-Topics
Add a WordPress User
Add a WordPress UserAdd a new user to allow multiple users manage content and editing for your website.
Latest Documentation
For the latest and greatest documentation, see Wordpress.org's article on Users -> Add New.
Adding Users
To add users, navigate to 'Users -> Add New' from the administrative portal.
Edit a WordPress User
Edit a WordPress User esembrat3To edit a user, follow the instructions below.
Edit a User
- From the administration dashboard, select 'Users -> All Users' from the left-hand menu.
- Hover over a user row for a 'Edit' text to appear. Click 'Edit' to edit the user.
Edit Multiple Users
To edit multiple users (change role), do the following:
- From the administration dashboard, select 'Users -> All Users' from the left-hand menu.
- From the user table, check the checkboxes of all users you want to change roles of.
- Select the dropdown 'Change role to...' and select a role you want to change all users to.
- Click the 'Change' button to confirm this role change.
Remove a WordPress User
Remove a WordPress User esembrat3To remove a user, follow the instructions below.
Remove a User
- From the administration dashboard, select 'Users -> All Users' from the left-hand menu.
- Hover over a user row for a 'Remove' text to appear. Click 'Remove' to edit the user.
Remove Multiple Users
To remove multiple users, do the following:
- From the administration dashboard, select 'Users -> All Users' from the left-hand menu.
- From the user table, check the checkboxes of all users you want to remove.
- Select the dropdown 'Bulk Actions' and select 'Remove'.
- Click the 'Apply' button to confirm this removal.
WordPress User Roles
WordPress User Roles esembrat3WordPress has a predefined set of user roles for your users to be placed into.
Read More
Wordpress maintains the most up-to-date documentation on user roles. Wordpress also has a developer-centric page on Role delegation.
Roles
The following roles are available:
- Administrator – nothing is off limits
- Editor – has access to all posts, pages, comments, categories, tags, and links.
- Author – can write, upload photos to, edit, and publish their own posts.
- Contributor – has no publishing or uploading capability, but can write and edit their own posts until they are published
- Follower (public sites) / Viewer (private sites only) – can read and comment on posts and pages
Role Inheritance
Each user role is capable of everything that a less powerful role is capable of. (In others words, Editors can do everything Authors can do, Authors can do everything Contributors can do, and so on.)
SharePoint / Teams
SharePoint / TeamsMicrosoft Sharepoint
SharePoint is the intranet content management system provided by Georgia Tech's campus Office365 subscription. It lets you share with a defined group of people a set of basic web pages, files, calendar entries, and more. You can access SharePoint by logging into Office 365, then selecting the icon in the upper-right-hand corner, often described as the "waffle" icon. Help and documentation about SharePoint can be found inside the application itself, and also within the ServiceNow application.
Public websites through SharePoint are no longer available, as Microsoft has discontinued this service. You can still use SharePoint to create intranet (internal) sites, but you can only make them available at most to all Georgia Tech Office 365 users (not the general public).
Microsoft Teams
Microsoft Teams are built on the same foundations as SharePoint, and creating a team gives your group access to all of SharePoint's features. In addition, a Team offers collaborative tools, such as a live chat area with message history and multiple channels, and a task organizer. Beyond the built in tools, Teams allows a variety of third-party tools to be added to a team to offer more functionality. Note: not all third-party tools for Teams are free; team owners are responsible for the costs of any non-free tools added to a Team.
Like SharePoint, Teams are for intranet (internal) purposes only. You cannot add anyone from outside of the Georgia Tech community to a Microsoft Team.
Comparisson of Content Management Systems
Comparisson of Content Management Systems| Content Management System | Site Types? | Georgia Tech Theme Available? | Mercury News/Events Support? | Support Available | Pros | Cons |
|---|---|---|---|---|---|---|
| Drupal |
|
Yes | Yes | Campus Community Users Group |
|
|
| WordPress (Sites @ Georgia Tech) |
|
Yes | Not Yet | 24/7 Helpdesk via CampusPress |
|
|
| SharePoint |
|
No | No | OIT (Limited) |
|
|
| Other Content Systems |
|
No | No | None |
|
|
Data Integration and Services
Data Integration and Services rootThis section contains information on various campus-available and campus-recommended resources for third-party data integration and services.
Data Integration and Services Sub-Topics
Google (Search, Analytics)
Google (Search, Analytics) rootThe campus uses many of Google's services.
Google Service Sub-Topics
Google Analytics
Google Analytics rootA Step-by-Step Guide to Migrating to Google Analytics 4 (GA4) From Universal Analytics (UA)
A Step-by-Step Guide to Migrating to Google Analytics 4 (GA4) From Universal Analytics (UA)In this step-by-step guide, we will walk you through the process of setting up a GA4 property, tracking it in parallel with an existing Universal Analytics property, and configuring it to track events, measure scroll depth, and measure engagement with embedded videos.
Overview of the Process:
- Getting Ready:
Make sure your website is ready for the migration process by updating your Google Analytics module/plug-in, creating a GTM account and container, and installing or enabling GTM on your website. - Setting Up and Connecting a GA4 Property:
Create a GA4 property, set up basic configuration, create a data stream, and add the GA4 tracking code to your website. - Configuring a GA4 Property:
Increase data retention time, increase user engagement time, turn on enhanced measurement, and edit Site Search and Video Engagement if necessary. - Check and Verify:
Wait 24 hours and check Google Analytics to ensure that the data is being collected properly.
Chapter 1: Background
About GA4
GA4 is the latest version of Google Analytics. It's a major update to the previous version, Universal Analytics, and provides many new features and improvements to the way data is collected and analyzed.
GA4 differs from Universal Analytics in several ways:
- Data Collection Model:
GA4 uses an event-based data model, which allows you to track user interactions on your website or app more granularly than in Universal Analytics. This means that you can track specific actions that users take on your website or app, such as clicks, page views, and video plays, rather than just tracking basic metrics like sessions and pageviews. - Privacy and Consent:
GA4 was designed with user privacy in mind and offers more options for users to control their data. GA4 includes features that help website owners comply with data privacy regulations like General Data Protection Regulation and California Consumer Privacy Act . - AI-powered Insights:
GA4 comes with built-in machine learning capabilities that use artificial intelligence to provide deeper insights into user behavior and trends. This allows you to gain a better understanding of how users interact with your website or app and make more informed decisions. - E-commerce Tracking:
GA4 includes more robust e-commerce tracking capabilities, allowing you to track specific actions such as product views, add-to-cart events, and purchases. This provides more detailed insights into the performance of your online store. - Cross-device Tracking:
GA4 provides a more accurate picture of how users interact with your website or app across multiple devices. This allows you to see how users move between devices and how their behavior changes as they interact with your brand across different channels.
Why Migrating Now to GA4 is Important
On July 1, 2023, Google will replace Universal Analytics with GA4.
After this date, website data will only be collected by GA4 tracking codes and Universal Analytics will no longer collect data. Google Analytics will let you view historical Universal Analytics reports until January 2024.
What If You Do Nothing?
If you don't create a GA4 property with basic settings, Google will create a new GA4 property for you. This new GA4 property will be connected to the corresponding Universal Analytics property.
However, since GA4 functions differently than Universal Analytics, you will lose a lot of reporting information with this automatic configuration.
For the best quality setup and the most historical data and insights, we recommend that you migrate your UA property to GA4 now.
Chapter 2: Getting Ready
Here’s a list of a few important tasks to complete before beginning the migration process:
- Check your website for the latest Google Analytics module
To collect the most historical data, we recommend keeping your current Universal Analytics tracking code on your website and adding the new GA4 measurement ID so that they both track website traffic in parallel until UA is discontinued. To do this, you’ll need the latest version of the Google Analytics Module.- For WordPress sites (CampusPress).
- CampusPress site has been updated with the latest module. Please skip this step.
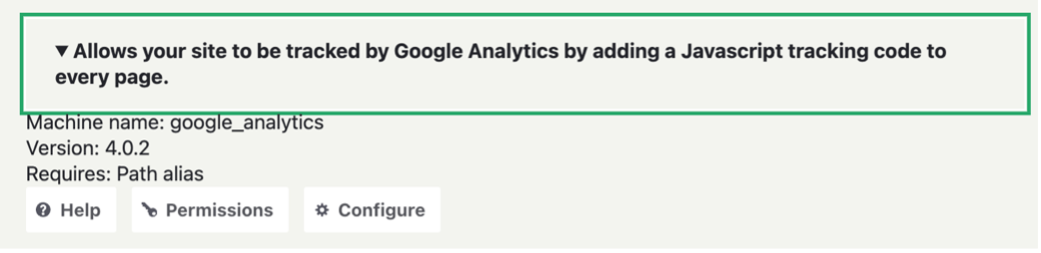
- For Drupal websites, go to the “Extend” menu and search for the Google Analytics module.
- If you find it, click the arrow, then select “Configure.”
- Check to see if there is an “Add another ID” button.

- If the option to add another ID is missing, or if you do not have a Google Analytics module, you can:
- Ask your web developer to install the latest update from Georgia Tech’s theme.
- Or proceed by replacing your Universal Analytics tag with the GA4 measurement code. Please note that you may have a gap in data until you properly configure your GA4 account settings.
- Ask your web developer to install the latest update from Georgia Tech’s theme.
- If you find it, click the arrow, then select “Configure.”
- For WordPress sites (CampusPress).
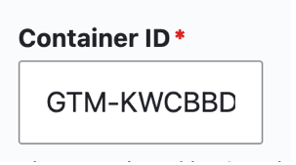
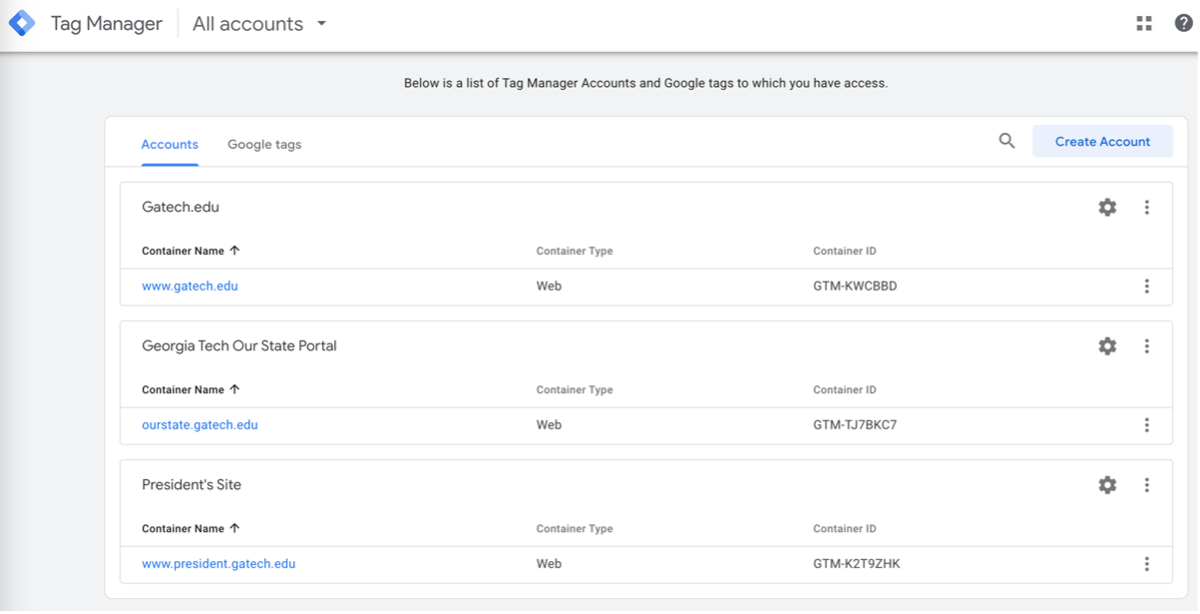
- Create a GTM Account and Container.
While GTM is not required to use GA4, using GTM makes the process of implementing and managing event tracking on your website easier and more efficient. With GTM, you can set up and configure enhanced tracking without needing a web developer. If you don’t already have a GTM account, create one at tagmanager.google.com.
- Check your website for the GTM module and enter the Container ID.
- For WordPress (CampusPress) websites.
- Navigate to the dashboard in the “Statistics + GTM” menu.
- In the “Google Tag Manager” block, click the "Activate” button.
- In the “Container ID” field, paste your GTM code and click “Save Changes.”
- For Drupal sites:
- Navigate to “Extend.”
- Filter for “Google Tag Manager.”
- If the module is already on your site but not enabled, check the box, and click “Install.”

- If it is not in your modules list, ask your web developer to install it.
- After enabling the module, click the arrow and then the “Configure” button.
- Click the link to the “Container Management Page.”
- Paste your GTM container code in the “Container ID” field and click “Save.”
- For WordPress (CampusPress) websites.
Chapter 3: Setting Up and Connecting a GA4 Property
- Create a GA4 Property.
Log in to your Google Analytics account, click on the "Admin" button and select "Create Property."- Set up basic configuration.
- Enter a property name.
- Select the correct time zone, currency, business information.
- Click the “Create” button.
- Create a data stream.
- Choose from where you will be collecting data (the web, an Android app, or an iOS app).
- Enter your website URL and name.
- Click the “Create Stream” button.
- Set up basic configuration.
- Add the GA4 tracking code to your website.
Under "Data Streams,” click the arrow. View and copy the “Measurement ID Code.”- For WordPress websites:
- Navigate to the dashboard in the “Statistics + GTM” menu.
- In the “Analytics Configuration” block, click the cog next to Google Analytics 4.
- In the “Measurement ID” field, copy and paste your GA4 code.
- Click “Save Changes.”
- For Drupal websites:
- Navigate to Google Analytics.
- Click the “Extend” menu link.
- Filter for Google Analytics.
- Add the GA4 code.
- Click the arrow next to the module name, then click the “Configure” button.
- On the configuration page, click the "Add Another ID" button.
- In the new field, paste the GA4 measurement ID from 2a., beginning with "G-"
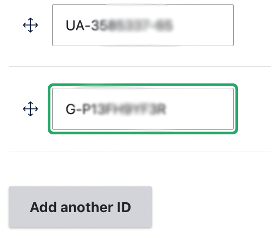
- Click the arrow next to the module name, then click the “Configure” button.
- Save
Click the blue "Save Configuration" button.
- Navigate to Google Analytics.
- For WordPress websites:
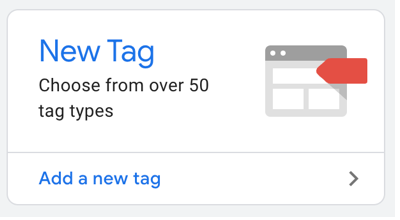
- Create a new tag in GTM.
- Log in to your account: tagmanager.google.com.
- Click the link for the container (website) you want to manage.
- Click “Add a New Tag.”
- Name the new tag.

- Add a tag type.
- In the “Tag Configuration” block, click the gray icon.

- Select "Google Analytics: GA4 Configuration" as the tag type.

- Input the GA4 measurement ID.
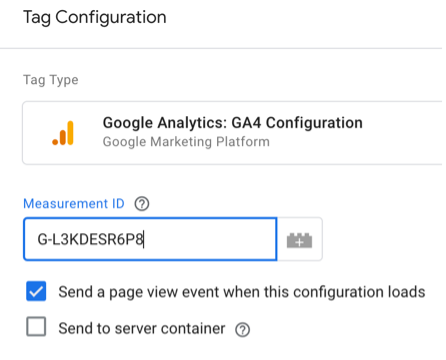
- In the “Tag Configuration” block, click the gray icon.
- Add a Trigger.
- In the Triggering box, click the gray icon.

- Select “All Pages.”
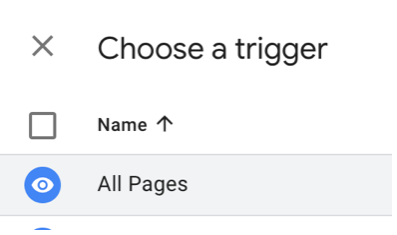
- In the Triggering box, click the gray icon.
- Save.
Click the blue “Save” button in the top right corner.
- Submit and Publish.
- Click the blue “Submit” button.
- Name this version.
In the field, describe the change you just made. - Click the blue “Publish” button.
Publish to send the changes to the live version of the website.
- Log in to your account: tagmanager.google.com.
You are now connected to Google Analytics 4!
Chapter 5: Configuring a Google Analytics 4 Property
Out of the gate, a Google Analytics 4 property automatically tracks the following events:
- first_visit. This is the first time a user visits a website or launches an app.
- session_start. When a user engages with the app or website and starts a new session.
- user_engagement. This event is fired 10 seconds after the visitor has stayed on a page.
Recommended adjustments to make:
- Increase Data Retention Time.
Under “Data Settings,” select “Data Retention” and select “14 months” from the drop-down menu.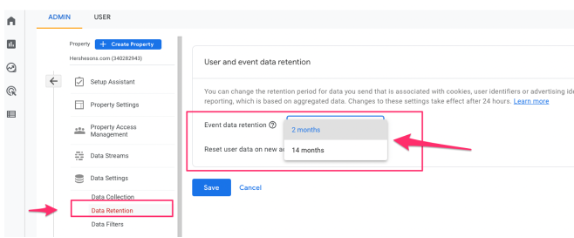
- Turn on “Enhanced Measurement.”
Under “Data Streams,” toggle on “Enhanced Measurements.”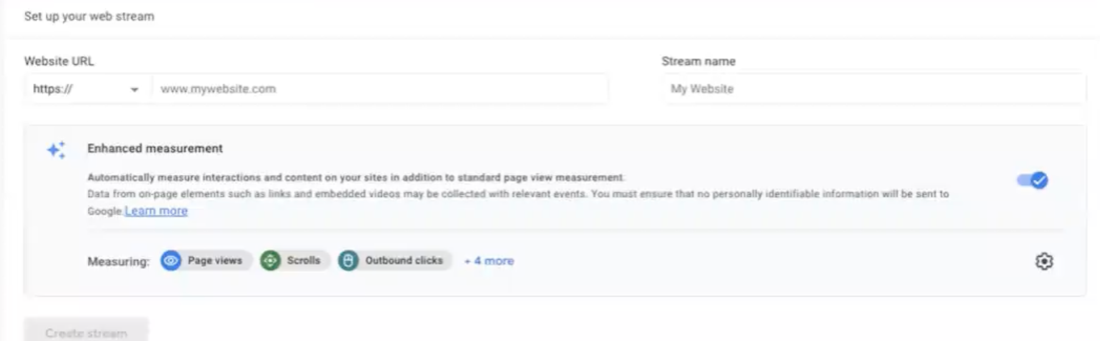
- Increase user engagement time.
Under “Settings,” select “Adjust Session Timeout.” Increase “Adjust timer for engaged sessions” to 20 or 30 seconds.
- Edit “Site Search” to correctly track internal search queries.
Click “Show Advanced Settings.”- For Drupal sites, enter “Keys” in the Keyword Parameter Query field.
- For WordPress, enter “s” in the Keyword Parameter Query field.
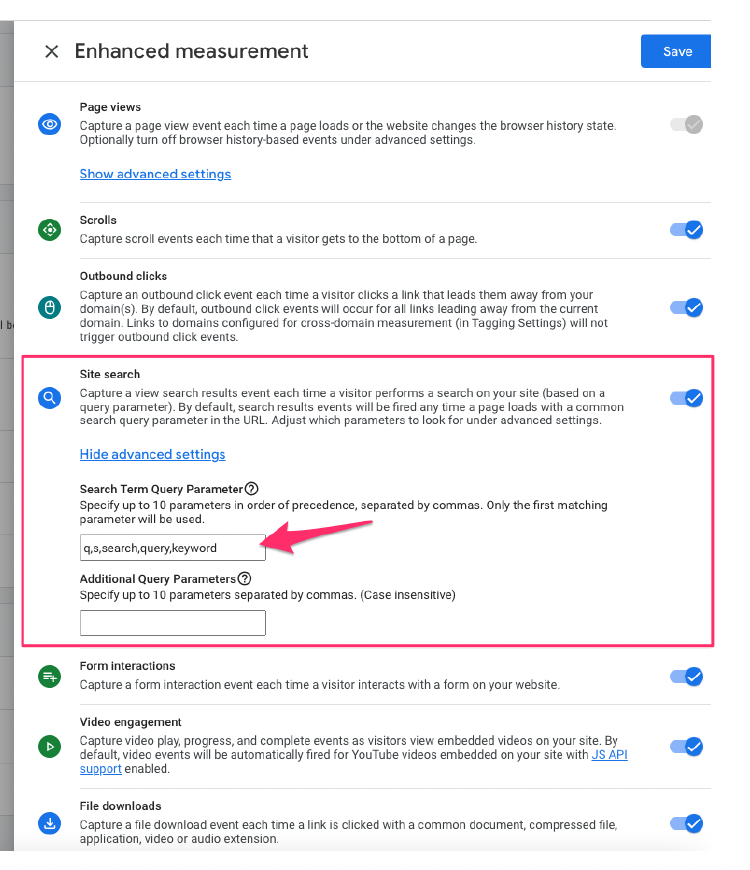
- Edit “Video Engagement” if you use Vimeo on your site.
You’ll need to edit “Video Engagement,” as it automatically measures YouTube videos, but not Vimeo.
- Measure Different Scroll Depths
To adjust the scroll depth in your GA4 account, follow these instructions: GA4 Scroll Depth.
Chapter 6: Check and Verify
Once you’ve completed all the steps above and updated your configurations, check Google Analytics in 24 hours to make sure the data is being collected properly.
Accessing BuzzAPI v3 Using PHP and Curl
Accessing BuzzAPI v3 Using PHP and Curl
<?php

$username = 'USERNAME';
$password = 'PASSWORD';
$apiURL = "https://api.gatech.edu/apiv3/";
$schema = 'central.academics.course_catalog.classes';

$ch = curl_init();

curl_setopt($ch, CURLOPT_URL, $apiURL . $schema . '/search');
curl_setopt($ch, CURLOPT_HTTPHEADER, array("Content-Type: application/json"));
curl_setopt($ch, CURLOPT_POST, TRUE);
curl_setopt($ch, CURLOPT_POSTFIELDS, json_encode(array('api_app_id' => $username, 'api_app_password' => $password, 'api_request_mode' => 'sync', 'term_code' => '201805')));
curl_setopt($ch, CURLOPT_RETURNTRANSFER, TRUE);

$results = curl_exec($ch);

print_r($results);
LDAP (Lightweight Directory Access Protocol)
LDAP (Lightweight Directory Access Protocol)This section contains information about Georgia Tech's LDAP system and ways of accessing it.
LDAP Sub-Topics
Finding GT Accounts Using the Public LDAP Server
Finding GT Accounts Using the Public LDAP Server afrank30Example code of how to retrieve a person's gtaccount (gburdell1) using command line.
Start command
For each of the examples given below, the command will start with this line:
ldapsearch -x -LLL -h whitepages.gatech.edu -b "dc=whitepages,dc=gatech,dc=edu"
For example,
ldapsearch -x -LLL -h whitepages.gatech.edu -b "dc=whitepages,dc=gatech,dc=edu" mail=george.p.burdell@gatech.edu
Use email to find gtaccount
mail=george.p.burdell@gatech.edu
Use unique given or first name
givenName=Adelle
Use unique family/last or surname
sn=Vuchatu
Use part of full name
cn="*Frank,A*"
OR
cn="*Adelle*"
Other ldap variables
Whitepages also lets you narrow your search using other values, such as:
building: William C Wardlaw CentertelephoneNumber: 404-385-4275displayNameORcn: Burdell,George Ptitle: Web Developer Sr [job title]objectClass: luPersonprimaryUidORuid: gburdell1postalAddress: 0181 [campus mail code]ou: Institute Communications [department]
Sensitive Data Considerations
Sensitive Data Considerations afrank30This section provides information and links to policies, checklists, and best-practices about storing and transmitting data that might be sensitive (FERPA, HIPAA, SSN, birthdates, etc).
Social Media (Facebook, Twitter, etc.)
Social Media (Facebook, Twitter, etc.)Social media services are very popular these days and can be a big help in connecting with your desired audience. Setting up and managing a social media account is beyond the scope of this article, but below you will find documentation on integrating social media into your websites.
Pulling Social Media into Sites
There are various tools available for integrating Facebook into a website. Some plugins or modules will let you enter the ID number of a page and can then pull in the posts from that page, showing them on a dynamically generated page of your website (quite commonly the front page). It is also possible for a Facebook page administrator to generate a widget (a short blob of HTML and/or JavaScript code) that can be pasted into a website to embed a series of recent posts from that Facebook page.
Embedding directly from Facebook using their code is likely to be the most stable method in the long-term, but does require both access to the Facebook page (to generate the embed code), and the ability to post pure HTML and JavaScript to the website in question (some Drupal site configurations on campus disallow this by default).
Do note that in early 2018 Facebook placed much stronger restrictions on public access to feeds, breaking many older plugins and modules that let you provide Facebook feeds on websites. If you are looking at modules or plugins for this purpose, make sure they've been updated by the maintainer since April of 2018, and be aware that some features you used to be able to use prior to the spring of 2018 are no longer available.
Twitter/X
Everything mentioned for Facebook in the previous section applies to Twitter with one bonus: anyone can generate embed code for any publicly visible Twitter account. Just visit the Twitter Publication site, enter the ID of the account you want to embed a timeline from, and follow the resulting instructions.
Editor's note: Twitter has evolved greatly over the course of 2023, and most embed tools no longer work with Twitter.
Other Social Media Integrations
Two other social media integrations are possible: pushing posts to social media accounts, and providing "share to" buttons on your site.
Pushing posts to social media requires a module or plugin specific to the content management system you are using. When configured correctly, you would be able to make a new blog-style post to your website, and it would be automatically copied to the associated social media account. In theory, you can set up multiple integrations of this type as long as you can find a suitable module or plugin for each social media service with which you want to integrate.
Adding "share to" buttons is a bit easier, and could be done manually on each page. However, since this takes a lot of time and effort, there are modules and plugins to add these buttons for you. Just search in the plugin or module repository for your content system on the phrase "Share to XXX" where "XXX" is the name of the social media service you use.
Social Media Caveats
It should go without saying that social media services can update their systems and APIs at any time. Usually they will give plenty of warning, but ultimately it's their network and they can change it as they wish (see the caveat about Facebook and Twitter/X above as an example). When such changes occur, expect to have to update any associated modules or plugins, which may stop working until you do update them. There's a greater chance that embeds generated directly from the social media service will be supported indefinitely, but even they may have to eventually be updated if the service decides to completely end support for an older API that they are using.
The other caveat is to remember (and to warn your stakeholders) that pulling from (or pushing to) social media is a matter of dealing with an outside service not controlled by Georgia Tech, so it is subject to downtime by the service provider or network failures anywhere along the way. Thus, it is to be expected that embeded social media feeds may not show up correctly 100% of the time.
Recommended Systems and Services
Recommended Systems and ServicesThis section contains information on web related systems and services recommended by the campus IT administration or your fellow campus web developers.
Note: OIT Web Hosting now has its own section (Web Hosting Solutions) in the handbook.
Recommended Systems and Services Sub-Topics
Georgia Tech Mercury: News and Events Aggregation
Georgia Tech Mercury: News and Events AggregationMercury (Hg) is a central repository for sharing events and news at Georgia Tech. It can provide news and events feeds to websites hosted on our campus web servers within the campus network, but cannot provide feeds to off-campus servers.
The basic concept for using Mercury is that a campus unit will have a news and events group created on the Mercury server. The unit can then add the Mercury Hg Reader module to their website to pull news and events from their Mercury group and display those items on their web pages.
Ample documentation on Mercury can be found in the Mercury Site's Help Section.
Conference Website Solutions
Conference Website SolutionsThere are multiple services, platforms, and options for developing a conference/event registration website. A few examples are listed below.
Please be aware that regardless of the option you use for your conference information and registration website, you must use the Bursar's TouchNet system to process any payment collections! Georgia Tech units are not allowed to use any other payment processors. The Bursar's Marketplace (see below) is integrated with TouchNet, and other systems can be integrated as well, but may require a skilled developer to write and/or configure the necessary integration code or components.
Drupal Based Options
Standard Drupal Installation
Registration can be done via Qualtrics or WebForm, with email confirmations. Payment can then be forwarded to a Georgia Tech implementation of Touchnet’s Marketplace Upay site set up for the specific conference (see the Bursar's website for full details.)
Non-Drupal On Campus Options
Georgia Tech Professional Education Conference Services
Georgia Tech Professional Education (GTPE) offers full conference service planning for both on and offsite: including contracting, planning and registration management.
GTPE can help with conference management, planning and registration. They have an established registration management system that is integrated with the Touchnet payment gateway. While their service is not free, contracting with GTPE to provide these services for your event may save you a significant amount of time and headaches. Please contact GTPE at 404-385-3500 if you are interested and request to be directed to our conference management manager to help get you started.
OpenConf
- Just for conferences
- Commercial (fee-based) product with a free (with restrictions and not truly open source) community version
Bursar's Marketplace
- On-campus resource
- Only approved option for collecting payments of any kind from anyone
Forms and Surveys
Forms and SurveysThis page details recommended services and applications for forms, surveys, and questionnaires.
Qualtrics
Qualtrics is a hosted commercial survey solution that has been licensed by Georgia Tech for campus use.
More information is available on the Qualtrics support site.
Protect your survey with GT Login.
LimeSurvey
LimeSurvey is available on OIT Webhosting via Installatron.
Georgia Tech-only access to Qualtrics survey
Georgia Tech-only access to Qualtrics surveyQualtrics allows for a form to be locked to only Georgia Tech user access through single-sign on (SSO).
To enable this, follow the directions below.
Enable Georgia Tech Login
- Navigate to Qualtrics and edit a survey.
- Under Survey Flow, select 'Add a New Element Here' and select Authenticator.
- Authentication type: SSO
- Check 'Capture respondent identifying info'.
- Configure "Embedded data set" to 'userid' and "Field from SSO" to 'username'.
- SSO type: CAS
- Hostname: sso.gatech.edu
- Port: 443
- URI: cas
- Click "Apply" in lower right corner.
Click Test CAS Connection to test the configuration values.
After adding the SSO configuration, move the 'Display Form' block to the success branch on successful authentication, so that the form only displays after SSO.
Using Data from Shibboleth/SAML Attributes
As part of the configuration for Qualtrics SSO, selected attributes are released about the authenticated user when authenticated via Shibboleth/SAML. These can be automatically included as "Embedded Data" in survey responses, and also used to populate text in answers to questions or in instructional text. As of October 2021, the following attributes are released to Qualtrics: mail, uid, givenName, displayName, eduPersonPrincipalName, sn, cn. Additional information on these attributes can be found on IAM's documentation site.
To use any of these attributes in a survey, follow these steps:
- Navigate to Qualtrics and edit a survey.
- Under Survey Flow, select 'Add a New Element Here' and select Authenticator.
- Authentication type: SSO
- Check 'Capture respondent identifying info'.
- "Embedded Data to Set..." is an internal identifier used within your survey and can be set to anything
- "Field from SSO" is the SAML attribute name as provided from GT SSO (see list above)
- SSO type: Shibboleth
- Example: Collecting displayName (e.g. George P Burdell) and mail (user's primary email address as set in Passport, e.g. george.burdell@gatech.edu)
- Click Apply to save changes
- To use these attributes in your survey, go back to the Builder tab and select one of your questions.
- Example: Populating name as a default answer to a text field
- In the Edit Question dialog on the left of the page, click Default choices.
- A modal should appear. Click the blue dropdown icon and select Embedded Data Field.
- Another dropdown should appear. Any attributes you configured in the authenticator should appear in the list. Select the one you wish to use for this field, then click Insert.
- Click Save to save the default value.
- After publishing the survey, that field will be automatically pre-filled with the user's display name.

Configure Survey Actions
Next, configure the survey access permissions.
- Navigate to Qualtrics and edit a survey.
- Click Survey Options.
- Select how you would like access to the survey:
- Open Access: Any Georgia Tech user account can access and complete the survey if they have the submission URL.
- By Invitation Only: Only invited Georgia Tech user accounts can submit a survey response.
- Click Save to save changes.
Short URLs with Georgia Tech Bitly (bit.ly)
Short URLs with Georgia Tech Bitly (bit.ly)Georgia Tech maintains a subscription to the Bitly whereby any ".gatech.edu" link submitted to the Bitly service will be shortened to a Georgia Tech branded bit link. Learn how to make a short, Georgia Tech branded web address using bit.ly.
Process
From the Georgia Tech ServiceNow FAQ:
Summary: Browse to https://bitly.com/. Paste in the "gatech.edu" based URL or the Office 365 URL you wish to shorten. Click "Shorten". Your Georgia Tech branded shortened link will be displayed to you, and you should click on "Copy" to copy it to your clipboard.
Detailed Process
- Browse to the Bit.Ly site: https://bitly.com/.
- Paste in the "gatech.edu" based URL or the Office 365 URL you wish to shorten.
- Click "Shorten".
- Your Georgia Tech branded shortened link will be displayed to you, and you should click on "Copy" to copy it to your clipboard.
Notes
- This procedure can be used for any 'gatech.edu' based URL or any URL from Office 365 OneDrive or SharePoint Online.
- You should record this shorten URL as you will not be able to retrieve it later from Bitly, but you can always create another one.
- You can use this process for non-Georgia Tech websites as well, but you will not receive a Georgia Tech branded shortened URL.
Video Captioning and Audio Transcription Services
Video Captioning and Audio Transcription ServicesThese systems and services deal with transcription of audio content and captioning of video content, per Georgia Tech's requirements.
The groups, services, and providers below have worked with Georgia Tech previously or currently on transcription and captioning services.
- 3PlayMedia - This company has supplied a 3PlayMedia case study on captioning and transcription services with Georgia Tech Distance Learning.
- Center for Inclusive Design & Innovation - a Georgia Tech entity operated by the College of Design that provides accessibility support to the entire University System of Georgia. However, its services are also made available to entities outside of the university system on a subscription basis. More information is available on CIDI captioning and transcription services.
- AI Media (formerly ACS, formerly Educaption) - Recommended by the Institute Communications Special Event Planning team. For more information, contact Carmin Beardsley, Operations Manager. Phone: (800) 335-0911, ext 703. Email: carmin@acscaptions.com [contact information may be out-of-date]
- Rev.com - Rev.com has been utilized for video transcription and captioning and provides a Rev.com pricing sheet on their How It Works page.
- WReally Transcribe
- YouTube - YouTube can add transcripts and captions to each video. However, you should never use just the automated captioning service for video. For most audio, it is unusable and produces incorrect results.
YouTube provides a guide to creating transcriptions and captions to YouTube videos. You can add captions in three different ways:- Create new subtitles and captions from scratch.
- Transcribe the video on the fly.
- Import a text document with the transcript or captions.
Web Development
Web DevelopmentThis section contains content system agnostic web design and development documentation and knowledge.
Web Development Sub-Topics
Appearances and Themes
Appearances and ThemesThis section contains generic appearance and theme-related resources for web development on campus.
Please be sure to also see the Georgia Tech Web Branding Rules for Georgia Tech's specific website standards and requirements.
Appearance and Theme Sub-Topics
HTML/CSS Templates for Creating Georgia Tech Websites
HTML/CSS Templates for Creating Georgia Tech WebsitesYou can find a repo of a static HTML/CSS template for creating a Georgia Tech website available on the Georgia Tech GitHub page.
Access
The static Georgia Tech theme template is kept in the ICWebTeam GitHub account:
- https://github.gatech.edu/ICWebTeam/gt-static
You must have an active Georgia Tech user account (GTAccount) in order to view this repository.
Details
The markup and styling associated with this repository is ported from the Georgia Tech Drupal theme. This template serves as a starter-kit to help one follow Georgia Tech Website Brand Requirements when building a static Georgia Tech website or website in a content-management system other than Drupal.
Contact
If you have any questions about this repository, please contact webteam@gatech.edu. For technical issues, please post an issue to the repo.
Security
Security ma195This section has security related resources including authorization and authentication techniques, data encryption techniques, and security best practices.
Security Sub-Topics
Central Authentication Service (CAS)
Central Authentication Service (CAS)What is Central Authentication Service (CAS)?
From Wikipedia (Central Authentication Service):
The Central Authentication Service (CAS) is a single sign-on protocol for the web.[1] Its purpose is to permit a user to access multiple applications while providing their credentials (such as userid and password) only once. It also allows web applications to authenticate users without gaining access to a user's security credentials, such as a password. The name CAS also refers to a software package[1] that implements this protocol.
Georgia Tech implements the CAS service to allow campus members to easily log into campus websites using their GT Account Username and associated password. However, for a website to utilize CAS, it must be set up correctly, which usually means adding a module, plugin, or library, and configuring it to work with Georgia Tech's CAS servers.
- Setting up CAS for Drupal 7 and 8 - Georgia Tech Drupal Article
- Setting up CAS for WordPress
- Setting up CAS for a stand-alone PHP application
- Setting up CAS for a static website on OIT Web Hosting - OIT FAQ Article
CAS Sub-Topics
CAS and Stand-Alone PHP Applications
CAS and Stand-Alone PHP ApplicationsThe most common approach for adding Central Authentication Service (CAS) support to a custom stand-alone PHP application is through the phpCAS Library. As of April 2024, the most recent version was phpCAS 1.6.1. Note: If you are using an earlier version you should upgrade as soon as possible to obtain the latest security patches.
The basic approach to using the library is to:
- Unpack it into a subdirectory of your application
- Require the library's main file,
CAS.php - Add the appropriate calls to it before your application does anything that requires the user's identity to be known
It is preferable to store the user's identity in a session cookie for later accesses, so that you are not authenticating the user against the CAS server on every single page access.
The phpCAS documentation has an example of a really simple phpCAS implementation. More information on using phpCAS can be found in the documentation library.
You will also need the campus CAS Server configuration settings.
Note: You would not utilize phpCAS in this manner if you are wanting to add CAS authentication to most content management systems (CMSs), such as Drupal or WordPress. Instead, you should look for a CAS module or plugin for your particular CMS, and use it. These modules and plugins are designed to integrate CAS into the CMS's user management system to give you proper security and a good end user experience. Not every CMS will have a CAS module, but most of the popular CMS's will. If you can't find a CAS module for the CMS you are using, you could look at it's module/plugin API and see if you can write your own module or plugin to integrate phpCAS, but this requires a fairly advanced knowledge of PHP programming, the CMS in question, and the CAS protocol or the phpCAS library.
CAS for WordPress Websites
CAS for WordPress WebsitesRecommended Option
If you want to utilize GT Account based authentication via CAS for a WordPress website, it is highly recommended that you try using the Sites @ Georgia Tech service, which has GT Account authentication already built in. Once you have your site created, it is very easy to add other users to the site, who can then log in using their own GT Account Username and password.
Alternative Option
If you have an already established WordPress site on OIT Web Hosting or another on-campus hosting solution where you are able to install plugins, and you don't want to recreate your site in the Sites @ Georgia Tech service, there is a plugin that supports CAS authentication: Authorizer.
After installing the plugin, read the instructions carefully and configure it using the campus CAS Server configuration settings.
Converting a Website to SSL (https://)
Converting a Website to SSL (https://)With changes to web browsers (Chrome in particular) coming soon that will mark non-SSL (http://) websites as Not secure, now is the time to consider upgrading your site to SSL encryption. The first part is getting an SSL certificate and adding it to your hosting account. However, you also have to check through and adjust your site for optimal results.
In most cases, switching to SSL will not outright break a site, but its not impossible in some cases:
-
Chrome and possibly some other browsers will not show a non-SSL page in an IFRAME of an SSL page. Unlike other types of security issues, Chrome will not let the user bypass or ignore the issue on non-SSL page in an IFRAME, so the user will be completely blocked from getting to the IFRAMEd content.
-
Custom code might break if it dissects page URLs and doesn't treat "http://" and "https://" as the same site, or has been coded to only work with http:// URLs.
The more common issue is a page being flagged as having mixed content, which means that something included on an SSL encrypted page (an image, a video embed, a CSS file, a JavaScript file, etc.) is being loaded from a non-encrypted site. A lot of times, this is due to a local resource having been added to the page with a fully qualified URL (e.g. http://foobar.gatech.edu/styles.css) instead of using a relative URL (e.g. /styles.css). Updating those URLs will fix the problem, though finding them can be a challenge. Getting comfortable with your favorite browser's development inspector can help a lot, as many have a Network feature to let you see all of the files being loaded by the page and which ones were SSL encrypted and which ones were not.
There are other places you should check to optimize your site:
-
Menu bars often have fully qualified links added to them, so check for ones that can either be shortened to a relative link or updated from "http://" to "https://"
-
Redirects in
.htaccessfiles are sometimes entered as fully qualified links. Once again, they should be made relative or updated from "http://" to "https://". If your content management system has its own redirection system (e.g. the Drupal 7/8 Redirect module), you may need to check its tables for URLs that need to be updated in the same way.
Certain applications may need a little assistance:
- WordPress has two settings on the General settings page: WordPress Address (URL) and Site Address (URL). Both need to be updated to begin with "https://"
In most cases, you'll not only want to clean up the links and settings of your site, but also redirect all of your non-SSL traffic to your SSL site, and content systems don't typically handle this for you. To cover all of your bases, it's good to add the following to your site's .htaccess file, ahead of any other Rewrite Engine rules:
RewriteEngine on
# This forces the visitor to the non-www.* address *before* forcing them to SSL
RewriteCond %{HTTP_HOST} ^www\.(.+)$ [NC]
RewriteRule ^ https://%1%{REQUEST_URI} [L,R=301]
# This checks to make sure the connection is not already HTTPS
RewriteCond %{HTTPS} !=on
# This rule will redirect users from their original location, to the same location but using HTTPS.
RewriteRule ^/?(.*) https://%{SERVER_NAME}/$1 [R,L]
One final tip: if you control any other websites that link to the site you're upgrading, you should go into them and update those links from "http://" to "https://", and also make sure they're using the version of your site's domain name that matches your SSL certificate (in most cases, this will be a version without "www." at the beginning.)
SSL Encryption
SSL EncryptionSSL encryption (technically Transport Layer Security, but still commonly referenced as SSL, the acronym for its now deprecated predecessor) is a protocol for encrypting communications between a web browser and a web server. Encrypted connections (denoted by a web URL starting with 'https://') are not easily monitored by third parties unlike unencrypted connections (denoted by a web URL starting with 'http://'), where all content can be easily viewed by anyone with access to some part of the connection path. SSL works through a system of public-key cryptography, and is intended to not only keep communications private, but to also help ensure that you are actually communicating with the right server and not a hacker's rogue server that is merely impersonating a legitimate server.
By default, SSL is provided and available on OIT Webhosting, and can be enabled other types of on-campus web hosting where you or your information technology support staff have low-level management access to the web server.
SSL Certificates
In order to enable SSL encryption for a website, you need to have an SSL certificate that securely identifies that your server is the genuine server for your website's domain name. There are many possibilities for obtaining an SSL certificate – too many to list here.
Presently, Georgia Tech is a member of InCommon, a collective of universities which have pooled resources. This means campus units can get SSL certificates for free. Usually one person in a department, college and/or school has the ability to request and issue certificates. Ask your information technology support staff for assistance if you need a certificate for a web site.
InCommon Certificate Caveats
- Georgia Tech's InCommon account can issue certificates for sub domains of Georgia Tech (addresses that end in .gatech.edu) as well as non-Georgia Tech domains. If you need a certificate for a non-Georgia Tech domain, you will need to contact the InCommon admins who will assist with granting authority to sign the non-Georgia Tech domain, and provide instructions on verifying the ownership of the non-Georgia Tech domain. This is usually accomplished by uploading a unique key file to your site's docroot for verification.
- If your site is on OIT Web Hosting, you may not need a certificate, as web hosting has a 'wildcard' / multi-site certificate that covers a lot of common Georgia Tech sub domains, and they are often willing to add additional Georgia Tech sub domains if you ask. Please see the OIT FAQ Article on SSL Certificates and Web Hosting for more information.
- As of now OIT Web Hosting only allows creation of 2048 bit certificates. Most security standards now call for a minimum of 4096 bit SSL certificates.
Other Types of SSL Certificates
Before InCommon, there were several options for SSL certificates. You may stumble across them:
- Paid SSL certificates - Issued by GoDaddy, Thawte, Comodo and others.
- Self signed certificates - Generated and signed on the server that hosts them. These are fine for development, but should never be used in production, as users will get a certificate error message in their browser when accessing a site with a self-signed certificate.
- Georgia Tech Signed certificates - For many years, Georgia Tech had its own root certificate. It's no longer used, but may still be on systems. If you find this, you should remove it, as the root certificate has expired, as have any certificates signed by that root certificate.
Implementing SSL Encryption
Security Best Practices
Security Best PracticesPatch, Patch, Patch
The most important security practice for web application software is to keep up with your software patches. The more commonly used the application, the greater a chance that someone out there is looking for insecure installations to hack.
Systems like Drupal and WordPress are so popular that you need to be prepared to deploy security patches for them just as soon as they come out. If your hosting server is running Installatron, you can configure it to automatically install many of these updates. If you don't have Installatron, you can still configure WordPress to automatically install new updates on its own. Drupal, unfortunately, requires manual intervention if you don't have an outside tool like Installatron, but modules can usually be updated from within the application. Drupal core updates have to be installed from the command line or from a web hosting file manager control panel.
Non-security patches can be important, too, but should be tested more thoroughly before deployment since they could break things. (Security patches could break things, too, but sometimes it may be better to break a small feature of your site temporarily than to leave it susceptible to a known vulnerability.)
Lock Down Site Access
Securing the back doors to your site is pointless if you leave the front door wide open. Make sure you have configured your web application properly so that only the proper authorized people can access it.
- Consider user roles carefully and don't give out more access privileges than are necessary.
- Audit user access lists and remove users who no longer need access (employees who no longer work for your unit, students who have graduated, anyone who has moved to a different role that doesn't need to use the application.)
- Besides auditing access lists within web applications, also audit the access lists for their server hosting accounts as well. Make sure that the people with access to administer those accounts still have reason to be doing so. Take old developers off of these accounts if they aren't actively working for you, even if you think you'll bring them back in later, and remove anyone who has left Georgia Tech, as they could potentially still be able to get to your hosting account even after many of their standard IT privileges have expired.
- If you implement a configuration where anyone with a GT Account can log into your application, be very careful about what you make available to these 'regular' users. Keep in mind that when you include all GT Accounts, you include all guest users, outside vendors and developers who are doing work for Georgia Tech units, retirees, alumni, etc. That's a pretty big pool of people. If you really don't need to include all of those people, look into options for validating that someone logging in is a current faculty/staff member or student.
- If you add custom security modules to content systems like Drupal and WordPress, don't just assume they work as you have configured them: open a different browser and test to make sure a non-logged in user really can't get to the content you are trying to protect. A security configuration that doesn't actually work is worthless.
Run a Tight Ship
Module and plugin based applications like Drupal and WordPress have one distinct downside: not all modules and plugins are created equal, and poorly written and managed ones can put your application at risk.
Before installing a module or plugin, review it carefully. Avoid ones that do not have active support, ones that haven't been updated in several years, and ones that have never left alpha/beta status. It's usually better to tell a stakeholder that there's nothing available to provide a certain functionality than to offer up a module or plugin that isn't stable and risks introducing security holes. It's also far better to say no up front than to try something that stakeholders get used to, only to later discover a serious uncorrectable problem that necessitates removing the plugin/module.
Avoid Frankensites
What's a Frankensite? It's a module/plugin based web application where so many extra components have been added to it that it's impossible to properly audit the functionality of the site. Upgrading these sites can either become impossible, or strokes of pure luck if a major update doesn't break several things at once.
When any kind of complex functionality is required, look at abstracting that functionality out to a separate application that can run in parallel with the main application. For example, if you are running a Drupal site and your stakeholders want a nice photo album, don't load up the Drupal site with the half-dozen extra modules needed to make a barely functional internal photo album system. Instead, set up a copy of ZenPhoto, which is designed from the ground up to handle photo albums. Or, suggest the usage of a hosted in-the-cloud system. Any of these options will keep your main website application from turning into an unmanageable Frankensite.
(Setting up multiple applications may seem like more work at first glance, but it's far less work in the long run, as you'll be able to streamline the installation of updates, not to mention that you can update the secondary applications one at a time without having to bring down any others or the main application/site.)
Enable and Monitor Security Logs
Many applications and all hosting account systems will log different kinds of activity related to your web application. While a lot of these logs may seem unreadable to the untrained person, they could still be invaluable should a problem arise - especially a security incident. It's a good idea to keep these logs around for at least six months, and even longer if your application handles any sensitive data. Check the Georgia Tech data security policy to find institute requirements and recommendations for log retention.
When possible, sending logs to a remote server is a really good idea, as that prevents those remote copies from being modified by a hacker who gets too far into your web server.
Make Regular Site Backups
Nothing is worse than having a site crash without a recent backup available. Whether the crash was due to a patch gone bad or a hacker getting into the site, being able to restore the site to a previously known good state is critical. Here are some recommended guidelines for handling backups:
- For all sites, run a full backup once a week, and for important sites, also run an incremental backup daily.
- Store backups in a safe location, ideally on a remote server. If possible, configure your infrastructure so that the web server can't modify a backup once it's been written to the remote server, so that a hacker who breaks into the web server can't delete your backups.
- TEST your backups! Far too many a systems administrator has been bitten hard by backup files that were corrupted, missing important components, or even just plain missing because the backup process didn't write out the files as expected. After running your first backup, download the files and try to recreate the website in a test environment to make sure you have a complete backup of the site. And, don't forget to check the backup archives periodically to make sure they're still functioning as you expect.
- Be sure to cycle out old backup files periodically, so that your backup system doesn't run out of disk space. This is yet another way to discover that you have no recent backups when you need them the most.
Install and Utilize Security Tools
Some applications may have third-party tools to help you monitor for security problems. A good, reliable security tool can block many types of known attacks, stop brute-force login attempts, log more details about accesses to the site, and/or point out configuration settings that you ought to change to make the site more secure.
Since every application is unique, you'll have to research the available security tools that work with a specific applications. Be sure to look at how well respected the tool is within the user community, as that will give you an idea of how safe and reliable it will be.
There are also server level security tools that you can utilize, such as Web Application Firewalls (WAFs). These have to be installed by a server administrator, but can add an extra layer of protection beyond the tools available for the specific application(s) you are running. The OIT Web Hosting servers all run a WAF that protects their hosting accounts by filtering any requests coming from off-campus.
Write Safe Code
If you are coding applications for the web or even just coding modules / plugins / themes for existing applications, take the time to write safe code:
- Sanitize any user input that you utilize to deter hackers from running malicious commands by submitting carefully crafted values into a form field.
- Use proper security wrapping methods to make sure that authorization is being checked properly before the execution of any higher level command.
- Avoid putting in a backdoor "just for testing", as it can be all too easy to forget to remove it later. If you must use one, document it boldly and clearly so that it's easy to detect when you review the code later.
- Do carefully review your code before putting it into production, and even better, have someone else review it as well, since they might catch bugs that aren't obvious to you.
- Always keep a copy of your code on a separate server, so that if your development or production servers get hacked, you can run a code comparison to your protected code to see if anything was changed by the hackers.
Clean Up After Yourself
Leaving junk behind in your public web hosting account directories can cause multiple problems, so keep your public directories clean:
- When installing code updates, keep the installers out of your public directories, or at least move them out once you are finished with the update. If your hosting account doesn't already have a private directory, create one and use it for installers, backups, etc.
- If you edit live code, don't leave any backup copies in the live directories. If you need to make a backup of a file before editing it, put the copy in a private directory. There are many ways in which an improperly named backup file could accidentally expose the program code to a hacker, and depending on the file, this could expose internal user account credentials, shared secrets, or internal server names, all of which could be quite valuable to a hacker.
- If you run a major update and want to move your current installation to a different folder, once again move it somewhere inside a private (non-public) directory, especially if there is no need to be able to access the old installation over the web. If you do need to leave the old installation up temporarily, plan a date at which it will be shut down, and if at all possible, firewall that directory for the interim to just on-campus IP addresses (or if possible, just IP addresses for your local unit). Old installations usually never get patched, and thus can become huge forgotten security holes if left publicly accessible over the web.
- Security precautions aside, keeping your public web directories neatly cleaned up will help you in many other ways, including making it easier to debug problems and in some cases even speeding up application performance.
Suppliers and Contracts
Suppliers and Contracts esembrat3This section covers all aspects of having websites created or managed by someone outside of your Georgia Tech unit, such as hiring a consultant from another part of campus, or using an outside web development company.
Suppliers and Contracts Sub-Topics
Georgia Tech Web Contract
Georgia Tech Web ContractFor those considering hiring a third party for their website work, Georgia Tech has an enterprise-wide contract in place that allows you to quickly get estimates from a group of pre-approved vendors.
In March 2020, the Institute finalized two enterprise-wide contracts for web projects:
- One for projects less than $50K.
- One for projects greater than $50K.
These contracts include a number of fully vetted vendors with a broad range of skillsets in owned digital. Every Georgia Tech unit seeking third-party website support must use a vendor from one of the enterprise-wide web contracts.
For more information, refer to: How to Hire a Website Vendor.
A Layman's Guide to Working With a Website Developer
A Layman's Guide to Working With a Website DeveloperOnce you have selected a developer or development company to rebuild your unit's website, you'll need to give them access to your existing website and in many cases a development workspace. The information below will help guide you through this process. Note: if you are using a student developer or hiring a tech temp, then you can skip the parts about setting up a GT Account Username, as these individuals will have their own GT Account username. Simply have them tell you what their GT Account username is and follow the instructions for adding it to the appropriate web hosting services and accounts.
Development Space
Your selected development company is going to need access to your existing website as well as to a space in which to develop your new website.
While some developers may prefer to do most of their work in their own development environment, we highly recommend having them test their work in a Georgia Tech web hosting space that is as similar to your existing hosting space as possible. This will avoid unnecessary downtime when it comes time to put the new website into place.
If your website is on OIT Web Hosting, then we recommend that you put in a request to OIT to create a second Web Hosting account on the same server, configured the same way. You can then have your developer load their work into that second account and test it there to make sure it will work on OIT's systems. Once they have confirmed that everything is working, you can then tackle the final steps for replacing the old site with the new one.
If your website is on Sites @ Georgia Tech, you can and should request an new site in which to allow the development company to do their building work. Unlike with other content management systems, with Sites @ Georgia Tech the developers will have to do their development directly on Sites @ Georgia Tech, as it is not practical to try to build the site somewhere else and then copy it to Sites @ Georgia Tech. Once the new site is ready to launch, you can work with OIT to repoint your current website domain name to the new site.
Access to the Current and New Web Hosting Spaces
If your current website is on any web hosting service managed by OIT, then at a minimum, your development company will need a guest GT Account Username to access the OIT Web Hosting control panels for your hosting accounts (the current account and the account for testing the new website). You can use PASSPORT to create this guest user account, which could be shared among individual developers working on your project. If you have questions about creating this account, please see your local IT support staff.
OIT Web Hosting
If your current website is on OIT Web Hosting then there are several factors to consider in providing access to your developer.
Once you have set up a GT Account Username for your development company, you will need to give it access to your sites Plesk Control Panels. Instructions are available for adding new administrators - please be sure to only add your developer's account as an 'administrator' and not as an 'owner'. Be sure to give the account access to both the original hosting site and the new site that you create for testing purposes.
The developers may wish to use a service called SSH to upload their files to either OIT Web Hosting account. If anyone in your unit is using this service with your current website, then you will need to coordinate with that person, as there is a single SSH password for the account. It is possible to use a token called an SSH key in lieu of the password. If your developer asks you to add their SSH key to one or both hosting accounts, you can refer to our instructions for managing SSH Key access to your hosting account.
If your existing website is in a content management system (Drupal, WordPress, etc.) then you'll want to give the developers access to the content system itself. This is a separate process from giving access to the web hosting account.
- For Drupal, log into the site as a user with administrator privileges, then navigate to People -> Add CAS User on the black administrative toolbar.
- For Wordpress, Instructions are available for adding users to WordPress sites.
- For other content systems, please consult the documentation for that particular system.
Finally, to access Plesk Control Panels or to access a hosting account via SSH, the developers will need VPN access. This comes automatically with any GT Account Username, but you should direct the developers to OIT's VPN instructions for using the campus VPN and installing the appropriate VPN client.
Sites @ Georgia Tech WordPress Hosting
If your current site is on Sites @ Georgia Tech and your updated site is going to remain on Sites @ Georgia Tech, then setting up your development company is a little easier.
Once you have set up a GT Account Username for your development company, you will need to give it access to your WordPress site. Log into Sites @ Georgia Tech, navigate into the administrative interface for the site in question, and go to the Users option. From there, add the GT Account Username that you created and make it an Administrator.
That's it! Accessing Sites @ Georgia Tech does not require any further configuration, and does not require use of the VPN either.
Cleaning Up After Development is Complete
Once your contract with your development company is complete and all deliverables are delivered, you need to make sure their access to your websites is turned off. A few key places to check and review:
-
Review the SSH Keys for the hosting account and delete any that belong to your developers.
-
Log into your website and check the website content management system user list. Delete or disable any accounts associated with your development company.
- Log into PASSPORT and disable the developer's Guest User Account. (Note: the person who created the guest user account must do this. If that person is no longer available, contact your local IT support for assistance.
On-Campus Contract Work
On-Campus Contract WorkOn-campus web developers can, in some cases, serve as contractors for on-campus web work.
Important Notes
- Please note that is strongly advised that you receive direct agreement from your supervisor and the hiring unit's leadership before beginning work.
- To simplify the process, the best practice is to complete this work outside of the employee's regular working hours.
Employee Policy
5.3.2 Extra Compensation:
Extra compensation may be paid to employees for tasks performed after normal business hours for duties not included in the employee’s normal job responsibilities, provided the following three criteria are met:
-
The tasks must be outside of the employee’s regular department.
-
The Departmental Agreement Form, must be completed and signed by the appropriate department heads. Departmental Agreement Form
-
The employee must meet at least one of the criteria listed below (Criteria from the Official Code of Georgia Annotated Section 45-10-25):
- Chaplain
- Fireman
- Dentist
- Certified Oral or Manual Interpreter for Deaf Persons
- Registered Nurse
- Licensed Practical Nurse
- Psychologist
- Teacher or Instructor of an evening or night course or program
- Professional holding a doctoral or masters degree from an accredited college or university
- Part-time employee
Also, an employee meeting all three criteria listed above may be paid extra compensation for a task for another department during normal job hours if the task is not part of the employee’s normal job responsibilities, and the employee takes annual leave for the portion of time that is being used for the task receiving extra compensation.
Employees that have been determined by the institution to be non-exempt, as defined by the Fair Labor Standards Act (FLSA), and are performing extra duties could qualify for overtime pay. Non-exempt employees should be paid at least the overtime rate or more.
Examples of situations justifying the payment of extra compensation are:
-
An employee teaching a continuing education course after hours or while taking annual leave, when teaching the course is not part of the employee’s normal job responsibilities.
Note: This is allowable under the Official Code of Georgia Annotated Section 45-10-25, No. 15.
-
A part-time public safety officer working extra hours to referee a ball game.
Note: Georgia Code 45-10-25 does not apply to part time employees.
-
A staff member with a masters degree doing web design for another department.
Note: This is allowable if the required Departmental Agreement Form is completed and signed by the appropriate department heads.
GitHub Enterprise and Repository Management
GitHub Enterprise and Repository ManagementGit is a distributed version-control system for tracking changes in source code during software development. {Definition and links courtesy of Wikipedia}
Georgia Tech OIT supports a centrally managed server running the GitHub Enterprise software, which provides a web-based interface to the underlying Git application. Georgia Tech community members can create and maintain code repositories on the Georgia Tech GitHub server and easily share access with other members of the Georgia Tech community. (Note: you cannot share access with anyone who does not have a Georgia Tech user account).
This page contains information about the Georgia Tech campus GitHub Enterprise installation.
A Georgia Tech gitflow Process
A Georgia Tech gitflow ProcessA proposed workflow for how smaller teams can code collaboratively with git at Georgia Tech.
Defining Git
Git is an environment-agnostic version control system that allows teams or individuals to collaborate on projects in a distributed fashion. Git was created for the command line, but there are also GUI clients available.
Commits
Under the hood, git is powered by a tree of commits. Each commit tracks the difference between it and the previous commit in the tree. This saves tremendous space by storing only the changes and not the entire changed file.
Repositories
Repositories (repos) are a place where files and their histories are stored. Local repos are stored on your machine and/or the production server. The remote (origin) repo is an agreed-upon authoritative repository through which all changes flow. We use the GitHub.gatech.edu enterprise website to store our remote repos, as well as to manage their permissions and the code review process.
Branches
Central to git is the idea of branches. Each branch is just a pointer to a commit in a tree. So making a new branch is as cheap as initializing a pointer to the current commit, and updating that pointer (and only that pointer) when work is done on that branch. And because of the way git stores commits, storage for the work done on branches will be cheap too.
Branches are a way for collaborators to work together without all working on the same version of code. This allows for more advanced nonlinear workflow than a single stream of commits. It also allows for powerful administrative features such as code reviews, keeping the master (production) branch stable and testing new features without compromising that stability.
Pull requests
Pull requests are a GitHub-specific feature that encourages review of any code changes before they go live. It also gives administrators a chance to request changes or resolve conflicts before the final code is merged into the master branch.
Collaborative Workflow Overview
This workflow is based on the lightweight GitHub Flow system. This choice reflects our emphasis on less complexity for our small team, instead of focusing on a perfectly clean commit history.
In this system, all development (whether fixes or features) is done in branches and then merged back into the master/production branch when completed. Below is a sample timeline for the workflow of creating and implementing a new feature branch.
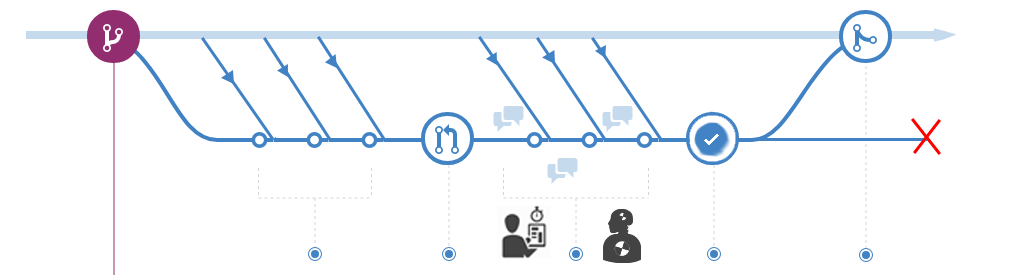
This workflow follows 5 rules:
-
The master branch is protected and should be kept deployable to production at all times. This is the most important rule. All code merged into master should first be thoroughly tested and reviewed. It is possible to revert the master branch, but this should be avoided whenever possible. Even if a hotfix is needed, verification of the fix should always be done in a branch. This is especially essential when our server is configured to automatically pull updates from the remote origin repo, meaning that any commit to master will quickly be made live.
-
Create separate branches off the latest master for each feature. Since branches are cheap, use one for every feature or fix. And, to ensure updated code, branch off of the current master.
-
Before every commit, pull the latest master and merge it into your local branch. One of the most challenging tasks in collaborative git is updating an existing file that needs to integrate divergent code changes from multiple developers. Merging the latest master branch into your local feature branch before every commit will largely prevent that by ensuring that any discrepancies in code are limited in scope and easily resolvable.
-
Constantly push all branches to the remote/origin repo. The remote repo isn’t just for maintaining the master branch: it can also store any other branches you are developing. This allows others to contribute to the individual branch you are working on (if you both are working on the same feature, for instance), as well as showing the current progress on each feature.
-
Use pull requests to add completed features to the master branch. Pull requests allow new features to be vetted by administrators before being added to production. Once a feature is in a mergeable state, a pull request allows discussion, review, and finally approval to get integrated into our live, master branch.
(Credit to Eli Trexler for putting together a lot of this content).
Connect Your Website to a GitHub Repo with SSH Keys
Connect Your Website to a GitHub Repo with SSH KeysLearn how to connect a repository on github.gatech.edu to a virtual host on a server (examples given for a RHEL7 server, but similar will work IF using at least OpenSSH version 5 or higher on your server).
Make SSH Keys on Server
- On your server, become the superuser (
sudo su). - Create a folder in which to store SSH keys (
mkdir /var/www/.ssh). - Create an SSH key pair on your server in that .ssh directory (
ssh-keygen -b 2048 -t rsa), and name the key for the virtual host (example: /var/www/.ssh/mysite). - Create a config file (
touch /var/www/.ssh/config) and add this code inside it:# mysite.gt Host mysite HostName github.gatech.edu PreferredAuthentications publickey IdentityFile /var/www/.ssh/mysite - Change the .ssh folder permissions (
chmod 700 /var/www/.ssh). - Change the .ssh folder ownership for use by apache (
chown -R apache:apache /var/www/.ssh). - Change ownership of the already-existing vhost's folder for use by apache (
chown -R apache:apache /var/www/vhosts/mysite.gatech.edu). - Copy the contents of the public key into your Text Editor of choice (
cat /var/www/.ssh/mysite.pub).
Add Deploy Key on Github
- Create your private repo on github.gatech.edu, under the appropriate departmental Team. Do not add any files (not even a README).
- Within your repo, click the Settings tab.
- Choose "Deploy keys" in the left side menu, and click on "Add deploy key"
- Give a descriptive title, like "Mysite server public key".
- Paste the public key you copied from your server into the "Key" area.
- If this is your initial copying of the repo from the server TO github, check "Allow write access", so that you can push to this github repo from your server.
- If you already have the initial copy of your files pulled from the server, you need to delete the old key and make a new one that does NOT allow write access (to improve the security setup).
- Click "Add key".
Connect your Server to Github
- Make sure git is running (
git --version). - Become the apache user (
su -s /bin/bash - apache). - You probably need to symlink the .ssh directory for the apache user, so that known_hosts is saved in the correct place.
- As the apache user, change to the home directory (
cd ~) - Find where that home directory is located (
pwd) - Make a symlink from your recently-created .ssh folder to apache's home directory location (
ln -s /var/www/.ssh /path/to/apache/home/.ssh).
- As the apache user, change to the home directory (
Existing Server Repository
If this vhost on your server already has a git repo initialized, follow these steps:
- Change to your vhost's folder (
cd /var/www/vhosts/mysite.cc.gatech.edu). - Use ssh not http to add the github repo as its origin, including the "Host" you created in the .ssh/config file as the url so that the server uses the correct ssh key to connect (
git remote add origin git@mysite:My-Dept/mysite.git). - Push your server's repo to github (
git push -u origin master). - Check the repo on github to make sure you see the commits from your server.
New Server Repository
If this vhost on your server does not yet have a git repo initialized, follow these steps:
- Change to the directory above your vhost (
cd /var/www/vhosts). - Use ssh not http to copy the repo from github to your server, including the "Host" you created in the .ssh/config file as the url so that the server uses the correct ssh key to connect (
git clone git@mysite:My-Dept/mysite.git mysite.gatech.edu). - Change to your vhost's folder (
cd /var/www/vhosts/mysite.gatech.edu). - Check the repo on your server to make sure you see the commits from github (
git log -n 1).
Configure protected master branch on Github (Under construction section)
Since you will be connecting the repo to a Production site, you need to protect the master branch on github, so that all changes pushed to it must go through an approval process before being merged into the master/production branch.
Customize .gitignore file
For a Drupal 7 site, add these lines to the repo's .gitignore file (as they should not be version controlled):
- sites/*/files
- sites/*/private
- sites/*/settings.php
Set cron to do a git pull as the apache user (Under construction section)
Example:0 */1 * * * cd /var/www/vhosts/mysite.gatech.edu && git pull >> /dev/null
Change File Permissions (Under construction section)
Often, the file and directory permissions on the server differ from your local development environment. You will need a cron job or automatic git-accompanying command so that, whenever it pulls updates from the remote repository, files and directories receive the correct ownership and permissions for the server.
For a Drupal 7 site, the defaults should be:
- user and group = apache:apache
- most directories = 755
- most files = 644
- not version controlled, so set it once and forget it:
- settings.php file = 444
- /sites/*/files = 777 (directory)
- /sites/*/files/* = 666 (files)
Connecting to GitHub Enterprise (command-line)
Connecting to GitHub Enterprise (command-line)Connecting to GitHub Enterprise at Georgia Tech, unlike Github.com, requires a few additional steps because GitHub Enterprise is not publicly accessible.
Please note that it is much easier to connect to GitHub Enterprise via GitHub Desktop, which natively supports enterprise installs like GitHub Enterprise at Georgia Tech.
To facilitate access to a repository in GitHub Enterprise at Georgia Tech, follow the directions below.
Setup
Derived from metroplus documentation.
- Generate a SSH key:
ssh-keygen -f ~/.ssh/filename-goes-here -b 4096
- Copy SSH key files onto your server of choice into ~/.ssh/, making sure that your private key is chmod to 0400.
- Add the SSH key to your GitHub Enterprise at Georgia Tech account.
- Establish SSH fingerprint for GitHub Enterprise at Georgia Tech:
ssh-keyscan github.gatech.edu >> ~/.ssh/known_hosts
- Edit (or create) file config in ~/.ssh/. This file is responsible for routing the generic git@github.gatech.edu account to the defined SSH key on the server and on Github. See below for an example config file.
Sample config file
host github.gatech.edu-identifying-text-here

 Host github.gatech.edu

 IdentityFile ~/.ssh/filename-goes-here

 User git
The above configuration routes git repository URLs for Host (github.gatech.edu) to check for the SSH key file under IdentityFile with the git account (User).
More Information
Site Development / Management Server Options
Site Development / Management Server OptionsWhether you are building sites from scratch or helping to maintain a production site, you are going to need some place to do your development work and test updates that need to be rolled out to your sites. You may even want to implement a pipeline process where you have development, test, and production versions of your sites.
What follows is a brief discussion of development server options
Local Development Site on a Desktop or Notebook
Several options exist for doing development on a regular computer (i.e. a workstation) that you use for general purposes. With Macintosh computers, you are already running a Unix style operating system with all of the components needed to do web services - they just aren't enabled by default. Linux based workstations are exactly the same. With any kind of standard computer (Windows, Macintosh, or Linux), there are also add-on applications that will let you create a Unix style environment for doing web site development and management. Some examples are:
- MAMP (Windows or Macintosh; free and commercial versions)
- Lando (Most major Operating Systems; free open-source)
Some upsides to a local development site are:
- Available on that computer regardless of network availability
- Full access to configure the instance as you wish (assuming you have admin rights to your computer)
- Local operations will run as quickly as your computer can support
Some downsides to a local development site are:
- To do development work, you have to have access to the particular computer that the site is on
- Transferring large sites to and from the production server may be slow
- Other developers cannot access your development site, since it's local to you
Development LAMP Virtual Machine on the Campus Network
As an alternative to a local development site on one of your workstation computers, your IT unit can help you get a LAMP (Linux, Apache, MySQL, PHP) virtual machine set up on the campus network that you can use for development. One LAMP server can host multiple development sites, so you probably only need a single development server regardless of how many sites you manage or expect to build.
Some upsides to a LAMP development server on the campus network are:
- Available from any workstation computer (desktop or notebook) you might be using
- Transferring large sites to and from the production server should be fast, as you won't be going outside the campus network
- Local operations will run as quickly as your virtual machine can support
- Other developers can access your development site, since it's on a shared server
Some downsides to a LAMP development server on the campus network are:
- To do development work, you have to have working network access
- Depending on your IT staff policies, you may not have full access to the virtual machine to configure everything yourself
If you're concerned about security, keep in mind that a LAMP virtual machine can be firewalled at the network level to just the campus and the VPN (or even tighter, if needed). You can also have your IT staff set up regular backups of your virtual machine so that the risk of losing anything is minimal - far less than if you are developing on a notebook computer.
Tips for Using a LAMP Development Virtual Machine
DNS Domains and Hostnames
Through Apache Virtual Host configurations, you can host as many sites as necessary on one LAMP server. To manage this, it's helpful to have a dedicated web development sub-domain assigned to your server. If you have DNS management access, then you could request such a domain and manage it yourself, adding CNAMEs to it as needed. If you're not familiar with the intricacies of DNS and don't want to get into it, you can ask your IT staff about assigning a wildcard domain to your server. What this means in layman's terms is that you'd have a domain like foo.unit.gatech.edu, and all possible names under it (e.g site1.foo.unit.gatech.edu, site2.foo.unit.gatech.edu, test1.foo.unit.gatech.edu, etc.) will be pointed to your development server. With that configuration in place, you can just add a site to your Apache Virtual Host configuration with a hostname that falls under your assigned wildcard domain, and it should just work immediately.
Scripting is Your Friend
If you're expecting to work with a lot of sites over time, a site creation script can be very helpful. Such a script would automatically add the right Apache configuration for your new site, and could even automatically create a MySQL database for the site. If you're working with a standard content management system, the script could even install a fresh copy of that system. The overhead needed for creating such a script that can do all of that might seem a bit high, but can really pay off when you need to spin up a site quickly.
Tracking is Important
If you're going to have multiple sites in your development environment, you absolutely must keep track of them and shut down or archive the ones you no longer need. Even though your server may be firewalled, you still don't want to leave unattended sites on your server that aren't being patched regularly.
A simple approach is to make an archive directory in /var/www/ and move any site no longer needed to that directory. At the same time, backup and remove the Apache configuration for the site so that Apache won't complain about the site's root directory not being where it used to be. Later, if you decide to revive an old development site, you can just move things back where they used to be, and in the meantime, no one can get to that old site over the web. Note: if you do revive an old development site built in any standard content management system or other third-party web application, be prepared to upgrade or patch it immediately to the latest release of that system!
Web Hosting Solutions
Web Hosting SolutionsThere are a number of options available to you for hosting a website at Georgia Tech, but the first question to ask yourself is whether you need an internal or public website:
Internal Website
An internal website is only available to a subset of the Georgia Tech population (or, at best, most anyone who has a Georgia Tech affiliation). These sites are well suited for sensitive information that shouldn't ever be shared publicly.
Several options are available for creating an internal website:
Microsoft Teams
Microsoft Teams is available to all faculty, staff, and students. Teams lets you create an intranet website for connecting a group of people and sharing information among them. Members of a team can create wiki style pages and shared documents (including Word documents and Excel spreadsheets), post messages to a live chat area that archives everything much like a discussion forum, and create task lists and schedules. Teams also provides access to SharePoint if you wish to create traditional website pages, however, these pages will only be available to the members of your team. Much more is possible through add-on tools that you can attach to your team once it has been created.
Please visit Microsoft Teams to explore it and learn more.
Canvas
The Canvas Learning Management System is primarily for supporting academic (course related) needs. Every teaching faculty member will get a site on the Canvas system for each course they are teaching.
Please see the Georgia Tech Canvas information site for more information on using Canvas.
Engage @ Georgia Tech
Student organizations have access to the Engage@Georgia Tech hosted service where they can create an online presence for their members with some publicly viewable features.
Public Website
A public website can be viewed by anyone anywhere in the world, and is best suited for general information websites describing the nature and activities of Georgia Tech units, programs, organizations, clubs, etc. Sensitive information should never be stored on a public website!
Sites @ Georgia Tech
Sites @ Georgia Tech is a Georgia Tech service for WordPress websites. It is available for any Georgia Tech faculty, staff, and student. With Sites @ Georgia Tech you can quickly and easily create web sites for research, publications and projects, blogs, initiatives, conferences, and so much more.
OIT Web Hosting
OIT Web Hosting is not a website creation application, but rather a place to host one of a variety of supported web applications, the most common used being the Drupal Content Management System, which can be used to build larger, more robust websites. OIT provides a ready to use version of Drupal called Drupal Express to make it easy to build a new site with a Georgia Tech look-and-feel.
You can run other applications on OIT Web Hosting, including Omeka, MediaWiki, and WordPress, but it is highly recommended that anyone interested in WordPress consider using Sites @ Georgia Tech as described above.
Please see the OIT Web Hosting handbook for more information.
Unit Managed Web Servers
Some units on campus may offer their own locally managed web hosting services and applications. Check with your local IT support staff to find out what your unit offers. Web services offered by and supported by your IT staff are perfectly viable options, but you should avoid trying to set up your own web server without the assistance and oversight of your IT staff.
Learn more about unit managed web servers and running websites on them.
Outside / Off-Campus Web Hosting [Not Recommended]
For several good reasons, units should avoid using outside web hosting, which introduces a number of unnecessary risks. This includes using commercial web hosting companies or commercial application vendors (e.g. WordPress.com or Google Sites), or using social media (such as Facebook) your primary web presence.
Learn more about the downsides and risks of using outside web hosting
Recommendations
The general rule of thumb for selecting a web hosting solution is to go with the solution that is the closest fit to the size and nature of your website. Specifically:
- Try to use Sites @ Georgia Tech for any WordPress needs, rather than set up your own copy of WordPress in OIT hosting or on a unit managed web server. Once you set up a separate copy of WordPress, you then have to make sure it is getting all needed security and bug fixing patches for the lifespan of the website.
- Try to use OIT Web Hosting for any Drupal needs, as OIT hosting provides a turnkey solution for Drupal sites. If you run Drupal on a unit managed server, you will have to handle the necessary backend maintenance on your own.
- Only request a unit managed web server (or an OIT virtual machine, which will be charged back to your unit) for a non-standard web application that won't run properly on OIT Web Hosting.
Web Hosting Sub-Topics
OIT Web Hosting
OIT Web HostingThe Office of Information Technology (OIT) provides an on-campus web hosting service for official Georgia Tech units and projects. This service can host many popular PHP based content management systems, including Drupal and WordPress.
For those looking to quickly setup a unit-level website, OIT Web Hosting supports Drupal Express, a central campus web application that will give you a jump start on building a Drupal based website by installing Drupal plus a number of standard add-on components, such as the official Georgia Tech website theme. You can request a Drupal Express site when you request your OIT Web Hosting account.
OIT has provided documentation on web hosting via the OIT Service Now FAQ and an administrator's guide for the hosting control panel system (Plesk).
OIT Web Hosting Sub-Topics
How to Request a Web Hosting Space from OIT
How to Request a Web Hosting Space from OITOverview of the Process
- In a web browser, go to the OIT Web Hosting site (https://hosting.gatech.edu/ - available on-campus or via the VPN only!)
- Log in, using your GT Account username and password (e.g. "gburdell1").
- Follow the link on the right-hand side of the main menu for My Plesk Hosting.
- In the grey horizontal section, select the Request a site on Plesk link, which will take you to a request form.
- Follow the link in the left-hand sidebar for Request, and then select the Request button under New Site
- Fill out the form and select the Request New Site button at the bottom of the page.
- These requests will take up to 72 hours to complete. You will receive an email once the site has been set up.
If you have any questions about any part of the form, you can hover over or tab to any of the question mark icons to get detailed instructions.
Add an Administrator to Your Web Hosting Control Panel
Add an Administrator to Your Web Hosting Control PanelThere are two user roles for OIT Web Hosting accounts: "owner" and "authorized user".
-
Owners are the people responsible for the website who make the key decisions about the site. An owner is oftentimes not the technical manager of the site, but must be a full-time employee of Georgia Tech.
- Authorized Users have most of the same privileges as owners, and can be anyone with a valid GT Account Username (including guest user accounts).
Keep in mind that OIT will reach out to the owner(s) first when there are issues with the website that need to be addressed, so make sure at least one of the owners is someone who can answer those questions and handle those requests.
Process
To grant or revoke access for another person to access your OIT Web Hosting site's Plesk control panel, an owner of the site should do the following:
-
Go to the OIT Web Hosting site (https://hosting.gatech.edu/) in your web browser (available on-campus or via the VPN only!)
-
Select the My Plesk Hosting button on the right-hand side of the main menu bar.
-
After logging in, you should see your list of web hosting sites. Locate the entry for the site in question and select the Manage button with the cogwheel icon next to it.
-
On the next page, select the Edit tab to modify the web hosting site's configuration.
-
Update the entries under the Manage Site Owners section and/or Manage Authorized Users section as needed, noting the following:
-
To add someone to a Web Hosting Account, that person must have logged into the OIT Web Hosting site at least once before you can add them to an account.
-
You must enter each person's GT Account Username (no other identifier will work).
-
Use the Add another item button to add extra blank spaces if needed.
-
To remove an existing administrator, just delete the person's GT Account from the given blank (you can re-use the blank for a different person if you wish.
-
On the Owners section:
-
The first field cannot be left blank. If you need to remove that person, you'll need to move one of the other owners up so that there is a valid GT Account username in the first field.
-
If you have trouble adding someone as an owner, ask them log into the OIT Web Hosting site, which will refresh their account information on the site. If you still have trouble adding that person as an owner, check their status in IAT or Mage to see if they are possibly missing the "full-time-employee" role.
-
-
-
Don't forget to select the Save button at the bottom of the page.
Accessing your Web Hosting Site via SSH (Command Line)
Accessing your Web Hosting Site via SSH (Command Line)Below are some helpful tips on how to use the SSH to get command line access your web hosting site via a Windows or Mac computer.
- Are you off-campus? You must use VPN from off-campus in order to access your site via SSH.
- FAQ: finding your login information for ssh
- Guide: Using ssh on Windows with cygwin (generic).
A sample command you might run to access your site is:
$ ssh my-ftp-username@my-internal-domain-name
Configure Automatic Backups on OIT's Web Hosting
Configure Automatic Backups on OIT's Web HostingWeekly backups of all OIT Web Hosting accounts now happens automatically. However, if you wish to to more frequent backups for an important site that changes regularly, the following instructions below explain how to configure the Plesk control panel on OIT's web hosting to keep automatic backups of your entire site.
Overview
First, read this general FAQ on how to create scheduled backups.
Setting Recommendations
For a Georgia Tech Drupal site, good default settings are:
-
Backup period: Daily
-
Maximum number of backups in repository: 14
-
Backup content: All configuration and content except mail
-
Suspend domain until backup task is completed: Depends on whether you want your site to be unavailable while this backup is happening.
Who Owns an OIT Hosted Website?
Who Owns an OIT Hosted Website?If you have administrative access to at least one OIT Web Hosting account, you can look up the owners and administrators of any other account. Simply navigate to your My Plesk Hosting page (available on-campus or via the VPN only) and follow the link in the left-hand sidebar for Site Lookup.
Unfortunately, there is no longer a means for looking up an account owner / administrator if you do not have access to at least one hosting account. In this case, you will need to either contact OIT for assistance, or find someone who does own an account to perform the look-up for you.
Enabling and Using SSL on OIT Web Hosting
Enabling and Using SSL on OIT Web HostingSSL encryption is highly recommended for websites these days, not just because it makes user interactions with your site more secure, but also because the major browser manufacturers are starting to mark all non-SSL encrypted sites with some kind of red symbol (red padlock, red 'X' through a padlock, etc.) to better warn users not to enter sensitive information into these sites. So, from a marketing standpoint, it's going to make your site look more professional if you turn on SSL encryption, which will keep those red warning symbols from showing.
OIT provides an article on How to Force Your Site's HTTP Traffic to HTTPS that covesr much of what you need to know to get started your site set up with SSL encryption.
Setting Up SSL on OIT Web Hosting with an External Domain Name
Setting Up SSL on OIT Web Hosting with an External Domain NameTo set up an external domain name with SSL encryption on an OIT Web Hosting account:
Generate a Certificate Signing Request (CSR) File
You can generate a CSR for an OIT Web Hosting site from the site's Plesk Control Panel:
- Log into the Web Hosting Control Panel System and navigate to your site's control panel
- On the control panel page, select SSL Certificates
- On the SSL Certificates page, select Add SSL Certificate.
- On the Add SSL Certificate page, fill in the requested information and then select the Request button (do not use the Self-Signed button!)
- That will generate a CSR that you can then upload to a third party certificate provider, and your Private key is auto-generated and stored in your Plesk Control Panel.
Uploading and Enabling the Certificate
Once you have received your certificate from your provider:
- Log into the Web Hosting Control Panel System and navigate to your site's control panel
- On the control panel page, select SSL Certificates
- Choose or Browse to the fileon your local computer, then select the Upload Certificate button.
- After the certificate has been uploaded, select Websites & Domains in the left-hand menu bar, then select Hosting Settings in the main control panel
- Look in the middle of the page for the Security section. Select your certificate via the provided drop-down selector
- Select the OK button to save your changes.
OIT Hosting and Hosting Site Mailing Lists
OIT Hosting and Hosting Site Mailing ListsOIT is phasing out the Sympa mailing list system and is no longer using it in conjunction with OIT Web Hosting. There are other solutions for having multiple people get notifications relating to an OIT Web Hosting account, and it may be best to discuss these with your local IT support, who should understand the ins and outs of campus email.
One important thing to note is that the Plesk hosting system will only support a single email address, and cannot handle a comma separated list of multiple addresses. So, in the hosting management system (found at https://hosting.gatech.edu/), you can only put a single email address in the Notification Email Address for Website field. If you are the sole site administrator, then just put your email address in this field and you will receive all site notification emails.
The simplest solution for sending notifications to multiple people, although it will typically require the help of your local IT support, is to create an email alias for your site that forwards to all of the site admins, and then enter that alias under Notification Email Address for Website.
Previous content about Sympa mailing lists is left below for reference until Sympa is completely phased out (date TBD.)
Prior to late 2016, OIT always set up a Sympa mailing list whenever it set up a web hosting account, and the 'hosting.gatech.edu' site automatically managed the membership of that mailing list, syncing the hosting account's administrators and owners to the mailing list.
This process changed with the late 2016 upgrade of 'hosting.gatech.edu'. Previously existing mailing lists remain in place, but new hosting accounts do not get mailing lists created for them, and owners and administrators are no longer synced to the existing mailing lists for existing hosting accounts. Instead, there is now a Notification Email Address for Website field on the hosting record where the site owner or administrator can specify an email address where Plesk server notifications (e.g. your hosting account SSH password is about to expire) can be sent. The hosting record is viewed and edited by selecting the cogwheel symbol next to the hosting account name on your Plesk Web Admin Tools page.
Here's what you need to know about this new system:
-
If you have a previously existing hosting account and want to keep using the previously existing notifications mailing list, you should open a ticket with OIT and ask them to make you the owner of that Sympa mailing list. Then, you can manually update the mailing list as needed.
-
If you have a new hosting account, you can manually request a Sympa mailing list for the people who will own and administer that account. Once the list has been approved, enter the list's delivery email address into the 'Notification Email Address for Website' field for the associated hosting account.
- If you don't want to use a Sympa mailing list, you can enter any address into the 'Notification Email Address for Website' field, but it will only accept a single address. If you want to have it send to more than one person without using a Sympa mailing list, ask your IT support to set up an email alias that points to all of the admins, then enter that alias into the 'Notification Email Address for Website' field.
How to Add a GitHub Repository in Plesk
How to Add a GitHub Repository in Plesk- In your repository on github.gatech.edu, click the Clone or download button.
- Click the Use SSH link in the upper-right corner of the dialog.
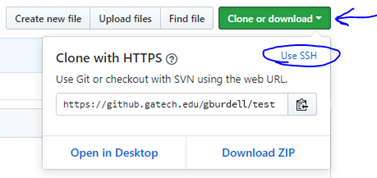
- Click the copy to clipboard icon.
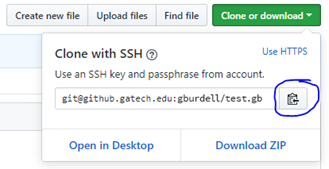
- Go to your domain under hosting.gatech.edu.
- In the Websites & Domains panel, click the Git link.
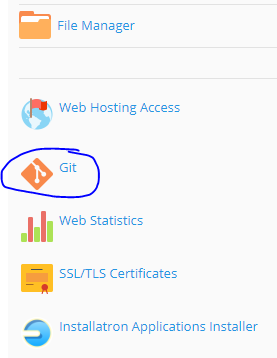
- In the Add Git Repository panel, make sure the Remote Git hosting option is selected.
- Paste the link you copied from your Github repository into the Remote Git repository box.
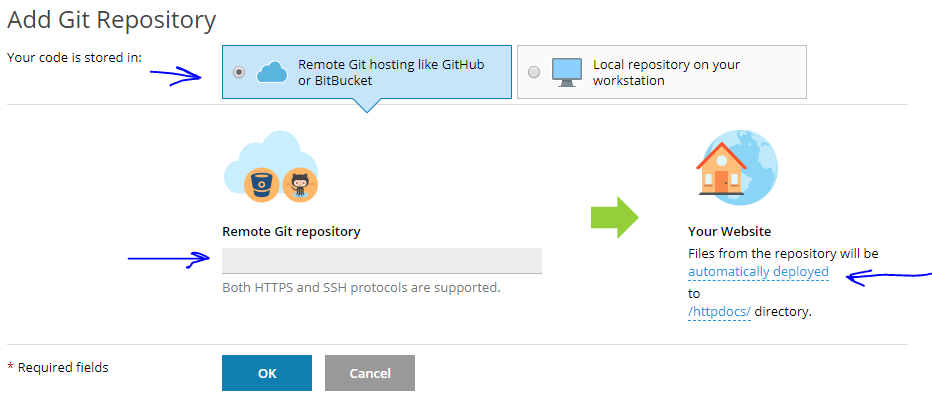
- To the right of the green arrow, you can accept the default or click the automatically deployed link and change it to manual deployment.
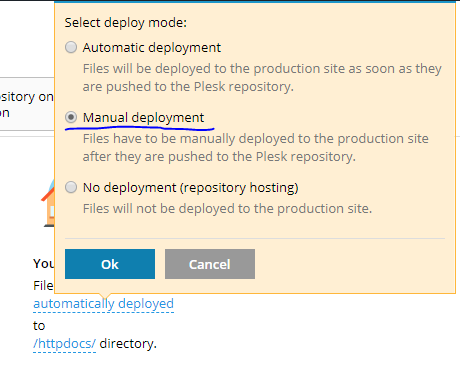
- Plesk will automatically generate an SSH public key. Copy the hash in the textbox.
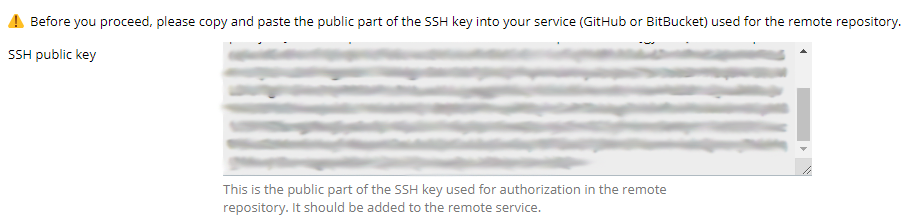
The SSH public key can be added to an individual user account or to the repository as a deploy key.
Adding SSH Public Key to an Individual User Account
- Go to your repository on github.gatech.edu > Settings > SSH and GPG keys.
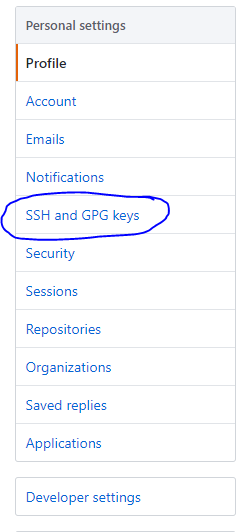
- Click the New SSH key button.
- In the SSH keys dialog, add a Title, paste the SSH key you copied from Plesk into the Key textbox, and click the Add SSH key button.
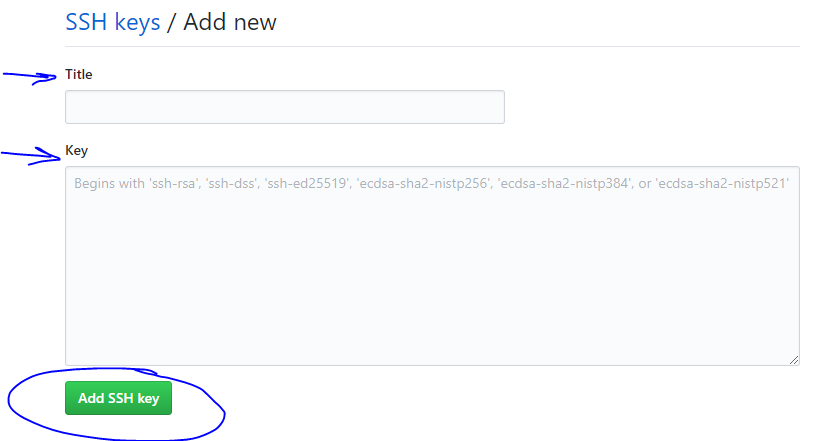
- Return to the Add Git Repository panel in Plesk and click the OK button.
- It takes a few seconds for Plesk to clone the repository.
- Once complete, you should see a your.domain.gatech.edu.git repository in Plesk.
Adding SSH Public Key to Repository as a Deploy Key
- Go into your repository in github.gatech.edu by clicking the name link.

- Click on Settings in the navigation bar.

- Click Deploy keys in the side menu.
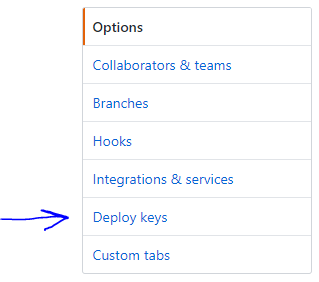
- Click the Add deploy key button.
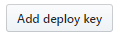
- In the Deploy keys dialog, add a Title and paste the SSH key you copied from Plesk in the Key textbox. Leave Allow write access box unchecked and click the Add key button.
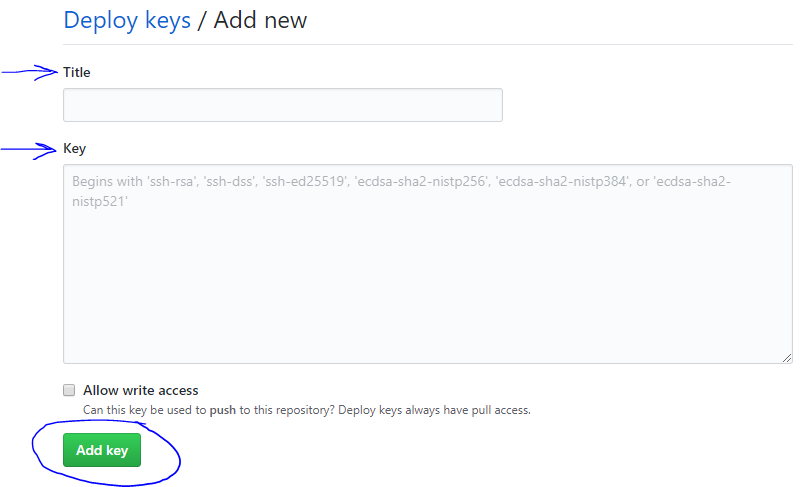
- Return to the Add Git Repository panel in Plesk and click the OK button.
- The cloning process takes a few seconds to run.
- Once complete, you should see a your.domain.gatech.edu.git repository in Plesk.
Managing SSH Access to an OIT Web Hosting Account
Managing SSH Access to an OIT Web Hosting AccountOIT Web Hosting accounts can be accessed remotely via a protocol called SSH, which gives you a command line style interface to the hosting account. From there, a knowledgable person such as a web developer can manipulate the files on the website, changing settings and configuration and even writing and debugging code to some extent. (The SSH interface on OIT Web Hosting is somewhat limited in its capabilities, so it's not recommended that anyone actually attempt to develop code using it, but technically this is possible.)
To access a hosting account via SSH, you either need the SSH password for the account or you need a valid SSH key.
SSH Password
To set the SSH password for an OIT Web Hosting account, go into the account's Plesk Control Panel, then select Web Hosting Access from the main control page (known as the "Websites & Domains" page). Please note that there is no way to see the current password - if you do not know what it is, all you can do is reset it to a new value.
SSH Keys
An SSH key is a form of public key encryption to let you connect to another system via SSH without having to send a normal password. To use this method, you will need to generate an SSH key for yourself. The process varies greatly based on the operating system and SSH client you are using, so we cannot provide any instructions for this part. However, in the end you should have two keys: a private key and a public key.
If you are enabling SSH Key access for an outside developer, then s/he should send you his/her public key, which is the part you need to enable access to your OIT Web Hosting Account.
Adding an SSH Key
After logging into the Plesk Control Panel for your hosting account, locate the large title text "Website & Domains". From there, look to the far right for an icon that looks like a square with a left-pointing black triangle in it, and select that icon. A menu of options should appear that starts with "Backup & Restore" - look to the bottom of that menu for "SSH Keys" and select that option.
That's the hard part. On the next page, "SSH Keys Manager", you can add and delete authorized keys. Simply select the Add Key button, paste the new key into the Key field, and select the Add button to add it.
Removing an SSH Key
To remove someone's key, simply locate it in the list on the "SSH Keys Manager" page, select the checkbox to the left of the key title, and then select the Remove button to remove it.
Unit Managed Web Servers
Unit Managed Web Servers kp37Some Georgia Tech units may offer locally managed web servers for hosting locally managed websites and web applications – check with your unit's information technology support staff to see what is available to your unit. A stand-alone web server can be useful for larger web applications that need more resources than a shared hosting account (such as an OIT Web Hosting account) can offer. In virtually all cases, however, you would not need a stand-alone web server for any standard content management system like Drupal or WordPress. Please see our main Web Hosting Solutions page for suggestions on how to select the best hosting for your needs.
Finally, please do not try to set up your own web server if you do not have experience in properly configuring and managing such a server. An improperly configured web server can be very dangerous to both the sites it hosts and to other servers on the same network, as it could become a gateway for hackers to gain access to other neighboring servers. If you need a stand-alone web server for a particular project, consult with your unit's information technology support staff and let them set up the server or guide you through the process.
Outside Web Hosting Solutions
Outside Web Hosting SolutionsCommercial Web Hosting
There are dozens if not hundreds of commercial web hosting solutions available outside of Georgia Tech, but use of them for Georgia Tech related websites is not recommended for a number of reasons:
- Most will require some form of payment, which is an unnecessary expense when free web hosting is available from on-campus resources (see OIT Web Hosting and Sites @ Georgia Tech).
- In most cases, you will not be able to point a *.gatech.edu DNS hostname to an outside hosting account, so you will also have to purchase your own domain name, which is further unnecessary expense, and requires approval from Institute Communications. A non-standard DNS hostname will also confuse your site visitors, who will expect any entity connected to Georgia Tech to have a *.gatech.edu hostname.
- Georgia Tech has no control over accounts with outside hosting vendors, so if the person who ordered the account leaves Georgia Tech, your unit may find itself locked out of its own web site, and Georgia Tech information technology support can not do anything to help you in that situation. This could even have legal ramifications, as it means a once legitimate Georgia Tech website could be sitting out on the internet possibly getting hacked and likely sharing out-of-date information.
- Services available to Georgia Tech websites and web applications, like Central Authentication Service (CAS), may not available to sites hosted off-campus, which means that you would be missing out on useful security and access management features.
- If you store sensitive data in a website or web application that is on unapproved outside web hosting, you may be violating Georgia Tech policy, or even state or federal law. Any site or application that deals with sensitive data should always be hosted on Georgia Tech owned or approved hosting!
If you have a valid and legitimate reason for hosting a site off-campus on commercial web hosting, make certain that multiple full-time employees in your unit have administrative access to the hosting account. Also make sure that your unit's financial staff know how to make yearly service payments so that the site doesn't suddenly disappear (and to avoid a panic due to someone realizing that the site needs to be renewed the day before it's going to expire.)
Social Media Sites
Many free social media services allow you to build the equivalent of a website, and this may seem like a good alternative to a commercial hosting service. However, the same concerns apply regarding potential loss of access to the account and inability of Georgia Tech information technology support to help you with these accounts. (Always make sure that multiple full-time employees in your unit know the passwords for all of your social media sites!) In addition, it's usually not a good idea to put your main web presence into social media, as that can turn away potential visitors who are not fans of social media. In the case of services like FaceBook and Twitter/X, visitors who are not users of the service may also find themselves unable to access all of your information due to the members-only access limitations of these services.
The best practice for units and student organizations is to use social media sites to supplement your web presence, but to always build and maintain at least a small standard website for your public audience that lets anyone and everyone see who you are and what you are doing.
A Guide to Domain Names
A Guide to Domain NamesAll websites that are funded and/or sponsored by the Institute are required to have a gatech.edu-based web address.
Georgia Tech owns the entire *.gatech.edu domain space. Any on-campus unit can request a domain name within this space at no charge. However, there are differences in domain names and brand standards that you need to consider.
Domain Name Formats
There are differences in domain formats, based on your unit's function and visibility.
Website Types and Domains:
- The official Georgia Tech website
- The internet domain name assigned to the Georgia Institute of Technology is gatech.edu.
- The Institute recognizes gatech.edu as its official domain name; it is legally registered to the Institute and, like other marks of the institution, is subject to the Institute’s use, policies, and guidelines.
- Institute-wide or multi-unit collaborative initiative websites
- Top-level domain aliases are generally reserved for units and initiatives that serve or represent the entire Institute and for multi-unit collaborative initiatives.
- A top-level domain alias is formatted as such: [requestedname].gatech.edu.
- Registered Student organizations (RSO) and Departmental Registered Student Organizations (DRSO)
- RSO and DRSO websites are assigned a “gtorg” alias.
- Student organization domains are formatted as: [requestedname].gtorg.gatech.edu.
- All other Georgia Tech unit websites
- All other academic, administrative, and/or other organizational units within the Institute that do not fit in the categories above are assigned sub-domains.
- This also includes personal websites that are hosted by the Institute.
- Sub-domains are formatted as such: [requestedname].[gtunit].gatech.edu.
- Sub-domain names can often be created and updated by a unit's Information Technology (IT) staff.
- Sub-domains do not have to go through the Institute-level vanity alias approval process to get a new sub-domain name, though your unit may have internal sub-domain name rules or best-practices.
- (Outside) Non-Georgia Tech Domain Names
It is possible to go to a commercial hosting company and purchase a non-Georgia Tech domain name. This practice is highly discouraged for several reasons:- Outside domain names have regular fees and costs. If your circumstances still warrant getting an outside domain name, make certain that billing is set up to go directly to your unit's financial department so that renewal fees get paid in a timely manner.
- Non-campus domain names may look suspicious to unfamiliar visitors, as non-campus domains have been used for phishing and cybersecurity incidents.
- Your website may not be able to make use of Georgia Tech services (such as single sign-on) that are limited to websites with a *.gatech.edu hostname.
- OIT may not be willing to host your website with an outside domain name (they reserve the right to make this decision on a case-by-case basis), so you may end up having to pay for outside web hosting as well.
- If you ever fail to renew your outside name, it could be grabbed by a spammer who could then put up a fake site under that domain name. This could hurt your unit's image and reputation for many years to come, as it is nearly impossible to get all links to your site throughout the internet updated to a new domain name.
Domain Name Standards
In order to create a cohesive web identity and to ensure the integrity of the Institute’s commitment to a unified web presence, the Institute has established brand standards for websites.
Requesting a Vanity Domain Alias
Institute Communications (IC) reviews all vanity domain alias requests to confirm they meet the brand standards for websites. Before requesting a vanity domain alias, you must read and understand the information listed under "Domain Name Standards" above.
Web Hosting Option Comparisons
Web Hosting Option Comparisons| Audience | Application | Types of Sites | Skill Level Needed | GT Account Integration (SSO) | Primary Features | Known Limitations | |
|---|---|---|---|---|---|---|---|
| Microsoft Teams | Internal | Microsoft Office 365 | Intranet | Basic | Yes | Wikis, forms, file repositories, basic pages |
|
| Canvas Project Sites | Internal | Canvas | Academic Intranet | Basic | Yes | Most Canvas features found in course sites |
|
| Github Pages | Internal | Github | Small, static websites | Advanced | Required? | Can create static, basic websites |
|
| Engage@Georgia Tech | Both | Campus Labs Engage | Student Org websites | Basic | Yes | Information sharing, Membership Rosters, etc. |
|
| Sites @ Georgia Tech | External | WordPress |
| Basic to Intermediate | Yes | Can create general webpages to make a traditional website |
|
| OIT Web Hosting + Drupal | External | Drupal | Medium to Large Unit websites | Intermediate to Advanced | Optional (with CAS module) |
|
|
Website Planning and Content Strategy
Website Planning and Content Strategy jtomasino3Building and maintaining an effective website requires a significant investment of time and resources.
Websites that are built without planning or evaluation of user needs can become confusing, cluttered, and outdated – a source of frustration for both website owners and visitors.
The resources below will help you create a well-planned website.
Need More Guidance?
The Non-Web Developer's Guide to a Website Redesign
All Planning and Content Strategy Sub-Topics
A Non-Web Developers Guide to a Website Redesign
A Non-Web Developers Guide to a Website Redesign
Introduction
Planning a website redesign is daunting, and the process is long and tedious — especially if you don't do it on a regular basis.
Have no fear: This guide aims to help make your job easier by providing an overview of the common phases and resources involved in a website redesign project so that you can set expectations and properly staff your internal and/or external teams.
Before You Begin
- Review the process overview below. While the process you ultimately follow may not mirror the steps exactly, it should follow similar guidelines.
- Familiarize yourself with some basic web development terminology.
- Download the template, which allows you to fill in your own data and ideas for each step.
Overview of the Process
Phase One: Plan
Initiation
- Identify the website’s purpose.
- Determine success metrics.
- Identify target audiences.
- Assemble a project team.
Discovery
- Assess the current website.
- Audit current content.
- Interview stakeholders.
- Look at competitor websites.
Scope
- List required features and functionalities.
- Determine the content management system (CMS), web hosting, and other integrations.
- Indicate Institute- and department-level requirements.
- Set a preliminary budget.
Phase Two: Design
UX Design
- Draft a sitemap.
- Articulate user flows.
- Create content outlines.
Wireframing
- Design homepage wireframes.
- Design main template-page wireframes.
Visual Design
- Using the Drupal theme as a base, determine the overall visual feel.
- Using wireframes, design homepage and main page mockups.
- Create and gather visual assets.
Phase Three: Build
Development
- Set up CMS.
- Install and customize the theme.
- Build page templates.
- Install and configure any data and service integrations or modules.
- Program any custom functionality.
- Customize the backend.
Population
- Add content including text, visuals, and files.
- Add links and functionality to the content.
- Proofread and edit where required.
- Create a 301 redirect strategy.
Phase Four: Deploy
Testing
- Test on different devices and browsers.
- Track and correct bugs.
- Find and fix broken links.
- Optimize and adjust as needed.
- Test for accessibility compliance.
Launch
- Assign user roles and train on CMS.
- Push the new website live.
- Implement 301 redirects for new URLs.
- Celebrate your good work!
Maintenance
- Monitor website traffic.
- Validate your page load times.
- Inform linking partners of your new URL structure.
- Create/update the XML sitemap and submit it to search engines.
Next Step
In the initiation phase, the project sponsors and other important stakeholders will decide whether to commit to the web project and define it at a broad level.
Website Redesign: Initiation
Website Redesign: InitiationPHASE 1: PLAN
The project sponsors and other important stakeholders will decide whether to commit to the web project and define it at a broad level.
Identify the website’s purpose.
- What is the rationale for embarking on this website project?
Example: We want a website that focuses solely on this program and the functions related to applying, enrolling, and being a student of the program. - What are your objectives and how will you leverage the website to achieve them?
Example: Increase newsletter subscriptions by making the web form responsive and brief.
Determine success metrics.
- How will you measure impact and success?
Example: Increase subscriptions 10%, from 500 to 550.
Identify target audiences and audience goals.
- Who are the primary and secondary audiences?
Examples: Prospective undergraduate students, current undergraduate students, prospective graduate students, current graduate students. - Are there any other key audiences that will visit the website?
Examples: High school counselors, parents of prospective undergraduate students. - What are the top three tasks you want each of these audiences to do on the website?
Examples: Read graduate program descriptions, learn how to apply, sign up for the newsletter.
Assemble a project team.
Who will be involved in the building, launch, and maintenance of your website? To determine whether you may need to hire an external vendor, answer the following questions:
- Do you have an in-house web developer? Yes/No
- Do you have an in-house content writer and editor? Yes/No
- Do you have an in-house designer? Yes/No
- Do internal team members have the bandwidth to make the website a top priority during key phases of the project? Yes/No
If you answered, “No” to any of the questions above, you should plan to hire freelance professionals or agencies. In this case, you will need to prepare a Scope of Work in order to find the best professionals to work with within your budget.
For those considering hiring a third party for their website work, Georgia Tech has an enterprise-wide contract in place that allows you to quickly get estimates from a group of pre-approved vendors.
Resources:
- Hiring a Website Vendor (aka, How to navigate the enterprise-wide web projects contract)
- Scope of Work Examples: Small and Large Website Projects
(Note: you will need to login with your GT account information to access these documents.)
![]() TIP:
TIP:
“Around this time, there may be a need to develop a communications strategy around the redesign effort and launch. In some instances, the communications will primarily be internal.” Shayla Hill, Assistant Director - Digital Strategy
Next Step
Once the project has been formally started, all team members should participate in the discovery part of the Planning Phase.
Website Redesign: Discovery
Website Redesign: Discovery jtomasino3PHASE 1: PLAN
Once the project has been formally started, the discovery phase begins. This phase is meant to reveal the state of your website today and your competitive landscape. All team members should participate in this phase of the project.
Assess current website.
If your current website has analytics, pull reports to benchmark for comparison later.
Analyze current content.
Begin inventorying existing website content to determine what content you have on your site, what needs to be updated, what can be removed, and what needs to be created.
Resources:
Interview stakeholders.
Interview the individuals or groups whose work and responsibilities are affected by how the website performs. Their input will help set a strategic direction that will guide the process.
Resource: Stakeholder Interview Questions
Look at competitor websites.
Perform an analysis of competitor and peer website categories to identify best practices, good ideas to emulate, and bad ideas to avoid.
Resource: Competitive Review Template
![]() TIP:
TIP:
“I actually draft a sitemap before I do a content audit. It helps me to have a really clear idea of the structure before diving into the content, thereby making it easier to eliminate content that is no longer needed.” Ashlee Gardner, Communicator
Next Step
Identify the technical and functionality requirements for the new website during the scope portion of the Planning Phase.
Website Redesign: Scope
Website Redesign: Scope jtomasino3PHASE 1: PLAN
During the scope phase, you will identify the technical and functionality requirements for the new website. If you need to outsource any work, the information that you have gathered in the initiation, discovery, and scope phases will be critical for the external vendor.
List required features and functionalities.
What features and functionality would you like on the site?
Determine the content management system (CMS), web hosting, and other integrations.
Select the CMS and web hosting service that should be used, as well as determine whether the website needs to integrate with any third-party applications (e.g., Mercury, Google Analytics, Salesforce).
Resources:
Indicate Institute- and department-level requirements.
These are requirements related to usability, security, legal issues, page loading times, etc. As a state-funded school, there are several requirements that every Institute website must legally comply with:
- Accessibility: Federal law and Georgia Tech policy require that you follow proper accessibility guidelines when creating and updating content.
- Security: Familiarize yourself with and adhere to Security Best Practices.
- Data Protection: All Institute websites must comply with the EU General Data Protection Regulation Compliance Policy.
Set a preliminary budget.
Establish a preliminary budget for the project and indicate other funding sources that could affect the project.
Resource: What it costs to plan, design and build a custom website.
![]()
TIP:
If you have an internal web developer, they can begin setting up the staging/production environments.
Next Step
During the UX design phase, you will begin to organize content around your website visitors' needs and your unit's priorities. This begins the design phase of the website redesign project.
Website Redesign: UX Design
Website Redesign: UX DesignPHASE 2: DESIGN
In this phase, you will draft a high-level organization of the technical, functional, and visual components of the website.
Draft a sitemap.
Using the information and data gathered in the discovery phase, sketch out an optimal sitemap. A sitemap will typically mirror your main menu navigation and website pages branching off from those pages.
Resource: Plan Your Site Structure
Articulate user flows.
Map out what each user will do when they visit the website. Outline the series of steps that will be involved in accomplishing each task.
Resources:
Create content outlines.
Using the user flow information above, list the high-level ideas that you want to convey and that users would be looking for on the main pages of the website.
![]() TIP:
TIP:
Make sure all team members familiarize themselves with the Accessibility Primer and Search Engine Optimization (SEO) Fundamentals. The two go hand-in-hand to help create a highly usable and accessible website.
Resources:
Next Step
Built upon a sound UX strategy, the design phase continues with wireframing.
Website Redesign: Wireframing
Website Redesign: WireframingPHASE 2: DESIGN
Wireframes are 2D illustrations indicating where the major navigation and content elements will appear on a webpage.
Design homepage wireframes.
Include full screen and responsive views/layouts.
Resource: How to create wireframes
Design main template-page wireframes.
Include full screen and responsive views/layouts.
![]() TIP:
TIP:
While this is happening, the content team can begin assigning, gathering, and organizing content. At the same time, the web developers can begin working on any backend features that do not require design. The backend is the part of the website that users do not see or interact with.
Resources:
Next Step
The design process continues with the visual design phase.
Website Redesign: Visual Design
Website Redesign: Visual DesignPHASE 2: DESIGN
Built upon a sound UX strategy, the design process continues with the visual design of the website.
Determine the overall visual feel.
Use the Drupal theme as a base. Be sure to review the Institute's Brand Guide and Web and Digital Style Guide.
Resources:
Design homepage and main page mockups.
Using approved wireframes, design a homepage mockup including full screen and responsive views/layouts.
![]()
TIP:
Before creating mockups for the rest of the pages, take the homepage mockup all the way through the review and approval process.
Create and gather visual assets.
These assets include buttons, calls-to-action, photos, and videos.
Resources:
Next Step
When all of the mockups have been approved, the project will move into the development portion of the build phase.
Website Redesign: Development
Website Redesign: DevelopmentPHASE 3: BUILD
When all of the mockups have been approved, the project will move into the development portion of the build phase.
Set up the content management system (CMS).
The recommended CMS for Georgia Tech websites is Drupal.
Resources:
Install and customize the theme.
You can find a repo of a static HTML/CSS template for creating a Georgia Tech website on the Georgia Tech GitHub page.
Resource: Appearances and Themes
Build page templates.
A page template is a guide for how a certain type of page will look. When reviewing your sitemap and content outlines, think about how these pages will look. Note that your page templates should match the list of wireframes in the preceding sections.
Install third-party integrations.
Install and configure any data and service integrations or modules.
Resource: Recommended Systems and Services.
Program any custom functionality.
Customize the backend.
Next Step
When the content is ready, the web developer will populate the new website by transferring existing content and uploading any new content.
Website Redesign: Populate
Website Redesign: PopulatePHASE 3: BUILD
When the content is ready, the web developer will transfer existing content and upload any new content to the website.
Add content.
This includes text, visuals, and files. The web developer should work hand-in-hand with the designer to ensure that the text and graphics appear correctly on every page.
Add links and functionality within the content.
Once all of the features and templates have been developed and the content has been loaded, review and collaborate with stakeholders to optimize existing content across key content sections. In other words, ensure that every webpage links to at least one other webpage within your website.
Proofread and edit.
An editor should always review the website content before changes are made live to the public. Additionally, make sure that your website content follows the Institute's editorial style so that the voice is consistent across the Institute.
Resource: Georgia Tech Editorial Style Guide
Create a 301 redirect strategy.
If any URLs are changing on the new site, you’ll need to create a 301 redirect strategy to eliminate the possibility of broken links from other websites that link to the page or from browser bookmarks.
Resource: How to Create a 301 Redirect Map
![]()
TIP:
Once you’ve developed a full 301 redirect map, give it to the developers to implement.
Next Step
Next is the testing, where all participants make sure that the website works the way it should before it goes live. This is the first stage of the deploy phase.
Website Redesign: Testing
Website Redesign: Testing jtomasino3PHASE 4: DEPLOY
The testing phase is for all participants to test the website and fix any errors before making it live to the public.
Develop a test plan.
The test plan should include:
- The actions and tasks each testing participant needs to complete.
- A priority scale for classifying bugs or issues.
- A consolidated communication method.
Test on different devices and browsers.
Each participant should click links and view each page on Chrome, Safari, Firefox, etc., as well as on desktop and mobile devices.
Track and correct bugs.
Often, timing gets tight as you get closer to the launch deadline, so it may not be possible for developers to do everything in time. A priority scale allows decisions to be made in terms of which items are launch-critical versus more minor things that can wait.
Check for broken links.
Resource: W3C Link Checker.
Test for accessibility compliance.
Resources:
Optimize and adjust as needed.
Next Step
Once the site is fully approved, a launch date should be scheduled and the website prepared for launch.
Website Redesign: Launch
Website Redesign: LaunchPHASE 4: DEPLOY
Once the site is fully approved, a launch date should be scheduled and the website prepared for launch. The website launch is when the new website is made visible to the public.
Assign user roles and train on the content management system (CMS).
Provide documentation and training for key staff to equip them with an understanding of the CMS and site-specific customizations.
Push the new website live.
Migrate the website to the permanent server.
![]()
TIP:
On launch day, all team members should monitor the site to ensure that there are no issues.
Implement 301 redirects for new URLs.
Celebrate your good work!
Next Step
Moving forward, the website should be updated following a monthly maintenance schedule — at a minimum.
Website Redesign: Maintenance
Website Redesign: Maintenance jtomasino3PHASE 4: DEPLOY
Moving forward, the website should be maintained on a regular basis. This should include Drupal updates, security updates, content maintenance, and basic page styling.
Monitor website traffic.
For two months post-launch, monitor what has changed from your baseline analytics report and alert the team of any issues on a weekly basis.
Validate page load times.
Compare it to your pre-migration baseline.
Inform linking partners of your new URL structure.
Send them your 301 redirect map.
Update your XML sitemap.
Submit it to search engines.
Website Discovery Brief
Website Discovery BriefBefore you begin building your website, take a step back to answer some fundamental questions, and develop a strategy to guide the process. To help you answer these questions and develop a strategic approach, we encourage you to use this website discovery brief.
The brief includes a series of prompts to help you think through the website planning process. Completing the Web Discovery Brief will result in a strategic framework you can use as a guide while working on your website.
Website Goals
- What are the reasons for considering a website or redesign of your website?
- What are your top five objectives for the new website?
- How does the website fit in with your communication goals? How do you think you can leverage the website to achieve these goals? (For example, how will the site help enroll new students, encourage donors, etc).
Website Audience
- Who are your current primary and secondary audiences? Can you rank them in size and importance to you?
- Are there any external audiences that should be part of this communication channel? (For example, parents, alumni). If so, what information do you want to provide to them?
- What are the top three things you want each key audience to do or find on the website? For instance, get informed, find a list services or offerings, support operational activities, enable/support community activities, add or view events, sign up for email newsletters.
Branding and Design
- Are you familiar with the branding guidelines for your organization as defined by Institute Communications? Review the Brand Guide now.
- How does your audience currently perceive you?
- How do you wish for audiences to perceive you in future?
- What is the single most important message you want to get across to your audience?
- List any five peer websites you like in terms of visual design and that you would like to use as a benchmark.
- __________________
- __________________
- __________________
- __________________
- __________________
Content and Functionality
- List any five sites that you like in terms of content and functionality. Which functionality or content do you like, and why?
- __________________
- __________________
- __________________
- __________________
- __________________
- What content/functionality has been successful in your current website? Why is it considered successful?
- What content/functionality has NOT been successful in your current website? Why?
- What content would you like on the website?
- What features and functionality would you like on the site?
Technology
- Where is your site currently hosted? What type of hosting do you have? Is this the hosting you would like to use in the future?
- Does your site connect to a database? Please describe the type of database, stored information, and requirements.
- Is there any technology (software, content management, site analytics/metrics tools, other) on your current site that must be retained? Please describe in detail.
- Does your site require any external sites, systems, or software to operate? For instance, does it connect to a database, interact with an external e-commerce system, pull in content from an external RSS feed? Please describe.
Ongoing Maintenance
- Who is responsible for the site’s strategic direction, producing its content, and updating it after launch?
- How frequently do you plan to or want to update your website's content?
- Who is responsible for applying updates to your website's security and modules on an ongoing basis?
Website Marketing and Analytics
- Do you currently have site metrics or analytics detailing how many visitors come to the site, what pages they visit, etc?
- How do you currently market the website? What are your plans to market the site in the future?
- How do you currently conduct outreach to your audiences that would drive them to the website?
- Do you maintain or participate in any other external sites that will drive traffic to or interact with this website?
Plan Your Site Structure
Plan Your Site StructureA well thought-out site structure is the foundation of your website's success. Before you start creating pages on your website, plan out its structure.
Step 1: Plan Your Hierarchy
Your website’s “hierarchy” is simply the way its information is organized. The hierarchy is the basis for the menu and URL structure.
Here is an example of a website hierarchy:
Think about a filing cabinet
Paperwork is much easier to find when it is assigned a clearly labeled folder. The same rule applies to organizing the webpages within a website. Humans prefer simple, logical organization, and so do search engines.
Tips to help plan your hierarchy
- Keep it simple and logical: Each main category should be unique and distinct. Each subcategory should somehow relate to the main category under which it is located.
- Limit the number of main categories to seven: Too many categories equals clutter and confusion.
- It doesn’t have to be fancy: It’s perfectly acceptable to sketch out your website hierarchy by hand on a piece of paper—or even a napkin, for that matter.
Step 2: Create a Menu Structure
Sample Menu Templates
Step 3: Create a URL structure
The third element in developing strong site structure is your URL structure. Your URL structure will be organized according to your site hierarchy.
If we use the website hierarchy above, the URL structure would be:
- Mywebsite.gatech.edu/add-content
- Mywebsite.gatech.edu/add-content/pages
- Mywebsite.gatech.edu/add-content/pages/multipurpose
- Mywebsite.gatech.edu/add-content/pages/basic
- Mywebsite.gatech.edu/add-content/pages/vertical
- Mywebsite.gatech.edu/add-content/pages/horizontal, etc.
Additionally, your URLs should be human-readable, which will make your site visitors and search-engines happy.
College Website Information Architecture Template
College Website Information Architecture TemplateThe College IA is designed to put your college’s work – academic offerings and research – at the forefront of the website.
Adopting this structure will help ensure a cohesive, unified experience across Georgia Tech academic sites. Users who visit multiple sites, such as students comparing degree programs, will have an easier time finding information.
A streamlined, easy-to-navigate site will also make a positive impression upon prospective students, faculty, and the larger community.
Below is a guideline for a college website’s main menu
You are not required to use menu categories that do not apply to your college, and you may have categories that are unique to your college. For consistency-sake, however, it is recommended that you, at minimum, begin the main menu with “About,” and end with “News and Events.” Limit your menu to seven categories or fewer.
About
Purpose: To provide background about your college and logistical information
Examples of what to include: Letter/welcome from a dean/chair, general department contact information, buildings & facilities, directions, job opportunities, history.
Academics
Purpose: To highlight your academic programs.
Examples of what to include: Information about undergraduate, graduate, and postdoc programs, secondary concentrations, program requirements, classes, admission.
Schools
Purpose: To highlight the schools within your college.
Examples of what to include: A high level overview of your schools and links to their websites.
Research
Purpose: To highlight the latest research taking place in your college.
Examples of what to include: Highlights of faculty research, overviews of your department’s main research areas, publications, news related to research, cross-university collaborations, and research initiatives or partnerships.
What not to include: Items that are intended only for an internal audience, such as paperwork for research administration or safety procedures; this information should be included in resources.
News and Events
Purpose: To showcase what’s happening now in your department, announcements, and upcoming events.
School Website Information Architecture Template
School Website Information Architecture TemplateThe School IA is designed to showcase your academic programs, research, and student life.
By using this navigation, you are helping to provide a cohesive, unified experience across Georgia Tech academic sites. Users who visit multiple sites, such as students comparing degree programs, will have an easier time finding information.
Below is a guideline for a school website’s main menu
You are not required to use menu categories that do not apply to your school, and you may have categories that are unique to your school. For consistency’s sake, however, it is recommended that you, at minimum, begin the main menu with “About,” and end with “News and Events.” Limit your menu to seven categories or fewer.
About
Purpose: To provide background about your school and logistical information.
Examples of what to include: Welcome from a dean/chair, general department contact information, buildings and facilities, directions, job opportunities, and history.
Academics
Purpose: To highlight your academic programs.
Examples of what to include: Information about undergraduate, graduate, and postdoctoral programs, concentrations, program requirements, and admission.
Student Life
Purpose: To focus on academic and co-curricular elements of student life that are unique to your school or to Georgia Tech.
Examples of what to include: Student profiles, organizations, career development, community outreach, and life in Atlanta.
Research
Purpose: To highlight the latest research taking place in your school.
Examples of what to include: Highlights of faculty research, overviews of your school’s main research areas, publications, news related to research, collaborations, and research initiatives or partnerships.
What not to include: Items that are intended only for an internal audience, such as paperwork for research administration or safety procedures; this information should be included in the bottom footer menu under Resources.
People
Purpose: To highlight the faculty, researchers, and staff associated with the school.
News and Events
Purpose: To showcase what’s happening now in your school, announcements, and upcoming events.
Take Stock of Your Current Content
Take Stock of Your Current ContentBefore moving your content into a new site, we encourage you to take stock of what content exists on your current site and develop a plan for migrating it.
Performing a content inventory and analysis is an excellent way to determine what content you have on your site, what needs to be updated, what can be removed, and what new content you need to create.
Although any site can benefit from this exercise, this process is especially important for large and complex websites, and for sites that have existed for several years. These sites will commonly have pages that are out-of-date or no longer needed.
To help you through this process, Institute Communications provides a step-by-step guide to auditing and analyzing your content and a content audit template.
Learn more about the purpose of a content inventory at usability.gov.
Content Audit and Analysis: A Step-by-Step Guide
Content Audit and Analysis: A Step-by-Step GuideA content inventory and analysis is an excellent way to determine what content exists on your current website, what needs to be updated, what can be removed, and what new content you need to create to meet your communications goals.
After completing an inventory and analysis, it will be easier to build your new site, knowing what is needed and what is not.
Below are some tools and methods you may find helpful.
Step 1: Build the inventory
Make a list of all of your current Web pages and input them into the Content Audit and Analysis Template.
A tool to help speed up this process is xml-sitemaps.
- Go to www.xml-sitemaps.com.
- Input your website URL into the "Starting URL" field, and click Start.
- Once the process is done, select “Download sitemap in text format.”
- Save the text document to your computer.
- Next, Open the text document, Select All of the text, and Copy it.
- Open GT Content Audit and Analysis Template in Exel, and paste all of the URLs into the "URL (Web Address)" column.
Please note that xml-sitemaps will only generate a list of your first 500 URLs. Any URLs beyond this will need to be input by hand into your content audit spreadsheet.
Step 2: Evaluate existing content
Look at each Web page and assess its purpose and condition.
- First, set a goal for your content audit.
Think about your website's audiences and what information they need to find on your site. Keeping these audiences in mind while conducting your audit will help you properly assess whether or not your content is meeting their needs. -
Next, grade each page.
O: Out-of-date. Content that is still useful and will move to the new site, but should be updated.
U: Unnecessary. Content that is not needed at all. It should not be moved to the new site.
C: Current. Content that is fine as is, up-to-date, and just needs to be moved to the new site.
H: Have to write. H will not be used on your first pass of the content audit, so nothing on the "AUDIT" tab should be marked H. -
Assign an owner to each page.
This is the person who is responsible for reviewing or updating the page content.
Step 3: Identify gaps in content
Next, think about what content you would like to add to the new site.
- Sort your content by grade.
- Copy the O and C content over to the tab titled “New Site Content Plan.”
The U content should be left behind since it is not needed for the new site. - In the “New Site Content Plan” tab, add lines for content you would like to add to the site.
Think about what kind of content you will need to add to serve your audiences and achieve your communications goals. - Assign all of the new content an H status, as well as a Page Owner and an Update Schedule.
In order to keep your content as up-to-date as possible, make note of any pages that contain timely content. You should set up a schedule for having the Page Owner review these pages on a regular basis. - Decide which photographs need to be updated or added.
Step 4: Gather and manage content
- Connect with the Page Owners
Start collecting the content you need to have updated or written. Be sure to provide deadlines with lots of padding. - Track the status of each page
The "NEW WEBSITE CONTENT PLAN" spreadsheet can then become a helpful way of tracking content as you add it to the new site, whether you are simply moving over content, or writing something new. You can use the “Status” column in the content plan to keep track of the process in a way that works best for your organization.
Writing for the Web Guide
Writing for the Web GuideVisitors come to your website to find information. They want it find it easily, and they want to find it fast. But if it doesn't answer their questions, it will be of little value, no matter how easy your website is to navigate.
Refer to this guide to learn how to create web content that makes your online audience happy.
Writing for the Web Sub-Topics
How Reading on the Web is Different from Print
How Reading on the Web is Different from PrintHow Users Read on the Web:
They don’t.
- Web users read about 20 percent of the words on a webpage.
- The more words on your webpage, the less they’ll read.
They scan.
- Searching for very specific information.
- Scanning for headings, specific words, links…anything that catches their attention or matches the reason they are visiting your website in the first place.
About Those “Users”…
- They are impatient: You have less than 12 seconds before they click off your page (and perhaps even your website).
- Providing clear and concise messages is not about user intelligence. It is about the writer making it easy for the reader.
- Formatting content in scannable chunks is not about users’ inability to read dense copy. It is about presenting information in the way that people expect to see it on the web.
How to Write Copy for the Web
How to Write Copy for the WebThe majority of web visitors do not read all of the text on a webpage. Instead, they skim the page, scanning for headings, specific words, links…anything that catches their attention or matches the reason they are visiting your website in the first place.
Because of the way that people read on the web, it is very important to write clearly and concisely and to format your copy in scannable chunks.
Four Techniques To Use
1. Craft clear, concise messages
- Get to the point immediately
- Use action verbs
- Omit unnecessary words
- Stick to the point
- Keep the subject matter of each webpage focused
- Sticking to one topic per webpage increases its visibility to search engines
- Then stop
- Don’t give users a lot of unnecessary or extra information
2. Be straightforward
- Use common words
- Plain language helps you communicate more effectively on the web
- It helps readers find what they need and understand what they find
- Use action verbs
INSTEAD OF: In order to USE: To
INSTEAD OF: We are currently planning USE: We are planning
INSTEAD OF: When used without USE: Without
INSTEAD OF: Is required to USE: Must
INSTEAD OF: Utilize USE: Use
INSTEAD OF: Facilitate USE: Help
INSTEAD OF: Methodology USE: Method
INSTEAD OF: Sufficient USE: Enough
INSTEAD OF: Conduct an analysis USE: Analyze
INSTEAD OF: Do an assessment USE: Assess
INSTEAD OF: Provide assistance USE: Help
INSTEAD OF: The use of USE: Using
3. Use personal pronouns
- Personal pronouns like “You,” “me,” and “I” pull readers in and make your material more relevant to them
4. Provide basic information
- In your “About Us” section, state who you are, what you do, and where you are located. Don't assume that everyone already knows
- Include a tagline on your homepage that summarizes what you do in one sentence or phrase
- List contact information and a map or directions in a prominent place on your website
Four Things to Avoid:
1. Jargon, industry terms, or academic-speak
- Avoid using words that typical readers may not understand
- Many terms that are familiar to Georgia Tech faculty and staff, but not to outside audiences
2. Abbreviations and acronyms
- Online users who are new to a topic are likely to be unfamiliar with related acronyms
- Overusing acronyms slows your audience down and increases confusion
- The first time you use an acronym, spell out each word then place the acronym in parentheses immediately after
- Don’t use more than two and, at most, three abbreviations in each document
EXAMPLES
GT
CATEA
CGIS
CQGRD
DBL
GTCMTGIFT
STEP
CEISMC
COACh
GEM
3. “Click Here”
- Tell your audience where they are going when they click a link
- Within a sentence, hyperlink a keyword or phrase that matches the content to where the link leads
- Don’t use the actual URL in your copy unless it is short (e.g., www.gatech.edu)
- Most stories should contain at least one link to additional information
- No webpage should be a dead end. Push readers toward other relevant content
- Too many links in the webpage copy can look cluttered and hard to read
- A better idea: Provide a list of links at the bottom of the article, or in a sidebar where they will be available but not distracting
EXAMPLES
Avoid: For the list of winners, click here.
Better: View the complete list of 2014 InVenture Prize winners
Better: U.S. Home Prices Keep Weakening
4. PDFs
- Not all web users have the software needed to open a PDF file
- PDFs are hard to read online. They should be reserved for documents intended to be printed
- Whenever possible, transfer the information from a PDF to a webpage. This makes the content readable to search engines, too
- When linking to a PDF, indicate this fact and list the file size in the hyperlink next to the title, e.g., Download the Graduate Student Handbook (317kb PDF)
How to Format Copy for the Web
How to Format Copy for the WebThe vast majority of web users don't read webpages word-for-word. Instead, they scan them, looking for the information they came to your website to find.
Use these formatting techniques to create scannable, easy-to-read pages.
Techniques
1. Use Headings and Subheadings on content-heavy pages
- Headings that identify sections of your page should be marked with actual heading tags (H1, H2, H3, H4, H5, H6) so that screen readers and other accessibility tools can identify your headings and then allow the user to easily skip ahead to a specific heading.
- All words are capitalized except articles, prepositions (and, a, the, of) and coordinating conjunctions, unless they are the first or last word.
2. Write meaningful titles and subheads
- A strong title is vital for a web story. If it doesn’t grab your readers’ attention, they’ll leave.
- Use a max of eight words.
- Include important keywords.
- Use strong verbs.
- Avoid using adjectives and prepositions.
- Subheads break up the page into easily digestible chunks.
- Aim for informative, not clever.
- Questions are often the most helpful subheadings.
3. Break up content with bulleted lists
- Lists make it easy for readers to quickly identify all the items or steps in a process.
- Seven list items max.
4. Split up long sentences
- Average length is 20 words or less.
- No single sentence should be longer than 28 words (and that’s a stretch).
5. Keep paragraphs short
- One idea per paragraph.
- Only one or two sentences.
- Fifty words max.
- Very often, paragraphs on a webpage are only one sentence long. This is OK.
- Break up long paragraphs with subheads.
6. Limit the number of words on each webpage
- Use half of the words (or less) than writing for print.
- Rather than placing all of the information on a single webpage:
- Break your information into chunks.
- Put each chunk on its own page.
- Connect the pages using links.
7. Use lots of white space
- Faced with large chunks of text, most web users will leave the page immediately.
External Web Content Resources
External Web Content ResourcesThese websites and experts are well regarded in the world of web content. Feel free to browse these external sites for more information about creating content for the web.
General Usability
Reading on the Web
- Jakob Nielsen
How Users Read on the Web
Writing Web Copy
- Hemingway Editor
Hemingway is a simple-to-use tool that helps streamline and simplify your writing. - A List Apart
Topic: Writing - Nielsen Norman Group
Writing for the Web Research Reports -
Plain Language Action and Information Network
Plainlanguage.gov
Formatting Copy on the Web
- Screaming Frog
Title Tag Best Practices - The Onion (Satire)
Nation Shudders at Large Block of Uninterrupted Text
Images on the Web
- Design Instruct
Usability Mistakes to Avoid When Using Photos in Your Website - Enviragallery
15 Best Free Image Optimizers for Image Compression
Find Images for Your Website
Find Images for Your WebsiteOne of the most common questions that comes up when editing a website is, “Where can I find photos?” Here are some resources for finding quality images for your website.
Before you begin collecting high-resolution photos, take a few moments to visit the Institute Communications site and review the best practices for choosing and formatting images for the Web.
The most important thing to keep in mind is to choose only photos that visually clarify the words on the page. In fact, website user testing has proven that visitors will completely ignore non-information-carrying photos.
Image Portal Photography Database
Institute Communications maintains a searchable database that houses thousands of high-resolution digital Georgia Tech photographs.
These photos may be downloaded free of charge, but may not be sent or sold to any third party for commercial purposes. Georgia Tech owns the copyright to all images.
Access to the database is available to faculty and staff with a valid Georgia Tech account username and password.
Log in to the Image Portal
Note: The first time you visit Image Portal, you must click the "forgot password" link and follow the prompts. Your username is your GT account/CAS name.
Georgia Tech Social Media Collections
Georgia Tech Digital Swag
This site houses high-resolution versions of iconic Georgia Tech images. Because they are designed for different digital devices, the images are available in several different formats.
The images are free to download and use but remain the property of Georgia Tech. The images may not be reproduced for resale or retail promotion without written permission from the Georgia Tech Licensing Department.
Public Domain Images
Public domain images have no copyright restrictions and may be used freely. Many government agency websites, such as the National Park Service website, offer an extensive collection of images, many of which will be in the public domain (in general, photographs taken by government employees while working for a government agency are considered to be in the public domain). Check each picture carefully, though, to make sure of its public domain status.
Creative Commons Images
Images that use Creative Commons licensing have less restrictive copyrights. Creators often clear their images for use by others, provided that the image is correctly attributed.
There is a variety of Creative Commons licenses, some with more restrictions than others. Be sure to adhere to the guidelines for the particular image you choose.
A good search tool for finding these images is search.creativecommons.
Burst.shopify is a free stock photo site offered under the Creative Commons Zero (CC0) license, which means you may to use the photos for any purpose.
Paid Stock Photo Websites
Institute Communications subscribes to iStockphoto, which is owned by Getty Images, but there are several other affordable websites to choose from.
Here are some of the most popular:
- Getty Images
- Shutterstock
- BigStock
- Corbis Images
- Freerange
- Science Source
- A-Z List of Stock Photo Websites
Free Stock Photo Websites
Many of these photographs are free from copyright restrictions or use Creative Commons licensing. Be aware that on these websites, every photo may not be free. In addition, you may still be asked to register before downloading images.
Your Own Photos
If you consider yourself to be a good photographer but lack the right equipment, you can rent digital and DSLR cameras from the Georgia Tech Library.
Select and Optimize Images for the Web
Select and Optimize Images for the WebUse the following best practices below to ensure that your images are appropriate for your website, and optimized for the Web.
Selecting
- Used properly, images are powerful tools
- Choose images that visually clarify the words on the page
- Web users pay close attention to photos and other images that contain relevant information. They completely ignore non-information-carrying photos and graphics
Sizing
- Compress the file size of your photos as much as you can to make them download as quickly as possible. Remember, web users are impatient
Naming
- Before you upload a picture to your website, name it clearly and accurately
- Use keywords in your filename to help search engine rankings
- If you upload an image, always type a description of the picture in the "Alternative Text" field. Alt text is simply a description of the picture that can be read by web visitors using screen readers. Having descriptions of your image will also help with search engine rankings, and is required by Georgia Tech's accessibility policy.
Sensitive Data Considerations
Sensitive Data ConsiderationsGeorgia Tech requires that considerations be made for obtaining, storing sensitive data.
Sensitive Data Topics
General Data Protection Regulation (GDPR)
General Data Protection Regulation (GDPR)New data privacy regulations in the European Union (EU) will effect the work of companies and organizations around the world — including Georgia Tech.
The European Union General Data Protection Regulations (EU GDPR) become enforceable Friday, May 25. The chief focus of these regulations is to protect the collection, use, and transmission of personal data of people while they are physically within the EU.
Compliance guidelines
Georgia Tech’s Legal Affairs, Risk Management, Enterprise Data Management, and Cyber Security teams have worked together to review the EU GDPR regulations and provide guidelines for EU GDPR compliance.
Not sure if your work or data use qualifies?
Questions?
What Data is Sensitive Data?
What Data is Sensitive Data?Please see the Data Governance Website for a full discussion of Georgia Tech data classification and management / security policies.